Section Ten Vascular Access
PROCEDURE 60 Peripheral Intravenous Cannulation
PROCEDURE 61 Rapid-Infusion Catheter Exchange
PROCEDURE 62 External Jugular Venous Access
PROCEDURE 63 Subclavian Venous Access
PROCEDURE 64 Internal Jugular Venous Access
PROCEDURE 65 Femoral Venous Access
PROCEDURE 67 Intraosseous Access
PROCEDURE 68 Umbilical Vessel Cannulation
PROCEDURE 69 Accessing Preexisting Central VenousCatheters
PROCEDURE 70 Accessing Implanted Vascular PortDevices
PROCEDURE 60 Peripheral Intravenous Cannulation
CONTRAINDICATIONS AND CAUTIONS
1. Avoid veins in limb on side of radical mastectomy with lymph node stripping, limbs that have sustained third-degree burns, or limbs with dialysis shunts (Josephson, 2004).
2. A hematoma may form if the needle punctures both the anterior and the posterior walls of the vein.
3. Attempt to draw any necessary blood specimens through the IV catheter to decrease the number of venipunctures the patient has to undergo (see Procedure 58).
4. Avoid placing IV lines over joints, because the movement of the joint may cause infiltration.
5. Rotate IV sites in adult patients every 72 to 96 hours to help prevent the development of phlebitis and infection (O’Grady et al., 2002).
6. Remove IV catheters inserted under emergency conditions and restart at a new site within 48 hours (O’Grady et al., 2002).
7. Remove IV catheters promptly on evidence of edema, redness, phlebitis, pain, or subcutaneous infiltration.
8. Do not apply antibiotic ointment or creams to insertion sites, because they may promote fungal infections and antibiotic resistance (O’Grady et al., 2002).
9. Shaving the site for intravenous cannulation may promote bacterial growth; if hair removal is necessary, clipping is preferred.
10. Never withdraw the catheter over the needle; this could shear off the catheter inside the vein.
11. Although rare, IV sites may generate emboli in patients with poor venous return. In adults, the feet and ankles are poor sites for IV cannulation because venous return may be sluggish.
EQUIPMENT
IV solution and tubing or IV lock and saline flush
T-piece or short extension set
Antiseptic swabs (Acceptable skin cleansing solutions include 2% chlorhexidine, tincture of iodine, an iodophor, or 70% alcohol [O’Grady et al., 2002].)
Transparent dressing (optional)
Vacuum tubes, syringe, or adapter for blood sampling (optional)
Local anesthetic or saline, tuberculin syringe with needle (optional)
PROCEDURAL STEPS
1. Apply a tourniquet 5 to 6 inches above the intended site of cannulation. Tuck the tail of the tourniquet under the tourniquet to permit one-handed release as soon as the vein is cannulated.
2. Identify a vein. If the vein is not distended and is easily palpable, lightly pat the area. Have the patient open and close the fist and lower the extremity below the level of the heart. An alternative is to apply a warm pack to help distend a vein. Make the initial venipuncture in the distal extremity to preserve proximal sites for potential later use. If possible, use the nondominant arm so the patient retains use of the dominant hand. Bifurcations are good sites for venipuncture because they are stable and are not prone to roll. Applying multiple tourniquets distally from the most proximal joint or transilluminator may be necessary to visualize a vein in obese or edematous patients (Rosenthal, 2005).
3. Cleanse the skin with an antiseptic solution by using a firm, circular swabbing motion outward from the center of the site. Allow the skin to air dry for 30 seconds (povidone-iodine should be allowed to dry for at least 2 minutes).
4. Inject an intradermal wheal of local anesthetic or saline solution at the intended puncture site (optional). This is not recommended when the vein is difficult to see, because the skin wheal may obscure the site.
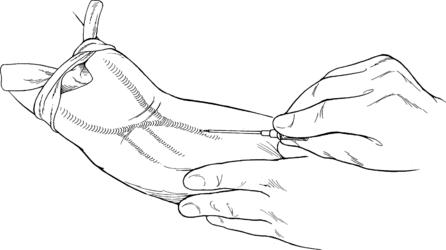
5. Using the thumb of your nondominant hand, apply slight traction to the distal vein to help stabilize the vein during venipuncture. Insert the needle through the skin at a 10- to 30-degree angle with the bevel up, in line with and alongside the vein. Alternatively, you may insert the needle directly over the vein, but there is an increased risk of posterior wall puncture with this technique (Figure 60-1).
6. When the vein is punctured, a flash of blood appears in the hub of the catheter. Advance the needle and stylet another ⅛ inch into the vein (adult patient).
7. Advance the catheter over the needle and into the vein. If any resistance is met on advancement of the catheter, stop immediately, remove the needle and catheter, and apply pressure to the site. Activate any needle shield or safety device as indicated.
8. To prevent blood leakage when connecting and disconnecting tubing and syringes, use your non-dominant hand and compress the vein just proximal to the tip of the catheter with the ring or middle finger while holding the catheter hub with the thumb and index finger.
9. If blood specimens are to be drawn through the IV catheter, attach the syringe or vacuum-tube adapter to the needle hub and withdraw the required samples (see Procedure 58).
11. Connect the IV tubing and open the roller clamp or attach the saline lock.
12. Apply ¼-in tape across the hub of the catheter to secure it. Do not place the tape over the insertion site or at the junction of the needle and tubing. Place a small sterile dressing over the insertion site. Alternatively, apply a transparent dressing over the site and needle hub.
13. Tape the IV tubing or saline lock securely.
14. Tape a label to the IV site with the date, the time, the size of the catheter, and your initials.
15. Adjust the drip rate as ordered or flush the saline lock. Assess the site for infiltration.
16. Before injecting medication through an injection port, clean the port with 70% alcohol or an iodophor (O’Grady et al., 2002).
AGE-SPECIFIC CONSIDERATIONS
Pediatric
1. Pediatric patients should not have routine rotation of IV sites; replace peripheral catheters only when clinically indicated (O’Grady et al., 2002).
2. Pediatric or elderly patients may require an arm board to protect the IV site. Wrapping the extremity with gauze can help prevent the patient from manipulating the catheter.
3. It may be helpful to secure the hand of a small child to an IV board before the venipuncture.
4. In infants and small children, advance the catheter off of the needle as soon as you see the blood flashback. This helps avoid puncture of the posterior wall of the vein. In adults with large, rope-like veins, advance the needle and stylet together approximately ¼ inch to prevent the catheter tip from catching on the thick wall of the vein.
5. In pediatric patients not yet walking, a foot vein may be appropriate. Avoid the child’s dominant hand or the favored hand for thumb/finger sucking (Rosenthal, 2005).
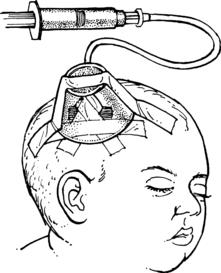
6. Scalp veins can be used for IV access in infants, although they are inadequate for large volumes of fluids or medications that must be administered quickly. A rubber band can be used as a tourniquet to distend the veins (Figure 60-2). Determine which direction the blood is flowing by occluding the vein with your finger and “milking” it. The IV catheter should be inserted in the same direction the blood is flowing. The rubber band has to be cut away carefully after the IV catheter is in place. A plastic medicine cup can be used to protect the IV line (Figure 60-3). Place padding between the cup and the scalp before taping it in place.
7. Use a T-piece or a short extension set on all pediatric IV lines to facilitate the injection of medications near the site and to avoid flushing long lengths of tubing to ensure that the medication has been infused.
8. An intradermal local anesthetic may not be the best option in children who approach any puncture with fear. An topical anesthetic cream (eutectic mixture of local anesthetics [EMLA] or lidocain) may be used to anesthetize the site, but this takes 20 to 60 minutes to be effective. School-aged children may be able to decide whether they want intradermal local anesthesia, which can be described as “a sting that makes the skin go to sleep so the needle doesn’t hurt so much.”
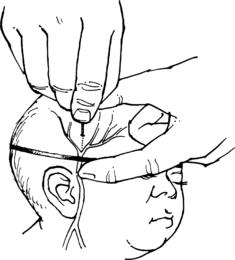
Figure 60-2 Use a rubber band as a tourniquet for scalp veins.
(From Lozon, M. M. [2004]. Pediatric vascular access and blood sampling techniques. In J. R. Roberts & J. R. Hedges [Eds.], Clinical procedures in emergency medicine [4th ed., p. 367]. Philadelphia: Saunders.)
Geriatric
1. Avoid using a tourniquet in elderly patients who have fragile veins to decrease the risk of blowing the vein. Using a blood pressure cuff upside down instead of a tourniquet will prevent skin tears in elderly patients. Inflate the cuff to just below diastolic pressure for effective compression (Rosenthal, 2005).
2. Using vacuum tubes to draw blood directly from the IV catheter increases the risk of blowing the vein in elderly patients.
COMPLICATIONS
1. Hematomas may form at unsuccessfully cannulated sites.
2. Inadequate cleansing of the skin at the cannulation site may result in the introduction of bacteria into the vein, which can lead to local infection or bacteremia.
4. Catheter embolism may occur if the catheter shears off as it is withdrawn over the stylet.
5. Infiltration of the surrounding tissue can occur because of a displaced catheter. Some medications can cause serious tissue damage if they infiltrate into the tissue.
Josephson D. Patient preparation and site selection for peripheral intravenous infusion therapy. In: Josephson D., ed. Intravenous infusion therapy for nurses: Principles & practices. 2nd ed. New York: Thomson Learning; 2004:153.
O’Grady N.P., Alexander M., Dellinger E.P., et al. Guidelines for prevention of intravascular catheter–related infections. Morbidity and Mortality Weekly Report. 2002;51:1–28.
Rosenthal K. Tailor your IV insertion techniques for special populations. Nursing. 2005;35:37–41.
PROCEDURE 61 Rapid-Infusion Catheter Exchange
Rapid-infusion catheter exchange is also known as RIC.
PROCEDURAL STEPS
1. *Infiltrate the area around the catheter with a local anesthetic.
2. Cleanse the entire area, including the puncture site and indwelling catheter, with an antiseptic solution.
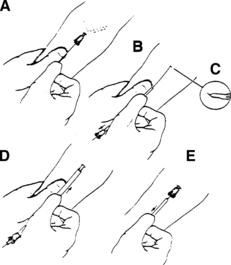
3. *Disconnect the IV tubing from the catheter and insert the guide wire through the indwelling catheter and into the vein (Figure 61-1, A). If resistance is met, withdraw the guide wire and reinsert. If resistance persists, the procedure must be stopped.
4. *When the guide wire has been inserted into the indwelling catheter, remove the existing catheter.
5. *Pass the sheath or dilator over the guide wire (Figure 61-1, B).
6. *Nick the skin with the scalpel blade at the insertion site (approximately 5 mm) (Figure 61-1, C).
7. *Thread the tapered tip of the dilator over the guide wire and advance the dilator and sheath into the vessel, using a slight twisting motion (Figure 61-1, D).
8. *Advance the sheath over the dilator by grasping the skin and using a slight twisting motion.
9. *Make sure the sheath is held in place and then remove the dilator and guide wire. The free flow of blood demonstrates that the catheter is in place (Figure 61-1, E).
10. Connect the catheter to the IV tubing. Blood tubing or large-bore tubing should be used if fluid resuscitation is indicated.
11. Secure the catheter with tape or a suture. Apply a dressing.
AGE-SPECIFIC CONSIDERATION
This procedure is not recommended for infants and small children because of the size of the peripheral catheter. All patients receiving fluids through this catheter must be closely monitored because excessive amounts of fluid may be delivered, which can be deleterious to the patient (Clark, 2002).
COMPLICATIONS
1. Rupture of the vein and hematoma formation may occur when the catheter being inserted is larger than the vessel.
2. Leaving the vessel dilator in place after catheter insertion may lead to limited function as well as the potential for the dilator to dislodge from the vessel and enter the systemic circulation.
3. Infiltration and infusion of fluids, blood, or medications into surrounding tissues may occur with this procedure.
PROCEDURE 62 External Jugular Venous Access
CONTRAINDICATIONS AND CAUTIONS
1. External venous access may be contraindicated if the patient has a suspected cervical spine injury and the patient’s head must be moved to gain vascular access (Campbell, 2004).
2. Use of the external jugular vein is contraindicated in a patient who has a penetrating injury to the neck, and it should be avoided when there is significant blunt trauma and soft tissue injury to the face, neck, or upper chest.
3. External jugular venous access should be used with caution in patients who cannot tolerate a supine or head-down position.
4. External jugular venous access should be used with caution when the anatomy of the external jugular vein is not clearly discernible.
5. Securing an external jugular venous line can be difficult, and this increases the potential for accidental dislodgement.
6. Patients taking anticoagulants are at increased risk of bleeding around the catheter. This could result in the development of an expanding hematoma and airway compromise.
EQUIPMENT
PATIENT PREPARATION
1. Place the patient in a supine, head-down position, with the head turned away from the side where the catheter is to be inserted. Please note that external jugular vein access may be obtained in the trauma patient, but the patient’s head cannot be moved or lowered.
2. If this procedure is to be performed on a patient with a suspected cervical spine injury, the cervical collar must be opened or the front portion removed and someone assigned to ensure cervical spine protection (Campbell, 2004).
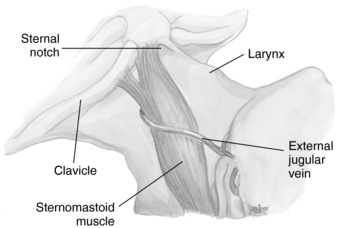
3. Cleanse the area overlying the external jugular vein with antiseptic solution. The external jugular vein runs downward and backward obliquely behind the angle of the mandible and across the sternomastoid muscle. It then courses deeply into the neck just above the midclavicular area. The external jugular vein enters the subclavian vein (Figure 62-1).
PROCEDURAL STEPS
1. *If the patient is conscious, anesthetize the insertion site with a local anesthetic.
2. *Attach the IV catheter to a syringe and align the needle with the external jugular vein, directing the needle tip toward the ipsilateral shoulder.
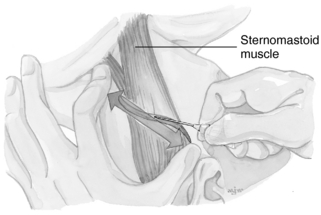
3. *Lightly “tourniquet” the distal end of the external jugular vein (just above the clavicle) with the opposite index finger. The opposite thumb can also be used on the proximal portion of the vein to assist in anchoring it for puncture (Figure 62-2).
4. *Perform the venipuncture midway between the angle of the jaw and the clavicle.
5. *When a blood return is noted in the syringe, advance the catheter off the needle to the hub. If you are using another type of device (i.e., a triple-lumen catheter), advance it according to the manufacturer’s instructions.
6. *If blood is to be obtained, withdraw the desired amount. Detach the syringe and place a gloved finger over the hub to prevent the introduction of air.
7. Connect the IV tubing and initiate the flow of the fluid. Monitor for signs of infiltration.
8. *Secure the catheter with sutures, tape, or surgical tape closures. Skin adhesive will help secure tape or surgical tape closures. Looping the IV tubing around the ear may add additional security. Apply a dressing over the area. Sedation may be required to help keep the patient from moving and dislodging the catheter (Fleck, 2005).
COMPLICATIONS
1. Infection and phlebitis. Risk factors associated with the development of infection and phlebitis include type of catheter, frequency of catheter manipulation, and patient-related factors (O’Grady et al., 2002).
2. Turning a patient’s head for better visualization of the external jugular vein may cause airway compromise.
3. Hematoma formation at the site of the insertion may cause airway compromise.
4. Inadvertent puncture of the carotid artery may occur.
5. The catheter may shear and an embolus may form.
Campbell J.E., ed. Basic trauma life support, 5th ed., Upper Saddle River, NJ: Pearson Prentice Hall, 2004.
Fleck D. Central line insertion (perform). In: Lynn-McHale D.J., Carlson K.K. AACN procedure manual for critical care. 5th ed. Philadelphia: Saunders; 2005:638–650.
Markenson D.S. Pediatric prehospital care. Upper Saddle River, NJ: Prentice Hall, 2002.
O’Grady N.P., Alexander M., Dellinger E.P., et al. Guidelines for prevention of intravascular catheter-related infections. Morbidity and Mortality Weekly Report. 2002;51:1–28.
PROCEDURE 63 Subclavian Venous Access
INDICATIONS
1. To obtain central venous access through the subclavian vein when peripheral access is unobtainable, such as occurs in a patient who is in profound shock or cardiac arrest, or in a patient with peripheral vascular access limitations, such as an intravenous substance abuser or one with severe peripheral vascular disease.
2. To monitor the patient’s central venous pressure (CVP).
3. To administer intravenous fluids, blood products, or medications, especially those likely to cause complications if administered via a smaller peripheral vein.
4. To administer long-term parenteral nutrition.
5. To provide a site for the insertion of a transvenous pacemaker or a pulmonary-artery catheter.
CONTRAINDICATIONS AND CAUTIONS
1. Insertion of a subclavian line should only be performed by a skilled physician, advanced practice nurse, or other appropriately trained practitioner (ACS, 2004).
2. A patient who has a coagulopathy from either a disease process or a medication must be monitored carefully for bleeding. A femoral site is preferred because the vessel can be compressed if bleeding should occur.
3. Fibrinolytic therapy must be administered with extreme caution when any central line is in place.
4. A patient who is agitated or uncooperative is at risk for injury during the procedure.
5. Subclavian access should be avoided in a patient who has had surgery or trauma to the clavicle, first rib, or subclavian vessels; has undergone radiation therapy to the clavicular area; has significant chest wall deformities; or is cachexic or obese (Mickiewicz, Dronen, & Younger, 2004).
6. Cannulization of the subclavian vein should be avoided in patients receiving positive end-expiratory pressure or continuous positive-airway pressure or in patients with pulmonary emphysema because of the increased risk of causing a pneumothorax.
EQUIPMENT
5-ml syringe; 18-, 25-, or 27-G needles for local anesthesia
Central venous access kit (Most kits contain an 8.5-Fr introducer, which can be used for large fluid-volume resuscitation or for the introduction of a transvenous pacemaker or a pulmonary artery catheter.)
Multiple-lumen catheter (used for fluid administration and allows insertion of invasive lines, transvenous pacemakers as well as ports for medication administration and obtaining blood)
16-G, 8-inch, single-lumen catheter
Flush solution (heparinized solution or 0.9% saline solution per institutional policy)
Silk suture (2-0 or 3-0) with a needle holder
Masks, caps, goggles, sterile gloves, and gowns
Dressing supplies (gauze or a transparent dressing) (NOTE: When the patient is diaphoretic or the site is oozing, it should be covered with gauze instead of a transparent dressing [O’Grady et al, 2002].)
PATIENT PREPARATION
1. Place the patient on a cardiac monitor and pulse oximeter (see Procedures 21 and 55).
2. Place the patient in a supine, 20-degree Trendelenburg position with a small, rolled towel placed between the shoulder blades to improve access. If thepatient cannot tolerate the Trendelenburg position, elevate the legs for a modified Trendelenburg position (see Procedure 48). Turn the patient’s head to the side opposite the insertion site.
3. *Cleanse the chest with an antiseptic solution. The subclavian vein rises as a continuation of the axillary vein, with its origin near the lateral portion of the first rib. The vein runs medially, passing under the middle third of the clavicle, and unites with the internal jugular vein near the sternum to form the brachiocephalic (innominate) vein.
4. *Drape the patient, using a sterile technique. In addition to gloves, masks and goggles should be worn for this procedure.
5. If a multiple-lumen catheter is being used, be sure that the ports have been flushed using the solution recommended by the hospital’s policies and procedures.
6. The right subclavian is the preferred site because the vein is shorter and provides a more direct route (Fleck, 2005).
PROCEDURAL STEPS
1. *Locate the landmarks for the subclavian vein and anesthetize the insertion site.
2. *Place the middle finger of your nondominant hand in the suprasternal notch.
3. *Locate the tubercle, which is approximately one third of the distance along the clavicle from the sternum.
4. *With the middle finger still in the suprasternal notch and the thumb on the inferior tubercle of the clavicle, insert the needle attached to the syringe under the tubercle along the undersurface of the clavicle, directing it toward the suprasternal notch (Figure 63-1). If the patient is awake and cooperative, have him or her take a deep breath and hold it during needle insertion.
5. *While aspirating, advance the needle approximately 3 to 5 cm.
6. *When the vein has been located, detach the needle from the syringe and place a gloved finger over the hub to prevent the introduction of air.
7. *Gently insert the guide wire through the needle hub (see Figure 63-1).
8. *After the guide wire is in place, remove the needle and allow the wire to remain in the vein.
9. *Use the No. 11 blade to make a small nick in the skin where the wire enters (see Figure 63-1).
10. *Some kits contain a separate dilator, whereas others have the catheter and dilator joined together. If the dilator is separate, insert it into the hub and leave the wire in place.
11. *Insert the catheter over the wire, making sure to maintain control of the wire at all times.
12. *Once the catheter has been inserted, remove the wire and the dilator (if it is joined to the catheter).
13. *Aspirate and ascertain that there is good blood flow.
14. Draw the blood as needed for the laboratory evaluation.
15. Attach the catheter to the IV solution.
16. *Suture the catheter in place.
17. Apply a sterile gauze or transparent dressing and tape it to secure the catheter and the tubing (O’Grady et al., 2002).
18. Obtain a chest radiograph to verify the catheter placement and to rule out any postprocedural complications, such as a pneumothorax.
19. Attach the catheter to the monitoring device, that is, the CVP monitor (if indicated).

AGE-SPECIFIC CONSIDERATIONS
1. For a young child, an infraclavicular approach may be a good route because it allows the catheter to be secured comfortably to the chest wall (Buntain, 1995; Fernandez et al., 1997, Lozon, 2004). The landmarks for the infraclavicular approach are the bend of the clavicle and the suprasternal notch. The needle is inserted a few millimeters caudally and a few millimeters medially to the bend of the clavicle. The needle should be “walked” along the clavicle and kept parallel to the chest. The needle is advanced toward the suprasternal notch. When a blood return has been obtained, the procedure should be continued as previously described (Buntain, 1995; Lozon, 2004).
2. Complications related to central venous cannulation are more common in children than in adults; therefore, it is recommended that the procedure be performed or supervised by an experienced practitioner.
3. The femoral vein is the area of choice for placement of a central line in the pediatric patient (Fernandez et al., 1997; Lozon, 2004).
4. The size of the catheter is based on the child’s age and weight (Evans & Bishop-Kurylo, 1996; Lozon, 2004):
COMPLICATIONS
1. Pneumothorax resulting from an overly acute angle of insertion
2. Insertion in the subclavian artery. In this event, remove the needle immediately and apply direct pressure.
3. Ventricular dysrhythmia as the result of insertion of the guide wire into the right ventricle
4. Air embolism as the result of not keeping the hub of the needle covered at all times (unless connected to the IV solution)
5. Guide wire embolism if the guide wire is not controlled during insertion
6. Hematoma formation from multiple attempts that may cause tracheal obstruction
7. Infection and phlebitis. Risk factors associated with the development of phlebitis include type of catheter, frequency of catheter manipulation, and patient-related factors (O’Grady et al., 2002).
8. Tracheal perforation and/or endotracheal cuff from needle insertion
9. Nerve injury to the phrenic or brachial nerves
10. Cerebral infarct from a clot related to insertion or an air embolism
American College of Surgeons (ACS). Advanced trauma life support course for doctors, 7th ed. Chicago: Author, 2004.
Buntain W. Management of pediatric trauma. Philadelphia: Saunders, 1995.
Evans T., Bishop-Kurylo D. Pediatric procedures. Topics in Emergency Medicine. 1996;18:30–45.
Fernandez E., Sweeney M., Green T. Central venous catheters. In: Dieckmann R., Fiser D., Selbst S. Pediatric emergency and critical care procedures. St. Louis: Mosby; 1997:196–202.
Fleck D. Central venous catheter insertion (perform). In: Lynn-McHale D.J., Carlson K.K. AACN procedure manual for critical care. 5th ed. Philadelphia: Saunders; 2005:638–650.
Lozon M.M. Pediatric vascular access and blood sampling techniques. In: Roberts J.R., Hedges J.R. Clinical procedures for emergency medicine. 4th ed. Philadelphia: Saunders; 2004:357–383.
Mickiewicz M., Dronen S., Younger J. Central venous catheterization and central venous pressure monitoring. In: Roberts J.R., Hedges J.R. Clinical procedures for emergency medicine. 4th ed. Philadelphia: Saunders; 2004:413–446.
O’Grady N.P., Alexander N.P., Dellinger E.P., et al. Guidelines for prevention of intravascular catheter-related infections. Morbidity and Mortality Weekly Report. 2002;51:1–28.
PROCEDURE 64 Internal Jugular Venous Access
INDICATIONS
1. To obtain central venous access when peripheral access is unattainable, such as occurs in a patient who is in profound shock or cardiac arrest or in a patient who is an intravenous (IV) drug abuser. There is a lower risk of pleural puncture when using the internal jugular (IJ) vein than when using the subclavian vein. In the obese or elderly patient, the IJ vein may afford easier access than the subclavian vein (Feldman, 2004).
2. To place a catheter to monitor central venous pressure.
3. To provide a site for insertion of a transvenous pacemaker or a pulmonary artery catheter.
4. To administer large amounts of fluid, blood products, or medications, especially those likely to cause complications if they are administered via a smaller peripheral vein.
5. Emergency venous access during CPR because the insertion location is out of the way and does not interfere with chest compressions (Mickiewicz, Dronen, & Younger, 2004).
CONTRAINDICATIONS AND CAUTIONS
1. This procedure is contraindicated in any patient with a potential cervical spine injury because positioning the patient for this procedure requires movement of the head.
2. Proceed with caution in the presence of an anatomic distortion (e.g., massive soft tissue injury) or patient habitus (obese, short neck) that interferes with the location of the anatomic landmarks.
3. A patient with a coagulopathy or at risk for coagulopathy, either from a disease process or from medication, must be monitored carefully for bleeding at the insertion site.
4. An infection in the area of the insertion precludes the use of that site.
5. If a hematoma develops on one side of the neck, insertion on the other side should be avoided or should be accomplished with extreme caution because of the potential for airway compromise if hematomas form bilaterally.
6. When selecting a site to insert a central line, several things should be considered, including selecting a site with the lowest risk of complications, anticipated duration of catheter placement, and type of fluids or medications that are to be administered through the device (McGee & Gould, 2003; O’Grady et al., 2002).
EQUIPMENT
Ultrasound equipment (optional)
5-ml syringe; 18-, 25-, or 27-G needles for local anesthesia administration
Central venous kit (Most kits contain an 8.5-Fr introducer, which can be used for fluid-volume resuscitation or for the introduction of a transvenous pacemaker or a pulmonary-artery catheter.)
Multilumen catheter (used for fluid administration and allows insertion of invasive lines, transvenous pacemakers, as well as ports for administering medication and obtaining blood)
16-G, 8-in single-lumen catheter
Intravenous solution and tubing
Silk suture (2-0 or 3-0) with a needle holder
Masks, caps, goggles, sterile gloves, and gowns
Dressing supplies (gauze or a transparent dressing). (NOTE: When the patient is diaphoretic or the site is oozing, it should be covered with gauze instead of a transparent dressing [O’Grady et al, 2002].)
PATIENT PREPARATION
1. Place the patient on a cardiac monitor (Procedure 55) and pulse oximeter (Procedure 21).
2. Place the patient in a Trendelenburg position and turn the head away from the site of insertion. Placing a pillow or towel roll under the patient’s shoulder can facilitate patient positioning. If the patient cannot tolerate the Trendelenburg position, elevate the legs for a modified Trendelenburg position (Procedure 48). Turn the patient’s head to the side opposite the insertion site.
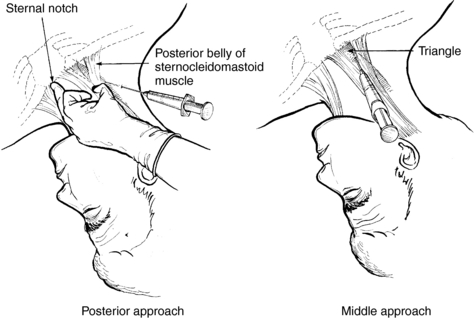
3. *Cleanse the area of insertion with an antiseptic solution. The IJ vein runs posteriorly and laterally to the internal and common carotid artery. As the vein nears the thoracic area, it becomes more lateral and more anterior to the common carotid artery. Another landmark used for accessing the IJ vein is the sternocleidomastoid muscle. The IJ vein runs medially to this muscle in its upper part and then passes posteriorly to the inferior heads of the muscle in its midportion. Landmarks for the IJ vein are the angle of the mandible, the clavicle, the suprasternal notch, the external jugular vein and the carotid pulsation, the two heads of the sternocleidomastoid muscle, and the triangle formed by the two heads and the clavicle (Figure 64-1).
PROCEDURAL STEPS
1. *Locate the landmarks of the IJ vein and infiltrate the area of insertion with a local anesthetic. Some research has demonstrated that the use of ultrasound guided IJ vein catheterization in the emergency department setting has been associated with a higher success rate and fewer complications (Leung, Duffy, & Finckh, 2006).
2. The three approaches to accessing the IJ vein are the middle, the anterior, and the posterior approaches. The posterior and middle approaches are the most commonly used and are described as follows (see Figure 64-1):
3. *Once the vein has been located, detach the syringe and place a gloved finger over the hub. Gently thread the guide wire through the hub of the needle. When the wire has been inserted 8 to 20 cm, remove the needle and leave the guide wire in place. Using the No. 11 blade, make a nick in the skin where the wire enters the skin. If there is a vein dilator, thread it over the wire to the hub and then remove the dilator, leaving the wire in place. Sometimes, the catheter and the dilator are inserted together over the wire. During insertion, always maintain control of the wire to prevent embolization into the circulation. Once the catheter is inserted, remove the wire and the dilator, if it is present. When the catheter is in place, confirm its location again by withdrawing some blood. Blood may also be drawn for a laboratory evaluation. If catheter patency is confirmed, connect it to the intravenous solution.
4. *Suture the catheter in place.
5. Apply a dressing and secure the catheter and the tubing with tape.
6. Obtain a chest radiograph to check the line placement and to rule out complications, such as a pneumothorax.
AGE-SPECIFIC CONSIDERATIONS
1. Only skilled personnel (or less-experienced providers under the direct supervision of a skilled clinician) can safely access the IJ vein in an infant or a young child (Lozon, 2004).
2. The right IJ vein is the preferred site for the pediatric patient because it has a lower risk of causing a pneumothorax or possible damage to the thoracic duct than does the left IJ vein. Accessing the right IJ vein in the pediatric patient increases the likelihood that the catheter may pass into the superior vena cava instead of the right subclavian vein (Lozon, 2004).
COMPLICATIONS
2. Hematoma formation from either a venous or an arterial bleed. If the carotid artery is nicked, apply direct pressure to control bleeding.
3. Air embolism resulting from the introduction of air into the catheter or guidewire embolism if control of the wire is not maintained
4. Thoracic duct injury because of a perforation of the thoracic duct
5. Infection and phlebitis. Risk factors associated with the development of infection and phlebitis include type of catheter, frequency of catheter manipulation, and patient-related factors such diabetes and medication use (steroids) (McGee & Gould, 2003; O’Grady et al., 2002).
Feldman R. Central venous access. In: Reichman E.F., Simon R.R. Emergency medicine procedures. New York: McGraw-Hill; 2004:314–337.
Leung J., Duffy M., Finckh A. Real-time ultrasonographically-guided internal jugular vein catheterization in the emergency department increases success rates and reduces complications: A randomized, prospective study. Annals of Emergency Medicine. 2006;48:540–547.
Lozon M.M. Pediatric vascular access. In: Roberts J.R., Hedges J.R. Clinical procedures in emergency medicine. 4th ed. Philadelphia: Saunders; 2004:357–383.
McGee D., Gould M.K. Preventing complications of central venous catheters. New England Journal of Medicine. 2003;348:1123–1133.
Mickiewicz M., Dronen S., Younger J. Central venous catheterization and central venous pressure monitoring. In: Roberts J.R., Hedges J.R. Clinical procedures in emergency medicine. 4th ed. Philadelphia: Saunders; 2004:413–446.
O’Grady N.P., Alexander M., Dellinger E.P., et al. Guidelines for prevention of intravascular catheter–related infections. Morbidity and Mortality Weekly Report. 2002;51:1–28.
Stay updated, free articles. Join our Telegram channel

Full access? Get Clinical Tree


