Tracheostomy Care
Whether a tracheotomy is performed in an emergency situation or after careful preparation, as a permanent measure or as temporary therapy, tracheostomy care has identical goals: to ensure airway patency by keeping the tube free of mucus buildup, to maintain mucous membrane and skin integrity, to prevent infection, and to provide psychological support.
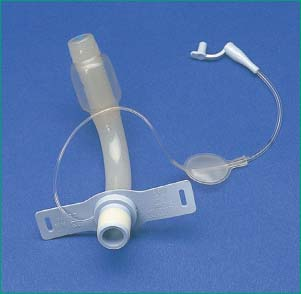
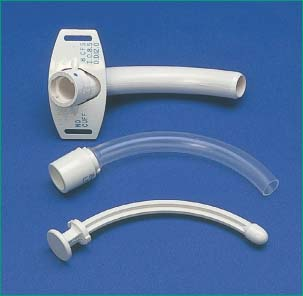
The patient may have one of three types of tracheostomy tube—uncuffed, cuffed, or fenestrated. Tube selection depends on the patient’s condition and the doctor’s preference.
An uncuffed tube, which may be plastic or metal, allows air to flow freely around the tracheostomy tube and through the larynx, reducing the risk of tracheal damage. A cuffed tube, made of plastic, is disposable. The cuff and the tube won’t separate accidentally inside the trachea because the cuff is bonded to the tube. Also, it doesn’t require periodic deflating to lower pressure because cuff pressure is low and evenly distributed against the tracheal wall. Although cuffed tubes may cost more than other tubes, they reduce the risk of tracheal damage. A plastic fenestrated tube permits speech through the upper airway when the external opening is capped and the cuff is deflated. It also allows easy removal of the inner cannula for cleaning. However, a fenestrated tube may become occluded. (See Types of tracheostomy tubes, page 718.)
Whichever tube is used, tracheostomy care should be performed using sterile technique until the stoma has healed to prevent infection. For recently performed tracheotomies, use sterile gloves for all manipulations at the tracheostomy site. When the
stoma has healed, clean gloves may be substituted for sterile ones. Changing tracheostomy ties helps prevent infection and the skin underneath the ties from becoming excoriated and wet. Tracheostomy ties should be changed at least once each day, or as needed.
stoma has healed, clean gloves may be substituted for sterile ones. Changing tracheostomy ties helps prevent infection and the skin underneath the ties from becoming excoriated and wet. Tracheostomy ties should be changed at least once each day, or as needed.
Types of Tracheostomy Tubes
Cuffed and uncuffed tracheostomy tubes each have advantages and disadvantages. Cuffed tubes help seal the area between the tube and trachea, decreasing the patient’s risk of aspiration; however, if the cuff pressure isn’t regularly monitored, it may erode the trachea. Also, if the cuff is inflated, the patient can’t talk and needs an alternate means of communication.
 |
Uncuffed tubes allow the patient to eat and talk, but this type of tube can’t be used in a patient who is receiving mechanical ventilation because oxygen may escape from around the tube.
 |
Equipment
For Cuff Inflation and Deflation
10-mL syringe ▪ gloves ▪ stethoscope ▪ handheld resuscitation bag.
For Tracheostomy Ties Change
30″ (76-cm) length of tracheostomy twill tape or commercially prepared tracheostomy ties ▪ bandage scissors ▪ clean or sterile gloves ▪ hemostat.
For Tracheostomy Tube Cannula and Stoma Care
Disposable inner cannula ▪ waterproof trash bag ▪ two sterile solution containers ▪ normal saline solution or sterile water ▪ sterile cotton-tipped applicators ▪ sterile 4″ × 4″ gauze pads ▪ sterile gloves ▪ prepackaged sterile tracheostomy dressing (or 4″ × 4″ gauze pad) ▪ equipment and supplies for suctioning and for mouth care ▪ materials, as needed, for cuff procedures and for changing tracheostomy ties ▪ personal protective equipment ▪ tracheostomy cleaning brush or sterile pipe cleaner ▪ Optional: water-soluble lubricant or topical antibiotic cream, third sterile solution container.
Keep supplies in full view in the patient’s room at all times for easy access in case of emergency. Consider taping an emergency sterile tracheostomy tube in a sterile wrapper above the head of the bed for access in an emergency.
Preparation of Equipment
For Tracheostomy Tube Cannula and Stoma Care
Check the expiration date on each sterile package and inspect the package for tears. Open the waterproof trash bag and place it next to you so that you can avoid reaching across the sterile field or the patient’s stoma when discarding soiled items. Establish a sterile field near the patient’s bed (usually on the overbed table), and place equipment and supplies on it. Pour normal saline solution or sterile water into one of the sterile solution containers; then pour normal saline solution or sterile water into the second sterile container for rinsing. For inner-cannula care, you may use a third sterile solution container to hold the gauze pads and cotton-tipped applicators saturated with normal saline solution. Hydrogen peroxide is no longer recommended for cleaning inner cannulas or tracheostomy sites.5 If you’ll be replacing the disposable inner cannula, open the package containing the new inner cannula while maintaining sterile technique.5 Obtain or prepare new tracheostomy ties, if indicated.
Implementation
Confirm the patient’s identity using at least two patient identifiers according to your facility’s policy.6
Explain the procedure to him, provide privacy and reassure him.
Assess the patient’s condition.
Help the patient into semi-Fowler’s position, if possible, or place him in a supine position with the head of the bed elevated as tolerated to prevent aspiration of secretions.
Hyperoxygenate the patient for at least 1 minute and then perform deep oropharyngeal suctioning to remove accumulated secretions from above the cuff and prevent pooled secretions from descending into the trachea after cuff deflation; these secretions have been implicated in the development of ventilator-associated pneumonia.7,8,9,10
For Cuff Inflation and Deflation
Read the cuff manufacturer’s instructions because cuff types and procedures vary widely.
Remove the ventilation device or humidified oxygen.
Insert a 10-mL syringe into the cuff pilot balloon. Ventilate the patient with a handheld resuscitation bag and slowly withdraw air from the cuff until a small leak is heard during inspiration. Leave the syringe attached to the tubing for later reinflation of the cuff.5 Slow deflation allows positive lung pressure to push secretions upward from the bronchi. Cuff deflation may also stimulate the patient’s cough reflex, producing additional secretions.
Reinflate the cuff using the minimal-leak technique or the minimal occlusive volume technique to help gauge the proper inflation point.
If you’re inflating the cuff using cuff pressure measurement, be careful not to exceed 25 mm Hg. If pressure exceeds 25 mm Hg, notify the doctor because you may need to change to a larger size tube, use higher inflation pressures, or permit a larger air leak.
After you’ve inflated the cuff, remove the syringe.
Reattach the ventilation device or humidified oxygen.
Check for minimal leaks at the cuff seal. You shouldn’t feel air coming from the patient’s mouth, nose, or tracheostomy site, and a conscious patient shouldn’t be able to speak.
Observe the patient for adequate ventilation.
Be alert for air leaks from the cuff itself. Suspect a leak if injection of air fails to inflate the cuff or increase cuff pressure, if you’re unable to inject the amount of air you withdrew, if the patient can speak, if ventilation fails to maintain adequate respiratory movement with pressures or volumes previously considered adequate, or if air escapes during the ventilator’s inspiratory cycle.
Note the exact amount of air used to inflate the cuff to detect tracheomalacia if more air is consistently needed.
For Ties Change
Obtain assistance from another nurse or a respiratory therapist because of the risk of accidental tube expulsion during this procedure. Patient movement or coughing can dislodge the tube.
If you aren’t using commercially packaged tracheostomy ties, prepare new ties from a 30″ (76-cm) length of tracheostomy twill tape by folding one end back 1″ (2.5 cm) on itself. Then, with the bandage scissors, cut a ½″ (1.3-cm) slit down the center of the tape from the folded edge.
Stay updated, free articles. Join our Telegram channel

Full access? Get Clinical Tree


Get Clinical Tree app for offline access
