Tracheal Suctioning, Intubated Patient
Tracheal suction involves the removal of secretions from the trachea or bronchi by means of a catheter inserted through the mouth or nose or a tracheal stoma, a tracheostomy tube, or an endotracheal (ET) tube. Besides removing secretions, tracheal suctioning stimulates the cough reflex. The procedure also helps maintain a patent airway to promote optimal exchange of oxygen and carbon dioxide and to prevent pneumonia that can result from pooling secretions.1,2
According to the American Association for Respiratory Care (AARC) guidelines, before you suction a patient, you should hyperoxygenate him with 100% oxygen for at least 30 to 60 seconds, using sterile technique.1,3 The duration of each suctioning event—which includes the placement and withdrawal of the suction catheter—should take no longer than 15 seconds.3 You should set the suction pressure as low as possible while still keeping it high enough to clear secretions effectively. After suctioning, you should hyperoxygenate the patient again for 1 minute or longer, following the same technique used to preoxygenate the patient.3
Equipment
Oxygen source (wall or portable unit, handheld resuscitation bag with a mask, 15-mm adapter, or a positive end-expiratory pressure valve, if indicated) ▪ wall or portable suction apparatus ▪ collection container ▪ connecting tube ▪ suction catheter kit or a sterile suction catheter, one sterile glove, one clean glove, goggles, and a disposable sterile solution container ▪ 1-L bottle of sterile water or normal saline solution ▪ syringe for deflating cuff of ET or tracheostomy tube ▪ waterproof trash bag ▪ personal protective equipment ▪ Optional: sterile towel.
Preparation of Equipment
Choose a suction catheter of appropriate size. The diameter should be no larger than one-half the inside diameter of the tracheostomy or ET tube to minimize hypoxia during suctioning. (A #12 or #14 French catheter may be used for an 8-mm or larger tube.)3,4,5 Place the suction apparatus on the patient’s overbed table or bedside stand. Position the table or stand on your preferred side of the bed to facilitate suctioning.
Attach the collection container to the suction unit and the connecting tube to the collection container. Label and date the normal saline solution or sterile water. Open the waterproof trash bag.
Implementation
Before suctioning, determine whether your facility requires a doctor’s order and obtain one, if necessary.
Confirm the patient’s identity using at least two patient identifiers according to your facility’s policy.10
Assess the patient’s vital signs, breath sounds, and general appearance to establish a baseline for comparison after suctioning. Review the patient’s arterial blood gas values and oxygen saturation levels if they’re available. Attach the patient to a pulse oximeter to assess oxygen saturation before and after the procedure.3 Evaluate the patient’s ability to cough and deep-breathe to help move secretions up the tracheobronchial tree.3
Explain the procedure to the patient even if he’s unresponsive. Tell him that suctioning usually causes transient coughing or gagging but that coughing helps remove secretions. If the patient has been suctioned previously, summarize the reasons for suctioning. Continue to reassure the patient throughout the procedure to minimize anxiety, promote relaxation, and decrease oxygen demand.
Unless contraindicated, place the patient in semi-Fowler’s or high Fowler’s position to promote lung expansion and productive coughing.
Remove the top from the normal saline solution or water bottle.
Open the package containing the sterile solution container.
Using strict sterile technique, open the suction catheter kit, and put on the gloves. If using individual supplies, open the suction catheter and the gloves, placing first the nonsterile glove on your nondominant hand and then the sterile glove on your dominant hand.1,3
Using your nondominant (nonsterile) hand, pour the normal saline solution or sterile water into the solution container.
Place a sterile towel over the patient’s chest, if desired, to provide an additional sterile area.
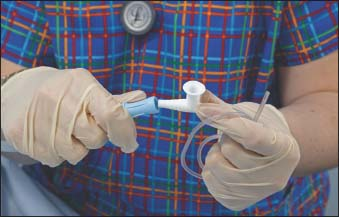
Using your dominant (sterile) hand, remove the catheter from its wrapper. Keep it coiled so it can’t touch a nonsterile object. Using your other hand to manipulate the connecting tubing, attach the catheter to the tubing (as shown below).3

Using your nondominant hand, set the suction pressure according to facility policy. Pressure should be set as low as possible but high enough to clear secretions; less than 150 mm Hg is recommended for adults.3,11 Higher pressures don’t enhance secretion removal and may cause traumatic injury. Occlude the suction port to assess suction pressure.
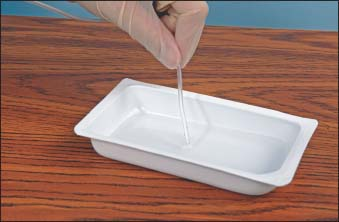
Dip the catheter tip in the saline solution or sterile water (as shown below) to lubricate the outside of the catheter and reduce tissue trauma during insertion.

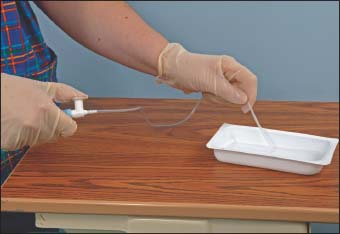
With the catheter tip in the sterile saline or water, occlude the control valve with the thumb of your nondominant hand (as shown below). Suction a small amount of solution through the catheter to lubricate the inside of the catheter, which facilitates passage of secretions through it.

If the patient is being mechanically ventilated, hyperoxygenate him for at least 30 seconds.2,3,11 First, adjust the fraction of inspired oxygen (FIO2) and tidal volume according to your facility’s policy and the patient’s needs. Next, either use the sigh mode or manually deliver three to six breaths with a manual resuscitation bag. If you have an assistant for the procedure, the assistant can manage the patient’s oxygen needs while you perform the suctioning.
Using your nonsterile hand, disconnect the patient from the ventilator. (If you’re using a closed system, see Closed tracheal suctioning.)
Stay updated, free articles. Join our Telegram channel

Full access? Get Clinical Tree


Get Clinical Tree app for offline access
