T
TERMINATION OF LIFE SUPPORT
According to the right-to-die laws of most states, a patient has the right to refuse extraordinary life-supporting measures if he has no hope of recovery. If the patient can’t make this decision, the patient’s next of kin is usually permitted to decide if life support should continue. A written statement of the patient’s wishes is always preferable. Because of the Patient Self-Determination Act, each health care facility is required to ask the patient upon admission if he has an advance directive. (See “Advance directive,” pages 9 to 11.) An advance directive is a statement of the patient’s wishes that becomes valid if he’s unable to make decisions for himself. An advance directive may include a living will, which goes into effect when the patient can’t make decisions for himself, as well as a durable power of attorney for health care, which names a designated person to make health care decisions when the patient can’t. The Patient Self-Determination Act also states that the patient must receive written information concerning his right to make decisions about his medical care.
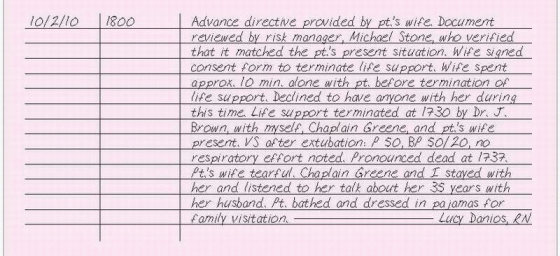
If life support is to be terminated, read the patient’s advance directive to ensure that the present situation matches the patient’s wishes, and verify that the risk manager has reviewed the document. Allow adequate time for the family to interact with the medical staff to ensure their questions and concerns are addressed. Check that the appropriate consent forms have been signed. Ask the patient’s family whether they would like to see the chaplain and whether they would like to be with the patient before, during, and after life-support termination.
ESSENTIAL DOCUMENTATION
Document whether an advance directive is present and whether it matches your patient’s present situation and life support wishes. Note that your facility’s risk manager has reviewed the advance directive. Document that a consent form has been signed to terminate life support, according to facility policy. Document the names of persons who were notified of the decision to terminate life support and their responses. Describe physical care for the patient before and after life-support termination. Note whether the family was with the patient before, during, and after termination of life support. Record whether a chaplain was present. Document the time of termination, name of the doctor who turned off the equipment, and names of people present. Record vital signs after extubation as well as the time the patient stopped breathing, the time he was pronounced dead, and who made the pronouncement. Document the family’s response, your interventions for them, and postmortem care for the patient.
|
THORACENTESIS
Thoracentesis involves the aspiration of fluid or air from the pleural space. It relieves pulmonary compression and respiratory distress by removing accumulated air or fluid that results from injury or such conditions as tuberculosis and cancer. It also provides a specimen of pleural fluid or tissue for analysis and allows the instillation of chemotherapeutic agents or other drugs into the pleural space.
ESSENTIAL DOCUMENTATION
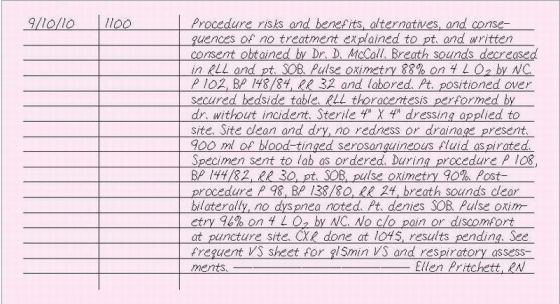
Note that the procedure, its risks and advantages, alternative treatments, and the consequences of no treatment have been explained to the patient and that a consent form has been signed. Record the date and time of the thoracentesis and the name of the person performing the procedure. Document the location of the puncture site, the volume and description (color, viscosity, and odor) of the fluid withdrawn, and specimens sent to the laboratory. Chart your patient’s vital signs and respiratory assessment before, during, and after the procedure. Record any postprocedural tests such as a chest X-ray. Note any complications (such as pneumothorax, hemothorax, or subcutaneous hematoma), the name of the doctor notified and the time of notification, orders given, your interventions, and the patient’s response. Also, record the patient’s reaction to the procedure.
After the procedure, record the patient’s vital signs every 15 minutes for 1 hour. Then continue to record the patient’s vital signs and respiratory status as indicated by his condition. These frequent assessments may be charted on a frequent vital signs flow sheet.
|
THROMBOLYTIC THERAPY
Thrombolytic drugs are used to dissolve a preexisting clot or thrombus, commonly in an acute or emergency situation. Some of the thrombolytic drugs currently used include alteplase, reteplase, anistreplase, and
streptokinase. Thrombolytic drugs are used to treat acute myocardial infarction, pulmonary embolism, acute ischemic stroke, deep vein thrombosis, arterial thrombosis, arterial embolism, and to clear occluded arteriovenous and I.V. cannulas. Patients receiving these drugs must be closely monitored for bleeding and allergic reactions.
streptokinase. Thrombolytic drugs are used to treat acute myocardial infarction, pulmonary embolism, acute ischemic stroke, deep vein thrombosis, arterial thrombosis, arterial embolism, and to clear occluded arteriovenous and I.V. cannulas. Patients receiving these drugs must be closely monitored for bleeding and allergic reactions.
ESSENTIAL DOCUMENTATION
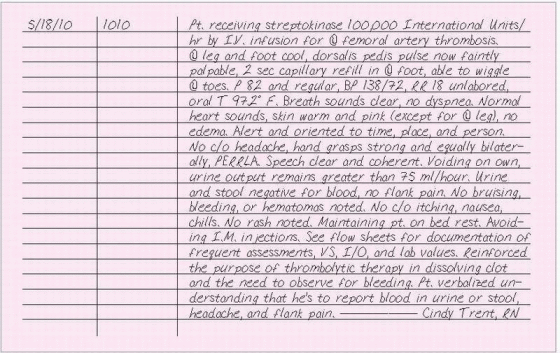
Record the date and time of your note. Chart the name, dosage, frequency, route, and intended purpose of the thrombolytic drug. Note whether the desired response is observed, such as cessation of chest pain, return of ECG changes to baseline, clearing of a catheter, or improved blood flow to a limb. Document your cardiopulmonary, renal, and neurologic assessments. Chart vital signs frequently, according to your facility’s policy. Record partial thromboplastin time and other coagulation studies. Frequently assess and document signs and symptoms of complications, such as bleeding, allergic reaction, or hypotension. Note the time that you notified the doctor of complications and abnormal laboratory test values, his name, orders given, your interventions, and the patient’s response. Document other nursing interventions related to thrombolytic therapy such as measures to avoid trauma. Use flow sheets to record your frequent assessments, vital signs, hemodynamic measurements, intake and output, I.V. therapy, and laboratory test values. Include any patient teaching and emotional care provided.
|
TRACHEOSTOMY CARE
Tracheostomy care is performed to ensure airway patency of the tracheostomy tube by keeping it free from mucus buildup, maintain mucous membrane and skin integrity, prevent infection, and provide psychological support. The patient may have one of three types of tracheostomy tubes: uncuffed, cuffed, or fenestrated. An uncuffed tracheostomy tube, which may be plastic or metal, allows air to flow freely around the tube and through the larynx, reducing the risk of tracheal damage. A cuffed tube, made of plastic, is disposable. The cuff and the tube won’t separate accidently because they’re bonded. A cuffed tube also doesn’t require periodic deflating to lower pressures, and it reduces the risk of tracheal damage. A fenestrated tube, also made of plastic, permits speech through the upper airway when the external opening is capped and the cuff is deflated. It also allows easy removal of the inner cannula for cleaning. However, a fenestrated tracheostomy tube may become occluded. When using any one of these tubes, use aseptic technique to prevent infection until the stoma has healed. When caring for a recently performed tracheotomy, use sterile gloves at all times. After the stoma has healed, clean gloves may be used.
ESSENTIAL DOCUMENTATION
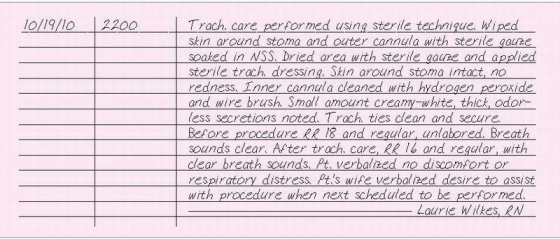
Record the date and time of tracheostomy care. Document the type of care performed. Describe the amount, color, consistency, and odor of secretions. Chart the condition of the stoma and the surrounding skin. Note the patient’s respiratory status. Record the duration of any cuff deflation, amount of any cuff inflation, and cuff pressure readings and specific body position. Note any complications, the time that you notified the doctor, his name, and orders given. Record your interventions and the patient’s response. Document the patient’s tolerance of the procedure. Be sure to report any patient or family teaching and their level of comprehension. Depending on your facility’s policy, patient teaching may be recorded on a patient-teaching record.
|
TRACHEOSTOMY OCCLUSION
On occasion, mucus may obstruct a tracheostomy tube, causing occlusion. When suctioning or withdrawing the inner cannula doesn’t clear an occluded tube, follow your facility’s policy. Stay with the patient while someone else calls the doctor or appropriate code. Continue to try to ventilate the patient using whichever method works; for example, a handheld resuscitation bag. Don’t remove the tracheostomy tube entirely because doing so may close the airway completely.
ESSENTIAL DOCUMENTATION
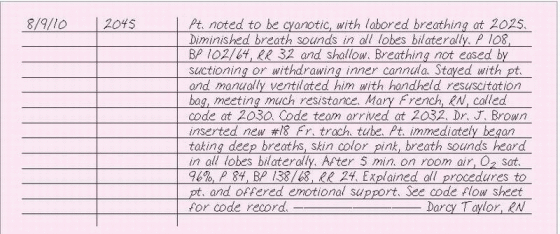
Record the date and time of the tracheostomy occlusion. Describe your efforts to clear the tube and the results. Note the time that you notified the doctor, his name, his interventions, and any orders given. If appropriate, record the time that a code was called. Use a code sheet to document the events of the code. (See The code record, page 54.) Record the patient’s respiratory status during the time of occlusion and after resolution of the occlusion. Note the patient’s response to the event.
|
TRACHEOSTOMY SUCTIONING
Tracheostomy suctioning involves the removal of secretions from the trachea or bronchi by means of a catheter inserted through the tracheostomy tube. In addition to removing secretions, tracheostomy suctioning also stimulates the cough reflex. This procedure helps maintain a patent airway to promote the optimal exchange of oxygen and carbon dioxide and to prevent pneumonia that results from pooling of secretions. Requiring strict sterile technique, tracheostomy suctioning should be performed as frequently as the patient’s condition warrants.
ESSENTIAL DOCUMENTATION
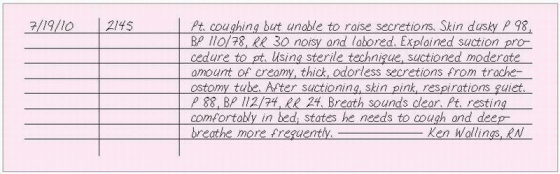
Record the date and time that you performed tracheostomy suctioning as well as the reason for suctioning. Document the amount, color, consistency, and odor of the secretions. Note any complications as well as nursing actions taken and the patient’s response to them. Record any pertinent data regarding the patient’s response to the procedure.
|
Stay updated, free articles. Join our Telegram channel

Full access? Get Clinical Tree


