Respiratory care
Respiratory diseases may be acute or chronic and may develop as a primary disorder or result from a cardiac condition. These conditions affect millions of people worldwide — no matter where you work, you’re sure to encounter patients with respiratory conditions.
Caring for a patient with a respiratory condition will challenge your nursing skills. Not only is the patient’s oxygenation compromised, but he may develop other problems, such as ineffective airway clearance and gas exchange, altered cardiac output, altered fluid volume, impaired thermoregulation, and decreased mobility. He may be anxious, cope ineffectively, and have an impaired ability to communicate. In addition, his nutritional status may be compromised. For such a patient, you’ll need to develop an individual care plan to make sure that he achieves optimum gas exchange and physical function.
To meet your care goals, you need to have a working knowledge of the many therapies available to respiratory patients. Although many health care facilities have staff members who specialize in respiratory procedures, you still need to keep your knowledge up to date so you’ll know and understand the rationales behind the patient’s treatment and be able to perform or assist with procedures if necessary, recognize complications, and detect the need for additional therapy.
The information presented in this chapter will give you the most recent research in the form of evidence-based EB discoveries from the National Institutes of HealthNIH and the Association for Healthcare Research and QualityAHRQ. Included are guidelines drawn up by professional groups, such as the American Association for Respiratory Care AARC, the American Association of Critical-Care NursesAACN, the Society of Critical Care MedicineSCCM, the American Heart AssociationAHA, the American Lung AssociationALA, the American Hospital Association’s Patient Care PartnershipPCP, and the Child Health Corporation of America’s Cooperative Pulse Oximetry FORUMFORUM. Some of the best practices in the chapter are grounded in fundamental principles of scienceSCIENCE. You’ll also find recommendations from the Centers for Disease Control and PreventionCDC and the Joint Commission for Accreditation of Healthcare OrganizationsJCAHO so that you can give the best care to your patient. For points related to the equipment, manufacturersMFR may recommend specific guidelines.
Chest physiotherapy
Chest physiotherapy includes postural drainage, chest percussion and vibration, and coughing and deep-breathing exercises. Together, these techniques mobilize and eliminate secretions, reexpand lung tissue, and promote efficient use of respiratory muscles. Of critical importance to the bedridden patient, chest physiotherapy helps prevent or treat atelectasis and also may help prevent pneumonia — two respiratory complications that can seriously impede recovery. (See Reducing health care-associated infections.)
Postural drainage, or sequential repositioning of the patient, encourages peripheral pulmonary secretions to empty by gravity into the major bronchi or trachea when performed in conjunction with percussion and vibration. Secretions usually drain best with the patient positioned so that the bronchi are perpendicular to the floor. Lower and middle lobe bronchi usually empty best with the patient in the head-down position; upper lobe bronchi, in the head-up position. (See Postural drainage positions, pages 284 and 285.)
Percussing the chest with cupped hands mechanically dislodges thick, tenacious secretions from the bronchial walls. Vibration can be used with percussion, or as an alternative to it, in a patient who’s frail, in pain, or recovering from thoracic surgery or trauma.
Candidates for chest physiotherapy include patients who expectorate large amounts of sputum (if sputum production is less than 25 ml/day, chest physiotherapy isn’t needed), such as those with bronchiectasis and cystic fibrosis. The procedure hasn’t proved effective in treating patients with status asthmaticus, lobar pneumonia, or acute exacerbations of chronic bronchitis when the patient has scant secretions and is being mechanically ventilated. Chest physiotherapy has little value for treating patients with stable, chronic bronchitis.
In critical care patients, including those on mechanical ventilation, postural drainage therapy (PDT) should be performed from every 4 to 6 hours, as indicated. The PDT order should be reevaluated at least every 48 hours, based on assessments from individual treatments.
In spontaneously breathing patients, PDT frequency should be determined by assessing the patient’s response to therapy. Acute care patient orders should be reevaluated, based on patient response to therapy, at least every 72 hours or with a change in the patient’s status. AARC
Contraindications for chest physiotherapy include active pulmonary bleeding with hemoptysis and the immediate posthemorrhage stage, fractured ribs or an unstable chest wall, lung contusions, pulmonary tuberculosis, untreated pneumothorax, acute asthma or bronchospasm, lung abscess or tumor, bony metastasis, head injury, recent myocardial infarction, and vomiting or immediately after eating. AARC
Equipment
Stethoscope • pillows • tilt or postural drainage table (if available) or adjustable hospital bed • emesis basin • facial tissues • suction equipment as needed • equipment for oral care • trash bag • optional: sterile specimen container, mechanical ventilator, supplemental oxygen
Preparation of equipment
Gather the equipment at the patient’s bedside.
Set up suction equipment, if needed, and test its function.
Implementation
Confirm the patient’s identity using two patient identifiers according to facility policy. JCAHO
Reducing health care-associated infections EB
Health care-associated infections (HAIs) most commonly attack the respiratory system, and complications from HAIs are a significant cause of patient deaths in hospitals. Patients on mechanical ventilators may have up to a 20-fold increase in the risk of hospital-acquired pneumonia. Western Medical Center, Tenet California Healthcare System, reduced HAIs in tracheal intubation using a multidisciplinary team approach.
Western Medical Center had a pneumonia rate of 10% to 15% in the intensive care unit (ICU), which was greater than the National Nosocomial Infections Surveillance System pooled mean. To reduce this rate, a multidisciplinary team was created to study the problem of reducing hospital-acquired pneumonia in high-risk ICU patients and implementing changes in nursing practice in the care of intubated patients admitted to the ICU.
Patients were evaluated using a Patient Identification for Rotational Therapy tool and those who were identified as high risk were placed on kinetic therapy within 48 hours. This therapy consists of rotation at a minimum of 40 degrees to either side for a minimum of 18 hours per day. High-risk patients also received nutritional therapy within 48 hours. Patients with long-term ventilator therapy received a tracheostomy and had a percutaneous endoscopic gastrostomy tube placed by day 7.
Patients were monitored using the Patient Identification for Rotational Therapy tool and specific quality indicators three times per week. Staff also received reinforcement in such areas as hand hygiene, suctioning, assessment skills, and modes of transmission.
The program resulted in a 43% decrease in hospital-acquired pneumonia in patients in the ICU. None of the patients placed on rotational therapy developed pneumonia. Of the patients receiving rotational therapy for pneumonia, 75% showed improvement within 48 hours. The length of time on a ventilator was reduced by 20% and length of stay in the ICU was decreased by 1 day.
Postural drainage positions
The following illustrations show the various postural drainage positions and the areas of the lungs affected by each.
| Lower lobes: Posterior basal segments Elevate the foot of the bed 30 degrees. Have the patient lie prone with his head lowered. Position pillows under his chest and abdomen. Percuss his lower ribs on both sides of his spine. | 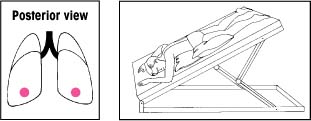 | Right middle lobe: Medial and lateral segments Elevate the foot of the bed 15 degrees. Have the patient lie on his left side with his head down and his knees flexed. Then have him rotate a quarter turn backward. Place a pillow beneath him. Percuss with your hand moderately cupped over the right nipple. For a woman, cup your hand so that its heel is under the armpit and your fingers extend forward beneath the breast. | 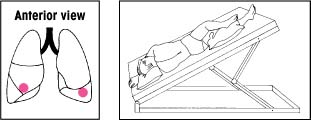 |
| Lower lobes: Lateral basal segments Elevate the foot of the bed 30 degrees. Instruct the patient to lie on his abdomen with his head lowered and his upper leg flexed over a pillow for support. Then have him rotate a quarter turn upward. Percuss his lower ribs on the uppermost portion of his lateral chest wall. |  | Left upper lobe: Superior and inferior segments, lingular portion Elevate the foot of the bed 15 degrees. Have the patient lie on his right side with his head down and knees flexed. Then have him rotate a quarter turn backward. Place a pillow behind him, from shoulders to hips. Percuss with your hand moderately cupped over his left nipple. For a woman, cup your hand so that its heel is beneath the armpit and your fingers extend forward beneath the breast. | 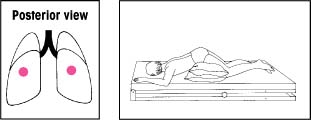 |
| Lower lobes: Anterior basal segments Elevate the foot of the bed 30 degrees. Instruct the patient to lie on his side with his head lowered. Then place pillows as shown. Percuss with a slightly cupped hand over his lower ribs just beneath the axilla. If an acutely ill patient has trouble breathing in this position, adjust the bed to an angle he can tolerate. Then begin percussion. |  | Upper lobes: Anterior segments Make sure that the bed is flat. Have the patient lie on his back with a pillow folded under his knees. Then have him rotate slightly away from the side being drained. Percuss between his clavicle and nipple. | 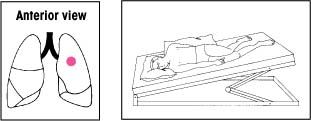 |
| Lower lobes: Superior segments With the bed flat, have the patient lie on his abdomen. Place two pillows under his hips. Percuss on both sides of his spine at the lower tips of his scapulae. | 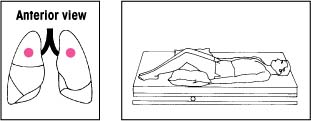 | Upper lobes: Apical segments Keep the bed flat. Have the patient lean back at a 30-degree angle against you and a pillow. Percuss with a cupped hand between his clavicles and the top of each scapula. | 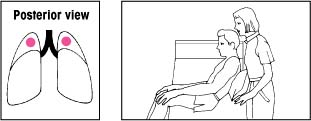 |
| Upper lobes: Posterior segments Keep the bed flat. Have the patient lean over a pillow at a 30-degree angle. Percuss and clap his upper back on each side. | 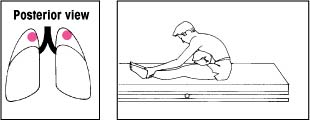 |
Performing percussion and vibration
To perform percussion, instruct the patient to breathe slowly and deeply, using the diaphragm, to promote relaxation. Hold your hands in a cupped shape, with fingers flexed and thumbs pressed tightly against your index fingers. Percuss each segment for 1 to 2 minutes by alternating your hands against the patient in a rhythmic manner. Listen for a hollow sound on percussion to verify correct performance of the technique.
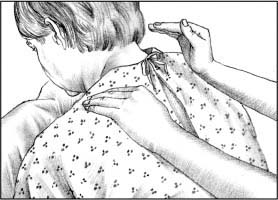 |
To perform vibration, ask the patient to inhale deeply and then exhale slowly through pursed lips. During exhalation, firmly press your fingers and the palms of your hands against the chest wall. Tense the muscles of your arms and shoulders in an isometric contraction to send fine vibrations through the chest wall. Vibrate during five exhalations over each chest segment.
 |
Explain the procedure to the patient, provide privacy, and wash your hands. CDC PCP
Auscultate the patient’s lungs to determine baseline respiratory status.
Position the patient as ordered. In generalized disease, drainage usually begins with the lower lobes, continues with the middle lobes, and ends with the upper lobes. In localized disease, drainage begins with the affected lobes and then proceeds to the other lobes to avoid spreading the disease to uninvolved areas.
After PDT, percussion, or vibration, instruct the patient to cough to remove loosened secretions. First, tell him to inhale deeply through his nose and then exhale in three short huffs. Then have him inhale deeply again and cough through a slightly open mouth. Three consecutive coughs are highly effective. An effective cough sounds deep, low, and hollow; an ineffective one, high-pitched. Have the patient perform exercises for about 1 minute and then have him rest for 2 minutes. Gradually progress to a 10-minute exercise period four times daily. SCIENCE
Provide oral hygiene because secretions may have a foul taste or a stale odor.
Auscultate the patient’s lungs to evaluate the effectiveness of therapy.
Special considerations
For optimal effectiveness and safety, modify chest physiotherapy according to the patient’s condition. For example, initiate or increase the flow of supplemental oxygen, if indicated. Also, suction the patient who has an ineffective cough reflex. If the patient tires quickly during therapy, shorten the sessions because fatigue leads to shallow respirations and increased hypoxia.
Maintain adequate hydration in the patient receiving chest physiotherapy to prevent mucus dehydration and promote easier mobilization. Avoid performing postural drainage immediately before or within 1 1/2 hours after meals to avoid nausea and aspiration of food or vomitus.
Because chest percussion can induce bronchospasm, any adjunct treatment (for example, intermittent
positive-pressure breathing or aerosol or nebulizer therapy) should precede chest physiotherapy.
Refrain from percussing over the spine, liver, kidneys, or spleen to avoid injury to the spine or internal organs. Also, avoid performing percussion on bare skin or the female patient’s breasts. Percuss over soft clothing (but not over buttons, snaps, or zippers), or place a thin towel over the chest wall. Remember to remove jewelry that might scratch or bruise the patient.
Nursing diagnoses
Impaired gas exchange
Ineffective airway clearance
Ineffective breathing pattern
Expected outcomes
The patient will:
maintain adequate ventilation and normal oxygen levels
express comfort during air exchange
expectorate sputum
have absent adventitious breath sounds (may worsen following therapy and then clear as secretions are cleared)
maintain a patent airway
breathe deeply and cough to remove secretions
have a normal chest X-ray.
Complications
During PDT in head-down positions, pressure on the diaphragm by abdominal contents can impair respiratory excursion and lead to hypoxia or orthostatic hypotension. The head-down position also may lead to increased intracranial pressure, which precludes the use of chest physiotherapy in a patient with acute neurologic impairment.
Vigorous percussion or vibration can cause rib fracture, especially in the patient with osteoporosis.
In a patient with emphysema who has blebs, coughing could lead to pneumothorax.
Documentation
Record the frequency, date, and time of chest physiotherapy; positions for postural drainage and length of time each is maintained; chest segments percussed or vibrated; the color, amount, odor, and viscosity of secretions produced and presence of any blood; any complications and interventions taken, and the patient’s tolerance of treatment.
Supportive references
American Association for Respiratory Care. “AARC Clinical Practice Guideline: Directed Cough”, Respiratory Care 38(5):495-99, May 1993.
American Association for Respiratory Care. “AARC Clinical Practice Guideline: Postural Drainage Therapy”, Respiratory Care 36(12):1418-426, December 1991.
McCool, F.D., and Rosen, M.J. “Non-pharmacologic Airway Clearance Therapies: ACCP Evidence-based Clinical Practice Guidelines”, Chest 129(1 Suppl):2505-595, January 2006.
McKay, C. “Reducing Nosocomial Pneumonia in Critical Care”, American Association of Critical-Care Nurses. www.aacn.org. Search word: McKay. EB
Vines, D.L., et al. “Current Respiratory Care, Part 1: Oxygen Therapy, Oximetry, Bronchial Hygiene”, Journal of Critical Illness 15(9):507-10, 513-15, September 2000.
Cricothyrotomy
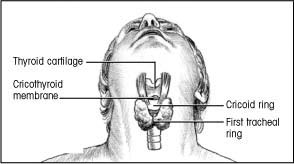
When endotracheal intubation or a tracheotomy can’t be performed quickly to establish an airway, an emergency cricothyrotomy may be necessary. Performed rarely, this procedure involves puncturing the trachea through the cricothyroid membrane.
Usually, your role will be to assist a physician with this procedure. However, if a physician isn’t available and the patient is likely to die before he can be intubated, you may have to perform the procedure yourself if you’ve been trained to do so. Ideally, cricothyrotomy is performed using sterile technique but, in an emergency, this may not be possible.
Equipment
Have one person stay with the patient while another collects the necessary equipment.
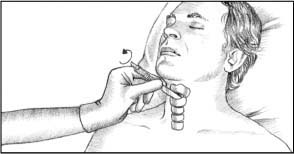
Performing an emergency cricothyrotomy
To perform an emergency cricothyrotomy, first put on sterile gloves and clean the patient’s neck with a sterile gauze pad soaked in povidone-iodine solution. To reduce the risk of contamination, use a circular motion, working outward from the incision site.
Locate the precise insertion site by sliding your thumb and fingers down to the thyroid gland. You’ll know you’ve located its outer borders when the space between your fingers and thumb widens.
Move your finger across the center of the gland, over the anterior edge of the cricoid ring.
 |
Using a scalpel
Make a horizontal incision, less than 1/2″ (1.3 cm) long, in the cricothyroid membrane just above the cricoid ring.
Insert a dilator to prevent tissue from closing around the incision. If a dilator isn’t available, insert the handle of the scalpel and rotate it 90 degrees (as shown below).
 |
If a small tracheostomy tube (#6 or smaller) is available, insert it into the opening and secure it to help maintain a patent airway. If a tracheostomy tube isn’t available, tape the dilator or scalpel handle in place until a tracheostomy tube is available.
If the patient can breathe spontaneously, attach a humidified oxygen source to the tracheostomy tube with a T tube; if he can’t, attach a handheld resuscitation bag. You’ll need to inflate the cuff of the tracheostomy tube with a syringe to provide positive-pressure ventilation.
Auscultate bilaterally for breath sounds, and take the patient’s vital signs.
Dispose of the gloves properly and wash your hands. CDC
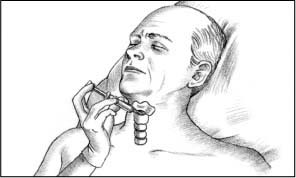
Using a needle
Attach a 10-ml syringe to a 14G (or larger) through-the-needle or over-the-needle catheter. Then insert the catheter into the cricothyroid membrane just above the cricoid ring.
Direct the catheter downward at a 45-degree angle, as shown below, to the trachea to avoid damaging the vocal cords. Maintain negative pressure by pulling back the syringe plunger as you advance the catheter. You’ll know the catheter has entered the trachea when air enters the syringe.
 |
When the catheter reaches the trachea, advance it and remove the needle and syringe. Tape the catheter in place.
Attach the catheter hub to one end of the I.V. extension tubing. At the other end, attach a hand-operated release valve or a pressure-regulating adjustment valve. Connect the entire assembly to an oxygen source.
Press the release valve to introduce oxygen into the trachea and inflate the lungs. When you can see that they’re inflated, release the valve to allow passive exhalation. Adjust the pressure-regulating valve to the minimum pressure needed for adequate lung inflation.
Auscultate bilaterally for breath sounds, and take the patient’s vital signs.
Dispose of the gloves properly and wash your hands. CDC
Scalpel or needle cricothyrotomy
Sterile gloves • povidone-iodine solution • sterile 4″× 4″ gauze pads • dilator • tape • oxygen source
Scalpel cricothyrotomy
Scalpel • tracheostomy tube (#6 or smaller, if available) • handheld resuscitation bag or T tube and wide-bore oxygen tubing
Needle cricothyrotomy
14G (or larger) through-the-needle or over-the-needle catheter • 10-ml syringe • I.V. extension tubing • hand-operated release valve or pressure-regulating adjustment valve
Implementation
Hyperextend the patient’s neck to expose the area of the incision site.
Have someone hold the patient’s head in the correct position while you perform the procedure. (See Performing an emergency cricothyrotomy.)
Special considerations
Immediately after the procedure, check for bleeding at the insertion site, subcutaneous emphysema or inadequate ventilation, and tracheal or vocal cord damage.
Nursing diagnoses
Impaired spontaneous ventilation
Expected outcomes
The patient will:
maintain normal arterial blood gas levels
maintain a respiratory rate within 5 breaths/minute of baseline.
Complications
Hemorrhage, perforation of the thyroid or esophagus, and subcutaneous or mediastinal emphysema may occur from this procedure.
Infection also may occur several days after the procedure.
Documentation
Document the date, time, and circumstances necessitating the procedure and the patient’s vital signs. Note whether the patient initiated spontaneous respirations after the procedure. Record how much and by what method oxygen was delivered. If any procedures were performed after the airway was established — endotracheal intubation, for example — note them.
Supportive references
American Association for Respiratory Care. “AARC Clinical Practice Guideline: Management of Airway Emergencies”, Respiratory Care 40(7):749-60, July 1995.
Blanda, M. “The Difficult Airway: Tools and Techniques for Acute Management”, Journal of Critical Illness 15(7):358-60, 369-73, July 2000.
Rich, J.M., et al. “The SLAM Emergency Airway Flow Chart: A New Guide for Advanced Airway Practitioners”, AANA Journal 72(6):431-39, December 2004.
Endotracheal intubation
Endotracheal (ET) intubation involves the oral or nasal insertion of a flexible tube through the larynx into the trachea for the purpose of controlling the airway and mechanically ventilating the patient. Performed by a physician, anesthetist, respiratory therapist, or nurse educated in the procedure, ET intubation usually occurs in emergencies, such as cardiopulmonary arrest, or in diseases such as epiglottiditis. However, intubation also may occur under more controlled circumstances such as just before surgery. In such instances, ET intubation requires patient teaching and preparation.
The 2005 International Consensus Conference on Cardiopulmonary Resuscitation and Emergency Cardiovascular Care Science provides recommendations on the skill level needed to intubate, methods of confirming ET tube placement, and alternatives to intubation.
The guidelines recommend that only health care workers with adequate training and experience or frequent retraining should perform ET intubation. If a health care worker isn’t authorized to perform ET intubation, alternative measures, such as a laryngeal mask airway or an esophageal-tracheal Combitube,
may be used. These alternatives are less likely to cause aspiration than the use of a bag-mask. AHA
may be used. These alternatives are less likely to cause aspiration than the use of a bag-mask. AHA
Advantages of ET intubation include establishing and maintaining a patent airway, protecting against aspiration by sealing off the trachea from the digestive tract, permitting removal of tracheobronchial secretions in the patient who can’t cough effectively, and providing a route for mechanical ventilation. Disadvantages include bypassing normal respiratory defenses against infection, reducing cough effectiveness, and preventing the patient from communicating.
Oral ET intubation is contraindicated in patients with acute cervical spinal injury and degenerative spinal disorders, while nasal intubation is contraindicated in patients with apnea, bleeding disorders, chronic sinusitis, or nasal obstructions.
Equipment
Two ET tubes (one spare) in appropriate size • 10-ml syringe • stethoscope • gloves • lighted laryngoscope with a handle and blades of various sizes, curved and straight • sedative • local anesthetic spray • mucosal vasoconstricting agent (for nasal intubation) • overbed or other table • water-soluble lubricant • adhesive or other strong tape or Velcro tube holder (see Securing an ET tube) • compound benzoin tincture • oral airway or bite block (for oral intubation) • suction equipment • handheld resuscitation bag with sterile swivel adapter • humidified oxygen source • optional: prepackaged intubation tray, sterile gauze pad, stylet, Magill forceps, sterile water, sterile basin
Preparation of equipment
Gather the individual supplies, or use a prepackaged intubation tray that typically contains most of the necessary supplies.
Select an ET tube of the appropriate size — typically, 2.5 to 5.5 mm, uncuffed, for children and 6 to 10 mm, cuffed, for adults. The typical size of an oral tube is 7.5 mm for women and 9 mm for men. Select a slightly smaller tube for nasal intubation.
Check the light in the laryngoscope by snapping the appropriate-size blade into place; if the bulb doesn’t light, replace the batteries or the laryngoscope, whichever is quicker.
Using sterile technique, open the package containing the ET tube and, if desired, open the other supplies on an overbed table.
Pour the sterile water into the sterile basin. Then, to ease insertion, lubricate the first 1″ (2.5 cm) of the distal end of the ET tube with the water-soluble lubricant, using aseptic technique. Do this by squeezing the lubricant directly onto the tube. Use only water-soluble lubricant because it can be absorbed by mucous membranes.
Attach the syringe to the port on the tube’s exterior pilot cuff.
Slowly inflate the cuff, observing for uniform inflation. If desired, submerge the tube in the sterile water and watch for air bubbles. Use the syringe to deflate the cuff.
A stylet may be used in oral intubation to stiffen the tube. Lubricate the entire stylet. Insert the stylet into the tube so that its distal tip lies about 1/2″ (1.3 cm) inside the distal end of the tube. Make sure that the stylet doesn’t protrude from the tube to avoid vocal cord trauma.
Prepare the humidified oxygen source and the suction equipment for immediate use.
If the patient is in bed, remove the headboard to provide easier access.
Implementation
Administer sedatives, as ordered, to induce amnesia or analgesia, and help calm and relax the conscious patient. Remove dentures and bridgework, if present. SCIENCE
Administer oxygen until the ET tube is inserted to prevent hypoxia.
Place the patient supine in the sniffing position so that his mouth, pharynx, and trachea are extended. For a blind intubation, place the patient’s head and neck in a neutral position.
Put on gloves. CDC
For oral intubation, spray a local anesthetic, such as lidocaine (Xylocaine), deep into the posterior pharynx to diminish the gag reflex and reduce patient discomfort. For nasal intubation, spray a local anesthetic and a mucosal vasoconstrictor into the nasal passages to anesthetize the nasal turbinates and reduce the chance of bleeding.
If necessary, suction the patient’s pharynx just before ET tube insertion to improve visualization of the patient’s pharynx and vocal cords.
Time each intubation attempt, limiting attempts to less than 30 seconds to prevent hypoxia.
Securing an ET tube
Before securing an endotracheal (ET) tube, make sure that the patient’s face is clean, dry, and free from beard stubble. If possible, suction his mouth and dry the ET tube just before taping. Check the reference mark on the tube to ensure correct placement. After securing, always check for bilateral breath sounds to ensure that the ET tube hasn’t been displaced by manipulation. To secure the tube, use one of the methods described here.
Method 1
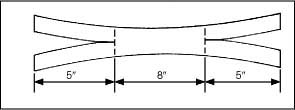
Cut one piece of 1″ cloth adhesive tape long enough to wrap around the patient’s head and overlap in front, and then cut an 8″ (20.3-cm) piece of tape and center it on the longer piece, sticky sides together.
Cut a 5″ (12.7-cm) slit in each end of the longer tape (as shown).
 |
Apply benzoin tincture to the patient’s cheeks, under his nose, and under the lower lip. (Don’t spray benzoin directly on the patient’s face; the vapors can be irritating if inhaled and can harm the eyes.)
Place the top half of one end of the tape under the patient’s nose and wrap the lower half around the ET tube. Place the lower half of the other end of the tape along his lower lip and wrap the top half around the tube.
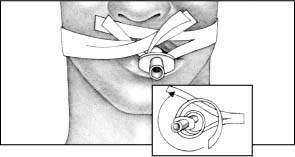 |
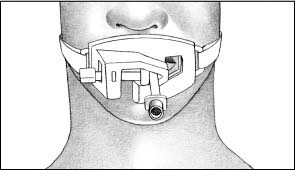
Method 2
ET tube holders are available that can help secure an ET tube.
Made of hard plastic or of softer material, the tube holder secures the ET tube in place. The tube holder is available in adult and pediatric sizes. Some models come with bite blocks attached.
Place the strap around the patient’s neck and secure it around the tube with Velcro fasteners (as shown).
Because each model is different, check the manufacturer’s guidelines for correct placement and care. MFR
 |
Intubation with direct visualization
Stand at the head of the patient’s bed. Using your right hand, hold the patient’s mouth open by crossing your index finger over your thumb, placing your thumb on the patient’s upper teeth and your index finger on his lower teeth. This technique provides greater leverage.
Grasp the laryngoscope handle in your left hand, and gently slide the blade into the right side of the patient’s mouth. Center the blade, and push the patient’s tongue to the left. Hold the patient’s lower lip away from his teeth to prevent the lip from being traumatized.
Advance the blade to expose the epiglottis. When using a straight blade, insert the tip under the epiglottis; when using a curved blade, insert the tip between the base of the tongue and the epiglottis.
Lift the laryngoscope handle upward and away from your body at a 45-degree angle to reveal the vocal cords. Avoid pivoting the laryngoscope against the patient’s teeth to avoid damaging them.
If desired, have an assistant apply pressure to the cricoid ring to occlude the esophagus and minimize gastric regurgitation.EB
When performing oral intubation, insert the ET tube into the right side of the patient’s mouth. When performing nasotracheal intubation, insert the ET tube through the nostril and into the pharynx. Then use Magill forceps to guide the tube through the vocal cords.
Guide the tube into the vertical openings of the larynx between the vocal cords, being careful not to mistake the horizontal opening of the esophagus for the larynx. If the vocal cords are closed because of a spasm, wait a few seconds for them to relax, and then gently guide the tube past them to avoid traumatic injury.
Advance the tube until the cuff disappears beyond the vocal cords. Avoid advancing the tube further to avoid occluding a major bronchus or precipitate lung collapse.
Holding the ET tube in place, quickly remove the stylet, if present.
Blind nasotracheal intubation
Pass the ET tube along the floor of the nasal cavity. If necessary, use gentle force to pass the tube through the nasopharynx and into the pharynx.
Listen and feel for air movement through the tube as it’s advanced to ensure that the tube is properly placed in the airway.
Slip the ET tube between the vocal cords when the patient inhales because the vocal cords separate on inhalation.
When the tube is past the vocal cords, the breath sounds should become louder. If at any time during tube advancement breath sounds disappear, withdraw the tube until they reappear.
After intubation
Inflate the tube’s cuff with 5 to 10 cc of air, until you feel resistance. When the patient is mechanically ventilated, you’ll use the minimal-leak technique or the minimal occlusive volume technique to establish correct inflation of the cuff. (For instructions, see “Tracheal cuff pressure measurement”, page 350.)
Remove the laryngoscope. If the patient was intubated orally, insert an oral airway or bite block to prevent the patient from obstructing airflow or puncturing the tube with his teeth.
Confirm ET tube placement by listening for bilateral breath sounds, observing chest expansion, and using techniques, such as capnography or capnometry.
The 2005 guidelines recommend confirming ET tube placement using techniques other than physical examination, such as esophageal detector devices, qualitative end-tidal carbon dioxide indicators, and capnographic and capnometric devices. Be aware that devices that rely on exhaled carbon dioxide may not be accurate in patients in cardiac arrest because of reduced lung perfusion and in patients with large amounts of dead space in the lungs such as a patient with a large pulmonary embolus. Other methods that complement nonphysical examination techniques include observing for bilateral chest expansion, auscultating for bilateral breath sounds, absence of abdominal sounds, feeling for warm exhalations, and observing for condensation in the ET tube.
If you determine that the tube isn’t in the trachea, immediately deflate the cuff and remove the tube. After reoxygenating the patient to prevent hypoxia, repeat insertion using a sterile tube to prevent contamination of the trachea. CDC
Auscultate bilaterally to exclude the possibility of endobronchial intubation. If you fail to hear breath sounds on both sides of the chest, you may have inserted the tube into one of the mainstem bronchi (usually the right one because of its wider angle at the bifurcation); such insertion occludes the other bronchus and lungs and results in atelectasis on the obstructed side. The tube also may be resting on the carina, resulting in dry secretions that obstruct both bronchi. (The patient’s coughing and fighting the ventilator will alert you to the problem.) To correct these situations, deflate the cuff, withdraw the tube 1 to 2 mm, auscultate for bilateral breath sounds, and reinflate the cuff.
When you’ve confirmed correct ET tube placement, administer oxygen or initiate mechanical ventilation, and suction, if indicated.
To secure tube position, apply compound benzoin tincture to each cheek and let it dry. Tape the tube firmly with adhesive or another strong tape or use a Velcro tube holder.
Inflate the cuff with the minimal-leak or minimal occlusive volume technique. For the minimal-leak technique, attach a 10-ml syringe to the port on the tube’s exterior pilot cuff, and place a stethoscope on the side of the patient’s neck. Inject small amounts of air with each breath until you hear no leak. Then aspirate 0.1 cc of air from the cuff to create a minimal air leak. Record the amount of air needed to inflate the cuff. For the minimal occlusive volume technique, follow the first two steps of the minimal-leak technique, but place the stethoscope over the trachea instead. Aspirate until you hear a small leak on inspiration, and add just enough air to stop the leak. Record the amount of air needed to inflate the cuff for subsequent monitoring of tracheal dilation or erosion.
Clearly note the centimeter marking on the tube where it exits the patient’s mouth or nose. By periodically monitoring this mark, you can detect tube displacement.
Make sure a chest X-ray is taken to verify tube position.
Place a swivel adapter between the ET tube and the humidified oxygen source to allow for intermittent suctioning and to reduce tube tension.
Place the patient on his side with his head in a comfortable position to avoid tube kinking and airway obstruction.
Auscultate both sides of the chest, and watch chest movement as indicated by the patient’s condition to ensure correct tube placement and full lung ventilation. Provide frequent oral care to the orally intubated patient, and position the ET tube to prevent the formation of pressure ulcers and to avoid excessive pressure on the sides of the mouth. Provide frequent nasal and oral care to the nasally intubated patient to prevent formation of pressure ulcers and drying of oral mucous membranes. SCIENCE
Suction secretions through the ET tube as the patient’s condition indicates to clear secretions and to prevent mucus plugs from obstructing the tube.
Special considerations
Orotracheal intubation is preferred in emergencies because insertion is easier and faster than with nasotracheal intubation. However, maintaining exact tube placement is more difficult, and the tube must be well secured to avoid kinking and prevent bronchial obstruction or accidental extubation. Orotracheal intubation is also poorly tolerated by conscious patients because it stimulates salivation, coughing, and retching.
Nasotracheal intubation is preferred for elective insertion when the patient is capable of spontaneous ventilation for a short period. Blind intubation is typically used in conscious patients who risk imminent respiratory arrest or who have cervical spinal injury.
Although nasotracheal intubation is more comfortable than oral intubation, it’s also more difficult to perform. Because the tube passes blindly through the nasal cavity, the procedure causes greater tissue trauma, increases the risk of infection by nasal bacteria introduced into the trachea, and risks pressure necrosis of the nasal mucosa. However, exact tube placement is easier, and the risk of dislodgment is lower. The cuff on the ET tube maintains a closed system that permits positive-pressure ventilation and protects the airways from aspiration of secretions and gastric contents.
Although low-pressure cuffs have significantly reduced the incidence of tracheal erosion and necrosis caused by cuff pressure on the tracheal wall, overinflation of a low-pressure cuff can negate the benefit. Use the minimal-leak technique to avoid these complications. Inflating the cuff a bit more to make a complete seal with the least amount of air is the next most desirable method.
Always record the volume of air needed to inflate the cuff. A gradual increase in this volume indicates tracheal dilation or erosion. A sudden increase in volume indicates rupture of the cuff and requires immediate reintubation if the patient is being ventilated or if he requires continuous cuff inflation to maintain a high concentration of delivered oxygen. When the cuff has been inflated, measure its pressure at least every 8 hours to avoid overinflation. Normal cuff pressure is about 18 mm Hg.
When neither method of ET intubation is possible, consider retrograde intubation as an alternative. (See Retrograde intubation, page 294.)
Nursing diagnoses
Impaired spontaneous ventilation
Risk for aspiration
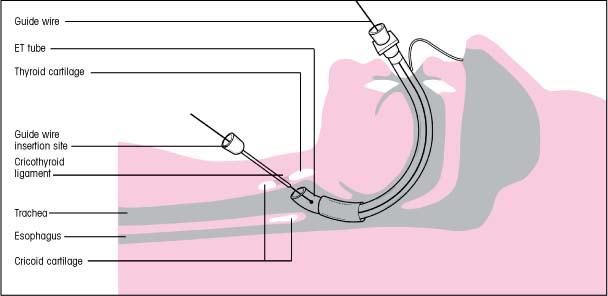
Retrograde intubation
When the patient’s airway can’t be secured using conventional oral or nasal intubation, retrograde intubation should be considered. In this alternative technique, a wire is inserted through the trachea and out the mouth and is then used to guide the insertion of an endotracheal (ET) tube (as shown below).
Only physicians, nurses, and paramedics who have been specially trained may perform retrograde intubation. However, the procedure has numerous advantages. It requires little or no head movement, it’s less invasive than cricothyrotomy or tracheotomy and doesn’t leave a permanent scar, and it doesn’t require direct visualization of the vocal cords.
Retrograde intubation is contraindicated in patients with complete airway obstruction, coagulopathy, a thyroid tumor, or an enlarged thyroid gland that overlies the cricothyroid ligament. It’s also contraindicated in patients whose mouths can’t open wide enough to allow the guide wire to be retrieved. Possible complications include minor bleeding and hematoma formation at the puncture site, subcutaneous emphysema, hoarseness, and bleeding into the trachea.
 |
Expected outcomes
The patient will:
maintain a respiratory rate within 5 breaths/minute of baseline
maintain normal arterial blood gas levels
breathe spontaneously after ventilator support is withdrawn
have no adventitious breath sounds on auscultation.
Complications
ET intubation can result in apnea caused by reflex breath-holding or interruption of oxygen delivery; bronchospasm; tooth damage or loss; aspiration of blood, secretions, or gastric contents; and injury to the lips, mouth, pharynx, or vocal cords. It also can result in laryngeal edema and erosion and tracheal stenosis, erosion, and necrosis.
Nasotracheal intubation can result in nasal bleeding, laceration, sinusitis, and otitis media.
Documentation
Record the date and time of the procedure, its indication and success or failure, tube type and size, cuff size, depth of ET tube as marked at the front teeth, amount of inflation and inflation technique, administration of medication, initiation of supplemental oxygen or ventilation therapy, results of chest auscultation
and the chest X-ray, any complications and interventions, and the patient’s reaction to the procedure.
and the chest X-ray, any complications and interventions, and the patient’s reaction to the procedure.
Supportive references
American Heart Association. “2005 AHA Guidelines for Cardiopulmonary Resuscitation and Emergency Cardiovascular Care: International Consensus on Science”, Circulation 112(22 Suppl): IV-1-IV-211, November 2005.
Lynn-McHale Wiegand, D.J., and Carlson, K.K. AACN Procedure Manual for Critical Care, 5th ed. Philadelphia: W.B. Saunders Co., 2005.EB
Wong, E., et al. “Confirmation of Endotracheal Tube Placement: Analysis of 6,294 Emergency Department Intubations”, Annals of Emergency Medicine 36(4 Part 2):S53, October 2000.
Endotracheal tube care
The intubated patient requires meticulous care to ensure airway patency and prevent complications until he can maintain independent ventilation. This care includes frequent assessment of his airway status, maintenance of proper cuff pressure to prevent tissue ischemia and necrosis, repositioning the tube to avoid traumatic manipulation, and constant monitoring for complications. Endotracheal (ET) tubes are repositioned for patient comfort or if a chest X-ray shows improper placement. Move the tube from one side of the mouth to the other to prevent pressure ulcers.
Equipment
Maintaining the airway
Stethoscope • suction equipment • gloves
Repositioning the ET tube
10-ml syringe • compound benzoin tincture • stethoscope • adhesive or hypoallergenic tape or Velcro tube holder • suction equipment • sedative or 2% lidocaine • gloves • handheld resuscitation bag with mask in case of accidental extubation
Removing the ET tube
10-ml syringe • suction equipment • supplemental oxygen source with mask • cool-mist large-volume nebulizer • handheld resuscitation bag with mask • gloves • equipment for reintubation
Preparation of equipment
Repositioning the ET tube
Assemble all equipment at the patient’s bedside.
Using sterile technique, set up the suction equipment.
Removing the ET tube
Assemble all equipment at the patient’s bedside.
Set up the suction and supplemental oxygen equipment.
Have ready all equipment for emergency reintubation.
Implementation
Confirm the patient’s identity using two patient identifiers according to facility policy. JCAHO
Explain the procedure to the patient even if he doesn’t appear to be alert. Provide privacy, wash your hands thoroughly, and put on gloves. CDC
Maintaining airway patency
Auscultate the patient’s lungs regularly and at any sign of respiratory distress. If you detect an obstructed airway, determine the cause and treat it accordingly. If secretions are obstructing the ET tube lumen, suction the secretions from the tube. (See “Tracheal suction”, page 352.)
If the ET tube has slipped from the trachea into the right or left mainstem bronchus, breath sounds will be absent over one lung. Obtain a chest X-ray as ordered to verify tube placement and, if necessary, reposition the tube.
Repositioning the ET tube
Get help from a respiratory therapist or another nurse to prevent accidental extubation during the procedure if the patient coughs. SCIENCE
Hyperoxygenate the patient and then suction the patient’s trachea through the ET tube to remove secretions, which can cause the patient to cough during the procedure. Then suction the patient’s pharynx to remove secretions that may have accumulated above the ET tube cuff. This helps to prevent aspiration of secretions during cuff deflation.EB1
To prevent traumatic manipulation of the tube, instruct the assisting nurse to hold it as you carefully
untape the tube or unfasten the Velcro tube holder. When freeing the tube, locate a landmark, such as a number on the tube, or measure the distance from the patient’s mouth to the top of the tube so that you have a reference point when moving the tube. SCIENCE
Deflate the cuff by attaching a 10-ml syringe to the pilot balloon port and aspirating air until you meet resistance and the pilot balloon deflates. Deflate the cuff before moving the ET tube because the cuff forms a seal within the trachea and movement of an inflated cuff can damage the tracheal wall and vocal cords. AARC
Reposition the ET tube as necessary, noting new landmarks or measuring the length. Immediately reinflate the cuff; instruct the patient to inhale, and slowly inflate the cuff using a 10-ml syringe attached to the pilot balloon port. As you do this, use your stethoscope to auscultate the patient’s neck to determine the presence of an air leak. When air leakage ceases, stop cuff inflation and, while still auscultating the patient’s neck, aspirate a small amount of air until you detect a slight leak. This creates a minimal air leak, which indicates that the cuff is inflated at the lowest pressure possible to create an adequate seal. If the patient is being mechanically ventilated, aspirate to create a minimal air leak during the inspiratory phase of respiration because the positive pressure of the ventilator during inspiration will create a larger leak around the cuff. Note the number of cubic centimeters of air required to achieve a minimal air leak. AARC
Measure cuff pressure, and compare the reading with previous pressure readings to prevent overinflation. Then use benzoin and hypoallergenic tape to secure the ET tube in place, or refasten the Velcro tube holder.
The ET tube also can be secured with a backboard commercial device. Studies show that using backboard commercial devices better prevent tube displacement when compared to using tape. AHA
Make sure that the patient is comfortable and the airway is patent. Properly clean or dispose of equipment.
When the cuff is inflated, measure pressure at least every 8 hours to avoid overinflation. AARC
Auscultate the lungs to ensure bilateral breath sounds. AARC
Removing the ET tube
Explain the procedure to the patient to reduce his anxiety.
Develop a protocol implemented by nurses and respiratory therapists to begin trials to decrease ventilator support soon after intubation. This ventilator support should be reduced at every opportunity.
When using step-wise reductions in mechanical ventilation, pressure support mode or multiple T-piece trials may be better than using intermittent mandatory ventilation.
When using weaning trials of unassisted breathing, low levels of pressure support may be helpful.
Patients who are alert, cooperative, and ready to breathe without an artificial airway may benefit from early extubation and the use of noninvasive positive-pressure ventilation.AHRQ
When you’re authorized to remove the tube, obtain another nurse’s assistance to prevent traumatic manipulation of the tube when it’s untaped or unfastened.
Elevate the head of the patient’s bed to high Fowler’s position, unless contraindicated.
Suction the patient’s oropharynx and nasopharynx to remove accumulated secretions and to help prevent aspiration of secretions when the cuff is deflated. SCIENCE
Using a handheld resuscitation bag or the mechanical ventilator, give the patient several deep breaths through the ET tube to hyperinflate his lungs and to increase his oxygen reserve.
Attach a 10-ml syringe to the pilot balloon port, and aspirate air until you meet resistance and the pilot balloon deflates. If you fail to detect an air leak around the deflated cuff, notify the physician immediately
and don’t proceed with extubation. Absence of an air leak may indicate marked tracheal edema, which can result in total airway obstruction if the ET tube is removed. AARC
If you detect the proper air leak, untape or unfasten the ET tube while the assisting nurse stabilizes the tube.
Insert a sterile suction catheter through the ET tube. Then apply suction and ask the patient to take a deep breath and to open his mouth fully and pretend to cry out. This causes abduction of the vocal cords and reduces the risk of laryngeal trauma during withdrawal of the tube.
Simultaneously remove the ET tube and the suction catheter in one smooth, outward and downward motion, following the natural curve of the patient’s mouth. Suctioning during extubation removes secretions retained at the end of the tube and prevents aspiration. AARC
Give the patient supplemental oxygen. For maximum humidity, use a cool-mist, large-volume nebulizer to help decrease airway irritation, patient discomfort, and laryngeal edema.
Encourage the patient to cough and deep-breathe. Remind him that a sore throat and hoarseness are to be expected and will gradually subside.
Make sure that the patient is comfortable and the airway is patent. Clean or dispose of equipment.
After extubation, auscultate the patient’s lungs frequently and watch for signs of respiratory distress. Stay especially alert for stridor or other evidence of upper airway obstruction. If ordered, obtain a sample for arterial blood gas (ABG) analysis. AARC
Special considerations
When repositioning an ET tube, be especially careful in patients with highly sensitive airways. Sedation or direct instillation of 2% lidocaine to numb the airway may be indicated in such patients. Because the lidocaine is absorbed systemically, you must have a physician’s order to use it.
After extubation of a patient who has been intubated for an extended time, keep reintubation supplies readily available for at least 12 hours or until you’re sure he can tolerate extubation. AARC
Never extubate a patient unless someone skilled at intubation is readily available.
If you inadvertently cut the pilot balloon on the cuff, immediately call the person responsible for intubation in your facility, who will remove the damaged ET tube and replace it with one that’s intact. Don’t remove the tube because a tube with an air leak is better than no airway. AARC
Nursing diagnoses
Impaired gas exchange
Risk for aspiration
Risk for trauma
Expected outcomes
The patient will:
maintain normal ABG levels
express feelings of comfort in maintaining air exchange
have no adventitious breath sounds on auscultation
avoid injury to the larynx or trachea.
Complications
Traumatic injury to the larynx or trachea may result from tube manipulation, accidental extubation, or tube slippage into the right bronchus.
Ventilatory failure and airway obstruction due to laryngospasm or marked tracheal edema are the gravest possible complications of extubation.
Documentation
After ET tube repositioning, record the date and time of the procedure, reason for repositioning (such as malposition shown by chest X-ray), new tube position, total amount of air in the cuff after the procedure, any complications and interventions, and the patient’s tolerance of the procedure. Document the physical findings and nonphysical examination to confirm tube placement.
After extubation, record the date and time of extubation, presence or absence of stridor or other signs of upper airway edema, type of supplemental oxygen administered, any complications and required subsequent therapy, and the patient’s tolerance of the procedure.
Supportive references
Agency for Healthcare Research and Quality. Criteria for Weaning from Mechanical Ventilation. Evidence Report/Technology Assessment: Number 23. AHRQ Publication No. 00-E028, June 2000. www.ahrq.gov/clinic/epcsums/mechsumm.htm.
American Association for Respiratory Care. “AARC Clinical Practice Guideline: Removal of the Endotracheal Tube”, Respiratory Care 44(1):85-90, January 1999.
American Heart Association. “2005 AHA Guidelines for Cardiopulmonary Resuscitation and Emergency Cardiovascular Care: International Consensus on Science”, Circulation 112(22 Suppl):IV-1-IV-211, November 2005.
Lynn-McHale Wiegand, D.J., and Carlson, K.K. AACN Procedure Manual for Critical Care, 5th ed. Philadelphia: W.B. Saunders Co., 2005. EB1
Moore, A.S. “Clinical Highlights: Does It Matter Whether You Use Twill or Adhesive Tape?” RN 62(2):20, February 1999.EB2
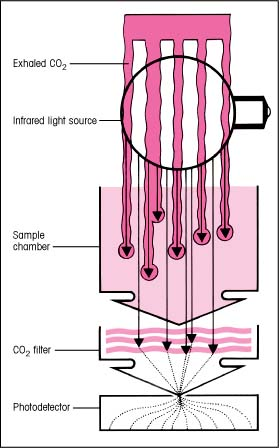
How ETCO2 monitoring works
The optical portion of an end-tidal carbon dioxide (ETCO2) monitor contains an infrared light source, a sample chamber, a special carbon dioxide (CO2) filter, and a photodetector. The infrared light passes through the sample chamber and is absorbed in varying amounts, depending on the amount of CO2 the patient has just exhaled. The photodetector measures CO2 content and relays this information to the microprocessor in the monitor, which displays the CO2 value and waveform.
 |
End-tidal carbon dioxide monitoring
Monitoring end-tidal carbon dioxide (ETCO2) determines the carbon dioxide (CO2) concentration in exhaled gas. In this technique, a photodetector measures the amount of infrared light absorbed by airway gas during inspiration and expiration. (Light absorption increases along with the CO2 concentration.) A monitor converts these data to a CO2 value and a corresponding waveform, or capnogram, if capnography is used. (See How ETCO2 monitoring works.)
ETCO2 monitoring provides information about the patient’s pulmonary, cardiac, and metabolic status that aids patient management and helps prevent clinical compromise. This technique has become standard during anesthesia administration and mechanical ventilation. Research suggests that ETCO2 monitoring may be used to assess whether a patient will survive after cardiopulmonary arrest. (See Using ETCO2 to predict survival in cardiopulmonary arrest. See also “Cardiopulmonary resuscitation”, page 217.)
The sensor, which contains an infrared light source and a photodetector, is positioned at one of two sites in the monitoring setup. With a mainstream monitor, it’s positioned directly at the patient’s airway with an airway adapter, between the endotracheal (ET) tube and the breathing circuit tubing. With a sidestream monitor, the airway adapter is positioned at the airway (regardless of whether the patient is intubated) to allow aspiration of gas from the patient’s airway back to the sensor, which lies either within or close to the monitor.
Some CO2 detection devices provide semiquantitative indications of CO2 concentrations, supplying an approximate range rather than a specific value for ETCO2. Other devices simply indicate whether CO2 is present during exhalation. (See Analyzing CO2 levels, page 300.)
ETCO2 monitoring may be used to help wean a patient with a stable acid-base balance from mechanical ventilation. It also reduces the need for frequent arterial blood gas (ABG) measurements, especially when combined with pulse oximetry. Other uses for ETCO2 monitoring include assessing resuscitation efforts and identifying the return of spontaneous circulation. This technique also detects apnea because no CO2 is exhaled when breathing stops.
Advanced cardiac life support guidelines recommend the confirmation of ET tube position using clinical assessment and confirmation devices, such as an ETCO2 indicator or esophageal detection device. ETCO2 monitoring used during ET intubation can avert neurologic injury and even death by confirming correct tube placement and detecting accidental esophageal intubation because CO2 isn’t normally produced by the stomach. AHA
The Society of Critical Care Medicine recommends that every intensive care unit have capnography available. SCCM
According to the American Association for Respiratory Care (AARC) guidelines, capnography should be used for all patients on mechanical ventilation. Capnography is also indicated to:
evaluate exhaled CO2, especially ETCO2, which is the maximum partial pressure of CO2 exhaled just before the beginning of inspiration (tidal breath)
monitor the severity of pulmonary disease and to evaluate the response to therapy, especially therapy intended to improve the ratio of dead space to tidal volume, matching of ventilation-perfusion ratio, and therapy intended to increase coronary blood flow
determine that tracheal rather than esophageal intubation has taken place
monitor the integrity of the ventilatory circuit, including the artificial airway
evaluate the efficiency of mechanical ventilatory support by determining the difference between the partial pressure of arterial CO2 (PaCO2) and the partial PETCO2
measure the volume of CO2 elimination in order to monitor metabolic rate and alveolar ventilation
monitor adequacy of pulmonary and coronary blood flow
monitor inspired CO2 when CO2 gas is being therapeutically administered as a graphic evaluation of the ventilator-patient interface. AARC EB2
Using ETCO2 to predict survival in cardiopulmonary arrest
Researchers have found that patients with end-tidal carbon dioxide (ETCO2) levels of 10 mm Hg or less after 20 minutes of cardiopulmonary resuscitation aren’t likely to survive. The higher the ETCO2 levels, the greater the chances of survival. In fact, the sensitivity, specificity, positive predictive value, and negative predictive value of ETCO2 to predict outcomes following resuscitation procedures was 100%. Some researchers recommend that aggressive resuscitation efforts be continued in patients with ETCO2 values greater than 15 mm Hg.
Ongoing ETCO2 monitoring throughout intubation also can prove valuable because an ET tube may become dislodged during manipulation or patient movement or transport.
Equipment
Gloves • mainstream or sidestream CO2 monitor • CO2 sensor • airway adapter as recommended by the manufacturer (a neonatal adapter may have a much smaller dead space, making it appropriate for a smaller patient) • ETCO2 sensor
Preparation of equipment
If the monitor you’re using isn’t self-calibrating, calibrate it as the manufacturer directs. MFR
If you’re using a sidestream CO2 monitor, be sure to replace the water trap between patients, if directed. The trap allows humidity from exhaled gases to be condensed into an attached container. Newer sidestream models don’t require water traps.
Implementation
Confirm the patient’s identity using two patient identifiers according to facility policy. JCAHO
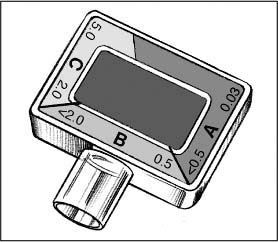
Analyzing CO2 levels
Depending on the end-tidal carbon dioxide (ETCO2) detector you use, the meaning of color changes within the detector dome may differ from the analysis for the Easy Cap detector described below.
The rim of the Easy Cap is divided into sections A, B, and C. Their control colors range from purple (in section A), signifying the absence of carbon dioxide (CO2), to beige, tan and, finally, yellow (in section C).The numbers in the sections range from 0.03 to 5 and indicate the percentage of exhaled CO2.
The color in the center rectangle reflects the patient’s CO2 level. It should fluctuate during ventilation from purple (matching section A) during inspiration to yellow (matching section C) at the end of expiration. This indicates that the ETCO2 levels are adequate — above 2%.
An end-expiratory color change from the C range to the B range may be the first sign of hemodynamic instability.
During cardiopulmonary resuscitation (CPR), an end-expiratory color change from the A or B range to the C range may mean the return of spontaneous ventilation.
During prolonged cardiac arrest, inadequate pulmonary perfusion leads to inadequate gas exchange. The patient exhales little or no CO2, so the color stays in the purple range even with proper intubation. Ineffective CPR also leads to inadequate pulmonary perfusion.
If the patient requires ET intubation, an ETCO2 detector or monitor is usually applied immediately after the tube is inserted. If he doesn’t require intubation or is already intubated and alert, explain the purpose and expected duration of monitoring. Tell an intubated patient that the monitor will painlessly measure the amount of CO2 he exhales. Inform a nonintubated patient that the monitor will track his CO2 concentration to make sure that his breathing is effective.
Wash your hands. CDC After turning on the monitor and calibrating it (if necessary), position the airway adapter and CO2 sensor as the manufacturer directs.MFR For an intubated patient, position the adapter directly on the ET tube. For a nonintubated patient, place the adapter at or near the patient’s airway. (An oxygen-delivery cannula may have a sample port through which gas can be aspirated for monitoring.)AARC
Turn on all alarms and adjust alarm settings as appropriate for your patient. Make sure that the alarm volume is loud enough to hear. AARC
Special considerations
Wear gloves when handling the airway adapter to prevent cross-contamination. CDC Make sure that the adapter is changed with every breathing circuit and ET tube change.
Place the adapter on the ET tube to avoid contaminating exhaled gases with fresh gas flow from the ventilator. If you’re using a heat and moisture exchanger, you may be able to position the airway adapter between the exchanger and breathing circuit.
If the patient’s ETCO2 values differ from the PaCO2 level, assess him for factors that can influence ETCO2 — especially when the differential between arterial and ETCO2 values (the arterial absolute difference of carbon dioxide [a-ADCO2]) is above normal. Such factors include decreasing CO2 production, increased CO2 removal caused by hyperventilation, and diminished pulmonary perfusion.
the PaCO2 level, measure expired ventilation at the same time. If expired ventilation and ETCO2 values are constant, the patient’s a-ADCO2 isn’t likely to have changed. Avoid estimating the PaCO2 level from the ETCO2 level if the expired ventilation has changed. Alert the physician if the patient’s a-ADCO2 level is above the normal range. He may have a mismatching or shunting problem. Monitor a-ADCO2 levels throughout therapy to determine the effectiveness of treatment and detect potential problems. If a-ADCO2 increases, the patient may have reduced pulmonary perfusion.
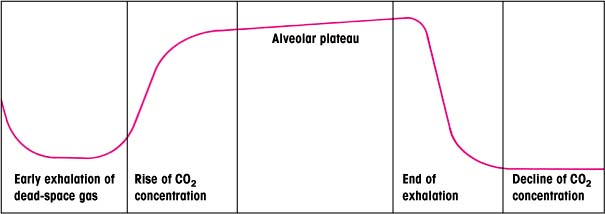
CO2 waveform
The carbon dioxide (CO2) waveform, or capnogram, produced in end-tidal carbon dioxide (ETCO2) monitoring reflects the course of CO2 elimination during exhalation. A normal capnogram (shown below) consists of several segments that reflect the various stages of exhalation and inhalation.
Normally, gas eliminated from the airway during early exhalation is dead-space gas that hasn’t undergone exchange at the alveolocapillary membrane. Measurements taken during this period contain no CO2.
As exhalation continues, CO2 concentration rises sharply and rapidly. The sensor now detects gas that has undergone exchange, producing measurable quantities of CO2.
The final stages of alveolar emptying occur during late exhalation. During the alveolar plateau phase, CO2 concentration rises more gradually because alveolar emptying is more constant.
The point at which the ETCO2 value is derived is the end of exhalation, when CO2 concentration peaks. Unless an alveolar plateau is present, this value doesn’t accurately estimate alveolar CO2. During inhalation, the CO2 concentration declines sharply to zero.
 |
The a-ADCO2 value, if correctly interpreted, provides useful information about the patient’s status. For example, an increased a-ADCO2 may mean that the patient has worsening dead space, especially if his tidal volume remains constant.
Remember that ETCO2 monitoring doesn’t replace ABG analysis because it doesn’t assess oxygenation or blood pH. Supplementing ETCO2 monitoring with pulse oximetry may provide more complete information. AARC
If the CO2 waveform is available, assess it for height, frequency, rhythm, baseline, and shape to help evaluate gas exchange. Make sure that you know how to recognize a normal waveform and can identify abnormal waveforms in the patient’s medical record. (See CO2 waveform.)
In a nonintubated patient, use ETCO2 values to establish trends. Be aware that in this patient, exhaled gas is more likely to mix with ambient air and exhaled CO2 may be diluted by fresh gas flow from the nasal cannula.
ETCO2 monitoring is usually discontinued when the patient has been weaned effectively from mechanical ventilation or when he’s no longer at risk for respiratory compromise. Carefully assess the patient’s tolerance to weaning.
Using a disposable ETCO2 detector
Before using a disposable end-tidal carbon dioxide (ETCO2) detector, check the instructions and ensure ideal working conditions for the device. Additional guidelines are provided here.
Avoiding high humidity, moisture, and heat
Watch for changes indicating that the ETCO2 detector’s efficiency is decreasing — for example, sluggish color changes from breath to breath. A detector may be used for about 2 hours; however, using it with a ventilator that delivers high-humidity ventilation may shorten its usefulness to no more than 15 minutes.
Don’t use the detector with a heated humidifier or nebulizer.
Keep the detector protected from secretions, which render the device useless. If secretions enter the dome, remove and discard the detector.
Use a heat and moisture exchanger to protect the detector. In some detectors, this filter fits between the endotracheal (ET) tube and the detector.
If you’re using a heat and moisture exchanger, remember that it will increase the patient’s breathing effort. Stay alert for increased resistance and breathing difficulties, and remove the exchanger, if necessary.
Taking additional precautions
Instilling epinephrine through the ET tube can damage the detector’s indicator (the color may stay yellow). If this happens, discard the device.
Take care when using an ETCO2 detector in a child who weighs less than 30 lb (13.6 kg). A small patient who rebreathes air from the dead air space (about 38 cc) will inhale too much of his own carbon dioxide.
Frequently spot-check the ETCO2 detector you’re using for effectiveness. If you must transport the patient to another area for testing or treatment, use another method to verify the tube’s placement.
Never reuse a disposable ETCO2 detector. It’s intended for one-time, one-patient use only.
Disposable ETCO2 detectors are available. When using a disposable ETCO2 detector, always check its color under fluorescent or natural light because the dome looks pink under incandescent light (light provided by ordinary lightbulbs). (See Using a disposable ETCO2 detector.)
Nursing diagnoses
Impaired gas exchange
Expected outcomes
The patient will:
maintain normal ABG values
have normal breath sounds.
Complications
Inaccurate measurements — such as from poor sampling technique, calibration drift, contamination of optics with moisture or secretions, or equipment malfunction — can lead to misdiagnosis and improper treatment.
The effects of manual resuscitation or ingestion of alcohol or carbonated beverages can alter the detector’s findings.
Color changes detected after fewer than six ventilations can be misleading.
Documentation
Document the initial ETCO2 value and all ventilator settings. Describe the waveform if one appears on the monitor. If the monitor has a printer, you may want to print out a sample waveform and include it in the patient’s medical record.
Document ETCO2 values at least as often as vital signs, whenever significant changes in waveform or patient status occur, and before and after weaning, respiratory, and other interventions. Periodically obtain samples for ABG analysis as the patient’s condition
dictates, and document the corresponding ETCO2 values.
dictates, and document the corresponding ETCO2 values.
Supportive references
Ahrens, T., et al. “End-Tidal Carbon Dioxide Measurements as a Prognostic Indicator of Outcome of Cardiac Arrest”, American Journal of Critical Care 10(6):391-98, November 2001.
Ahrens, T. “Technology Utilization in the Cardiac Surgical Patient: SvO2 and Capnography Monitoring”, Critical Care Nursing Quarterly 21(1):24-40, May 1998.
American Association for Respiratory Care. “AARC Clinical Practice Guideline: Capnography/Capnometry during Mechanical Ventilation”, Respiratory Care 48(5):1321-324, May 2003.EB1
American Heart Association. “2005 AHA Guidelines for Cardiopulmonary Resuscitation and Emergency Cardiovascular Care: International Consensus on Science”, Circulation 112(22 Suppl):IV-1-IV-211, November 2005.
Blonshine, S. “Expanding the Knowledge Base: New Applications of Capnography”, AARC Times 23(2):51-53, February 1999.EB1
Capovilla, J., et al. “Noninvasive Blood Gas Monitoring”, Critical Care Nursing Quarterly 23(2):79-86, August 2000.
Carroll, P. “Respiratory Monitoring: Evolutions: Capnography”, RN 62(5):68-71, 78, May 1999.
Esophageal airway insertion and removal
Esophageal airways, such as the esophageal gastric tube airway (EGTA) and the esophageal obturator airway (EOA), are used temporarily (for up to 2 hours) to maintain ventilation in the comatose patient during cardiac or respiratory arrest. These devices avoid tongue obstruction, prevent air from entering the stomach, and keep stomach contents from entering the trachea. They can be inserted only after a patent airway is established.
An esophageal-tracheal tube is an alternative to esophageal airways. This tube has two cuffed lu-mens — one is sealed at the distal end and has perforations at the level of the pharynx and the other lumen is open at the distal end. If the esophageal-tracheal tube is in the trachea, it functions as an ET tube after the small distal cuff is inflated. If the tube enters the esophagus, the larger cuff on the sealed lumen is inflated and the tube functions as an EOA. This device has the advantage of being able to provide ventilations, unlike the EOA, if the tube is inserted into the trachea. AARC
Although health care providers must have special training to insert an EGTA or EOA, insertion of these airways is much simpler than ET intubation. One reason is that these devices don’t require visualization of the trachea or hyperextension of the neck. This makes them useful for treating patients with suspected spinal cord injuries.
Esophageal airways shouldn’t be used unless the patient is unconscious and not breathing because conscious and semiconscious patients will reject this method. They’re also contraindicated if facial trauma prevents a snug mask fit or if the patient has an absent or weak gag reflex, has recently ingested toxic chemicals, has an esophageal disease, or has taken an overdose of opioids that can be reversed by naloxone (Narcan).
Equipment
Esophageal tube • face mask • #16 or #18 French nasogastric (NG) tube (for EGTA) • 35-ml syringe • intermittent gastric suction equipment • oral suction equipment • gloves and face shield • optional: handheld resuscitation bag, water-soluble lubricant
Types of esophageal airways
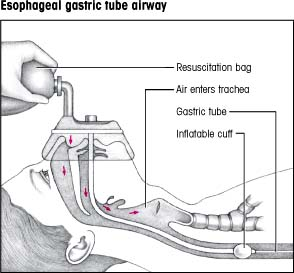
Gastric tube airway
A gastric tube airway consists of an inflatable mask and an esophageal tube, as shown. The transparent face mask has two ports: a lower one for insertion of an esophageal tube and an upper one for ventilation, which can be maintained with a handheld resuscitation bag. The inside of the mask is soft and pliable; it molds to the patient’s face and makes a tight seal, preventing air loss.
The proximal end of the esophageal tube has a one-way, nonrefluxing valve that blocks the esophagus. This valve prevents air from entering the stomach, thus reducing the risk of abdominal distention and aspiration. The distal end of the tube has an inflatable cuff that rests in the esophagus just below the tracheal bifurcation, preventing pressure on the noncartilaginous tracheal wall. During ventilation, air is directed into the upper port in the mask and, with the esophagus blocked, enters the trachea and lungs.
 |
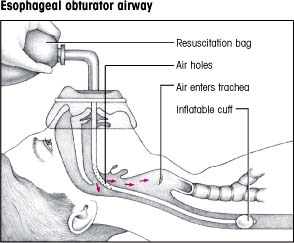
Obturator airway
An obturator airway consists of an adjustable, inflatable transparent face mask with a single port, attached by a snap lock to a blind esophageal tube, as shown at right. When properly inflated, the transparent mask prevents air from escaping through the nose and mouth.
The esophageal tube has holes at its proximal end, through which air or oxygen introduced into the port of the mask is transferred to the trachea. The tube’s distal end is closed and circled by an inflatable cuff. When the cuff is inflated, it occludes the esophagus, preventing air from entering the stomach and acting as a barrier against vomitus and involuntary aspiration.
 |
Preparation of equipment
Gather the equipment. (See Types of esophageal airways.)
Fill the face mask with air to check for leaks.
Inflate the esophageal tube’s cuff with 35 cc of air to check for leaks; then deflate the cuff.
Connect the esophageal tube to the face mask (the lower opening on an EGTA) and listen for the tube to click to determine proper placement.
Implementation
Lubricate the tube’s distal tip with a water-soluble lubricant.
Assess the patient’s condition to determine if he’s an appropriate candidate for an esophageal airway. AARC
If the patient’s condition permits, place him in the supine position with his neck in a neutral or semiflexed position. Hyperextension of the neck may cause
the tube to enter the trachea instead of the esophagus. Remove his dentures, if applicable. SCIENCE
Insert your thumb deeply into the patient’s mouth behind the base of his tongue. Place your index finger and middle fingers of the same hand under the patient’s chin and lift his jaw straight up.
With your other hand, grasp the esophageal tube just below the mask in the same way you would grasp a pencil. This promotes gentle maneuvering of the tube and reduces the risk of pharyngeal trauma.
Still elevating the patient’s jaw with one hand, insert the tip of the esophageal tube into the patient’s mouth. Gently guide the airway over the tongue into the pharynx and then into the esophagus, following the natural pharyngeal curve. No force is required for proper insertion; the tube should easily seat itself. If you encounter resistance, withdraw the tube slightly and readvance it. When the tube is fully advanced, the mask should fit snugly over the patient’s mouth and nose. When this is accomplished, the cuff will lie below the level of the carina. If the cuff is above the carina, it may, when inflated, compress the posterior membranous portion of the trachea and cause tracheal obstruction.
Because the tube may enter the trachea, deliver positive-pressure ventilation before inflating the cuff. Watch for the chest to rise to confirm that the tube is in the esophagus. AARC
When the tube is properly in place in the esophagus, draw 35 cc of air into the syringe, connect the syringe to the tube’s cuff-inflation valve, and inflate the cuff. Avoid overinflation because this can cause esophageal trauma. AARC
If you’ve inserted an EGTA, insert the NG tube through the lower port on the face mask and into the esophageal tube and advance it to the second marking, so it reaches 6″ (15.2 cm) beyond the distal end of the esophageal tube. Suction stomach contents using intermittent gastric suction to decompress the stomach. This is particularly necessary after mouth-to-mouth resuscitation, which introduces air into the stomach. Leave the tube in place during resuscitation.
For both airways, attach a handheld resuscitation bag or a mechanical ventilator to the face mask port (upper port) on the EGTA. Up to 100% of the fraction of inspired oxygen can be delivered this way. AARC
Monitor the patient to ensure adequate ventilation. Watch for chest movement, and suction the patient if mucus blocks the EOA tube perforations or in any way interrupts respiration. AARC
Removing an esophageal airway
Assess the patient’s condition to determine if airway removal is appropriate. The airway may be removed if respirations are spontaneous and number 16 to 20 breaths/minute. If 2 hours have elapsed since airway insertion and respirations aren’t spontaneous and at the normal rate, the patient must be switched to an artificial airway that can be used for long-term ventilation such as an ET tube. AARC
Detach the mask from the esophageal tube.
Place the patient on his left side, if possible, to avoid aspiration during the removal of the esophageal airway. If he’s unconscious and requires an ET tube, insert it or assist with its insertion and inflate the cuff of the ET tube before removing the esophageal tube. With the esophageal tube in place, the ET tube can be guided easily into the trachea, and stomach contents are less likely to be aspirated when the esophageal tube is removed. AARC SCIENCE
Deflate the cuff on the esophageal tube by removing air from the inflation valve with the syringe. Don’t try to remove the tube with the cuff inflated because it may perforate the esophagus.
Remove the EGTA or EOA with one swift, smooth motion, following the natural pharyngeal curve to avoid esophageal trauma.
Perform oropharyngeal suctioning to remove residual secretions.
Assist the physician as required in monitoring and maintaining adequate ventilation.
Special considerations
Store EGTAs and EOAs in the manufacturer’s package to preserve their natural curve. MFR
To ease insertion, direct the airway along the right side of the patient’s mouth because the esophagus is located to the right and behind the trachea. Or you may advance the tip upward toward the hard palate, and then invert the tip and glide it along the tongue surface and into the pharynx. This keeps the tube centered, avoids snagging on the sides of the throat, and eases insertion in the patient with clenched jaws.
Watch the unconscious patient as he regains consciousness because activation of the gag reflex can cause retching. Evaluate the conscious patient’s need for continued ventilatory support and for removal of
the esophageal airway. To help prevent complications, don’t leave the EOA in place for more than 2 hours. AARC
A mechanical ventilator attached to the ET tube or tracheostomy tube maintains more exact tidal volume than a mechanical ventilator attached to an esophageal airway.
Nursing diagnoses
Impaired spontaneous ventilation
Risk for trauma
Expected outcomes
The patient will:
maintain normal arterial blood gas values
maintain a respiratory rate within 5 breaths/minute of baseline
remain free from esophageal injuries and other injuries that may result from tongue obstruction.
Complications
EOAs may be inferior to ET intubation in providing adequate oxygenation and ventilation. They don’t prevent aspiration of foreign material from the mouth and pharynx into the trachea and bronchi.
Esophageal airways may cause esophageal injuries, including rupture, and in semiconscious patients may cause laryngospasm, vomiting, and aspiration.
Tracheal occlusion can occur if the esophageal airway is inserted in the trachea.
Documentation
Record the date and time of the procedure, type of airway inserted, patient’s vital signs and level of consciousness, removal of the airway, any alternative airway inserted after extubation, and any complications and interventions taken.
Supportive references
American Association for Respiratory Care. “AARC Clinical Practice Guideline: Management of Airway Emergencies”, Respiratory Care 40(7):749-60, July 1995.
Asselin, M.E., and Cullen, H.A. “What You Need to Know about the New ACLS Guidelines”, Nursing2001 31(4):48-50, April 2001.
Barnes, T.A., et al. “Cardiopulmonary Resuscitation and Emergency Cardiovascular Care: Airway Devices”, Annals of Emergency Medicine 37(4):S145-51, April 2001.
Blanda, M. “The Difficult Airway: Tools and Techniques for Acute Management”, Journal of Critical Illness 15(7):358-60, 369-73, July 2000.
Kern, K.B., et al. “New Guidelines for Cardiopulmonary Resuscitation and Emergency Cardiac Care: Changes in the Management of Cardiac Arrest”, JAMA 285(10):1267-269, March 2001.
Foreign body airway obstruction
Severe airway obstruction is an uncommon but preventable emergency that can result in death within minutes if not treated. Sudden airway obstruction may occur when a foreign body lodges in the throat or bronchus, when the tongue blocks the pharynx, when the patient experiences traumatic injury, or when the patient aspirates blood, mucus, or vomitus. An obstructed airway can also occur from bronchoconstriction or bronchospasm.
An obstructed airway causes anoxia, which in turn leads to brain damage and death in 4 to 6 minutes. The Heimlich maneuver uses an upper-abdominal thrust to create sufficient diaphragmatic pressure in the static lung below the foreign body to expel the obstruction. The Heimlich maneuver is used in conscious adult patients and in children older than age 1. However, the abdominal thrust is contraindicated in pregnant women, markedly obese patients, and infants younger than age 1. For such patients, a chest thrust, which forces air out of the lungs to create an artificial cough, should be used.
These maneuvers are contraindicated in a patient with mild airway obstruction, when the patient can maintain adequate ventilation to dislodge the foreign
body by effective coughing, and in an infant. However, if the patient has poor air exchange and increased breathing difficulty, a silent cough, cyanosis, or the inability to speak or breathe, immediate action to dislodge the obstruction should be taken. (See also “Cardiopulmonary resuscitation”, page 217.)
body by effective coughing, and in an infant. However, if the patient has poor air exchange and increased breathing difficulty, a silent cough, cyanosis, or the inability to speak or breathe, immediate action to dislodge the obstruction should be taken. (See also “Cardiopulmonary resuscitation”, page 217.)
Implementation
Conscious adult with mild airway obstruction AHA
Ask the person who’s coughing or using the universal distress sign (clutching the neck between the thumb and fingers) if she’s choking. If she indicates that she is but can speak and cough forcefully, she has good air exchange and should be encouraged to continue to cough. Remain with the person and monitor her.
Conscious adult with severe airway obstruction AHA
Ask the person, “Are you choking?” If the patient nods yes and has signs of severe airway obstruction, tell her that you’ll help dislodge the foreign body.
Standing behind the patient, wrap your arms around her waist. Make a fist with one hand, and place the thumb side against her abdomen in the midline, slightly above the umbilicus and well below the xiphoid process. Then grasp your fist with the other hand (as shown below).
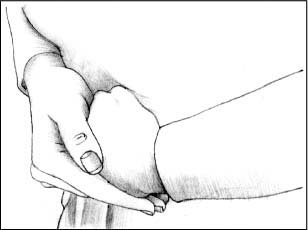 |
Squeeze the patient’s abdomen with quick inward and upward thrusts. Each thrust should be a separate and distinct movement, forceful enough to create an artificial cough that will dislodge an obstruction (as shown below).
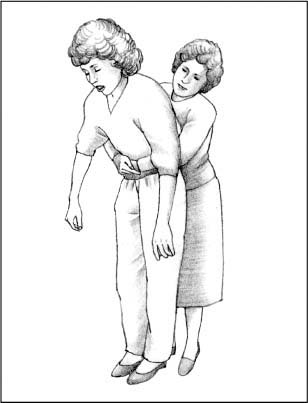 |
Make sure that you have a firm grasp on the patient because she may lose consciousness and need to be lowered to the floor. Support her head and neck to prevent injury, and continue as described below.
Repeat the thrusts until the foreign body is expelled or if the patient becomes unconscious. At this point, contact the emergency medical service (EMS) and follow the interventions for relieving an obstructed airway in an unconscious person.
Unresponsive adult AHA
Lower the patient to the ground and immediately contact EMS.
Begin CPR.
Each time the airway is opened using a head tilt-chin lift, look for an object in the patient’s mouth.
Remove the object if present.
Attempt to ventilate the patient and follow with 30 chest compressions.
Obese or pregnant adult AHA
If the patient is conscious, stand behind her and place your arms under her armpits and around her chest.
Place the thumb side of your clenched fist against the middle of the sternum, avoiding the margins of the ribs and the xiphoid process. Grasp your fist with your other hand and perform a chest thrust with enough force to expel the foreign body. Continue until the patient expels the obstruction or loses consciousness (as shown below).
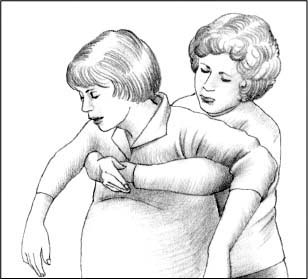 |
If the patient loses consciousness, carefully lower her to the floor.
Then, follow the same steps you would use for the unresponsive adult (as shown below).
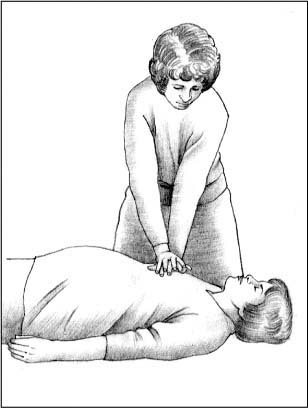 |
Conscious child with severe airway obstruction AHA
If the child is conscious and can stand but can’t cough or make a sound, perform abdominal thrusts using the same technique as you would with an adult.
Unresponsive child AHA
Use the same techniques you would for the unresponsive adult.
Conscious infant AHA
Place the conscious infant face down so that he’s straddling your arm with his head lower than his trunk. Rest your forearm on your thigh and deliver five forceful back blows with the heel of your hand between the infant’s shoulder blades (as shown at top of next page).
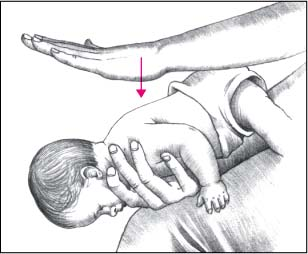 |
If you haven’t removed the obstruction, place your free hand on the infant’s back. Supporting his neck, jaw, and chest with your other hand, turn him over onto your thigh. Keep his head lower than his trunk.
Position your fingers. To do so, imagine a line between the infant’s nipples and place the index finger of your free hand on his sternum, just below this imaginary line. Then place your middle and ring fingers next to your index finger and lift the index finger off his chest. Deliver five quick chest thrusts as you would for chest compression at a rate of approximately one per second.
If the airway obstruction persists, repeat the five back blows and five chest thrusts until the obstruction is relieved or the infant becomes unresponsive.
Unresponsive infant AHA
Use the same techniques you would for the unresponsive adult.
Special considerations
If the patient vomits during abdominal thrusts, quickly wipe out his mouth with your fingers and resume the maneuver as necessary.
Even if your efforts to clear the airway don’t seem to be effective, keep trying. As oxygen deprivation increases, smooth and skeletal muscles relax, making your maneuvers more likely to succeed.
Nursing diagnoses
Ineffective airway clearance
Expected outcomes
The patient will:
maintain a patent airway
cough effectively
have no adventitious breath sounds
maintain normal arterial blood gas levels.
Complications
Nausea, regurgitation, and achiness may develop after the patient regains consciousness and can breathe independently.
Even when performed correctly, abdominal thrusts can damage internal organs of the abdomen or chest by laceration or rupture.
Incorrect placement of the rescuer’s hands, or osteoporosis or metastatic lesions that increase the risk of fracture, also may cause injury.
The patient who has received abdominal thrusts should be evaluated by a physician to detect possible complications.
Documentation
Record the date and time of the procedure, the patient’s actions before the obstruction, signs and symptoms of airway obstruction, approximate length of time it took to clear the airway, and the type and size of the object removed. Note his vital signs after the procedure, any complications that occurred and interventions taken, and his tolerance of the procedure. Note the time, name of the physician notified, any orders given, and your interventions.
Supportive references
American Heart Association. “2005 Guidelines for Cardiopulmonary Resuscitation and Emergency Cardiovascular Care: International Consensus on Science”, Circulation (22 Suppl):IV-1-IV-211, November 2005. EB
American Heart Association. Currents in Emergency Cardiovascular Care 16(4), Winter 2005-2006.
Humidifiers
Humidifiers, which deliver a maximum amount of water vapor without producing particulate water, are used to prevent drying and irritation of the upper airway in such conditions as croup, in which the upper airway is inflamed, or when secretions are particularly thick and tenacious. Some humidifiers heat the water vapor, which raises the moisture-carrying capacity of gas and thus increases the amount of humidity delivered to the patient. Room humidifiers add humidity to an entire room, while humidifiers added to ventilation lines humidify only the air being delivered to the patient. (See Comparing humidifiers.)
Equipment
Humidifier • sterile distilled water, or tap water if the unit has a demineralizing capability • container for wastewater • bleach • white vinegar • flowmeter • vaporizer • disinfectant
Preparation of equipment
Bedside humidifier
Open the reservoir and add sterile distilled water to the fill line, and then close the reservoir.
Keep all room windows and doors closed tightly to maintain adequate humidification.
Plug the unit into the electrical outlet.
Heated vaporizer
Remove the top and fill the reservoir to the fill line with tap water. Replace the top securely.
Place the vaporizer about 4′ (1 m) from the patient, directing the steam toward but not directly onto the patient. Place the unit in a spot where it can’t be overturned to avoid hot water burns; this is especially important if children will be in the room.
Plug the unit into an electrical outlet. Steam should soon rise from the unit into the air.
Close all windows and doors to maintain adequate humidification.
Diffusion head humidifier
Unscrew the humidifier reservoir, and add sterile distilled water to the appropriate level. (If using a disposable unit, screw the cap with the extension onto the top of the unit.)
Screw the reservoir back onto the humidifier and attach the flowmeter to the oxygen source.
Screw the humidifier onto the flowmeter until the seal is tight. Then set the flowmeter at a rate of 2 L/ minute and check for gentle bubbling.
Stay updated, free articles. Join our Telegram channel

Full access? Get Clinical Tree


Get Clinical Tree app for offline access
