Peritoneal Lavage, Assisting
Used mainly as a diagnostic procedure in a patient with blunt abdominal trauma, peritoneal lavage helps detect bleeding in the peritoneal cavity. When possible, abdominal ultrasound should be performed before peritoneal lavage to assess fluid in the abdominal cavity. Peritoneal lavage may also be used to warm the abdominal cavity in a patient with hypothermia, to obtain a cytology specimen in a patient with cancer, and for irrigation in a patient with peritonitis or an intraabdominal abscess.
The procedure may progress through several steps. Initially, the doctor inserts a catheter through the abdominal wall into the peritoneal cavity and aspirates the peritoneal fluid with a syringe. If he can’t see blood in the aspirated fluid, he then infuses a balanced saline solution and siphons the fluid from the cavity. He inspects the siphoned fluid for blood and also sends fluid samples to the laboratory for microscopic examination.
The medical team maintains strict sterile technique throughout this procedure to avoid introducing microorganisms into the peritoneum and causing peritonitis. (See Tapping the peritoneal cavity, page 580.)
Peritoneal lavage is contraindicated in a patient who has had multiple abdominal operations (adhesions), who has an abdominal wall hematoma, who’s unstable and needs immediate surgery, who has coagulopathies, or who can’t be catheterized before the procedure. The procedure requires great caution and a different technique if the patient is pregnant.
Equipment
Indwelling urinary catheter insertion equipment ▪ nasogastric (NG) tube insertion equipment ▪ electric hair clippers ▪ IV pole ▪ macrodrip IV tubing ▪ IV solutions (1 L of warmed, balanced saline solution, usually lactated Ringer’s solution or normal saline solution) ▪ peritoneal dialysis tray ▪ two pairs of sterile gloves ▪ gown ▪ goggles ▪ antiseptic solution ▪ 3-mL syringe with 25G 1″ needle ▪ 1% lidocaine with epinephrine, if needed ▪ 8″ (20.3 cm) #14 intracatheter extension tubing and a small sterile hemostat (to clamp tubing) ▪ 30-mL syringe ▪ one 20G 1½″ needle ▪ sterile towels ▪ three containers for specimen collection, including one sterile tube for a culture and sensitivity specimen ▪ labels ▪ 4″ × 4″ sterile gauze pads ▪ alcohol pads ▪ 1″ hypoallergenic tape ▪ 2–0 and 3–0 sutures.
Preparation of Equipment
If using a commercially prepared peritoneal dialysis kit (containing a #15 peritoneal dialysis catheter, trocar, and extension tubing with roller clamp), make sure the macrodrip IV tubing doesn’t have a reverse flow (or back-check) valve that prevents infused fluid from draining out of the peritoneal cavity. Label all medications, medication containers, and other solutions on and off the sterile field.1
Implementation
If able, conduct a preprocedure verification process to make sure that all relevant documentation, related information, and equipment are available and correctly identified to the patient’s identifiers.2
Verify that the laboratory and imaging studies have been completed as ordered and that the results are in the patient’s medical record. Notify the doctor of any abnormal results.
Make sure the patient has a signed informed consent form in his medical record, unless the procedure is being performed in an emergency.3,4
Confirm the patient’s identity using at least two patient identifiers according to your facility’s policy.8
Provide privacy and reinforce the doctor’s explanation of the procedure. Answer all questions to ease the patient’s anxiety and ensure his cooperation.
Put on a gown, sterile gloves, and goggles.
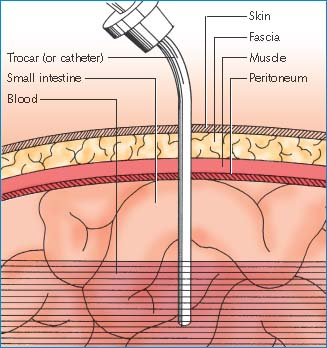
Tapping the Peritoneal Cavity
After preparing the patient’s skin with an antiseptic solution and administering a local anesthetic to numb the area near the patient’s navel, the surgeon will make a small incision (about ¾″ [2 cm]) through the skin and subcutaneous tissues of the abdominal wall. He’ll retract the tissue, ligate several blood vessels, and use 4″ × 4″ sterile gauze pads to absorb and keep incisional blood from entering the wound and producing a false-positive test result. Next, he’ll direct the trocar through the incision into the pelvic midline until the instrument enters the peritoneum. Then he’ll advance the peritoneal catheter (via the trocar) 6″ to 8″ (15 to 20 cm) into the pelvis. Using a syringe attached to the catheter, he’ll aspirate fluid from the peritoneal cavity and look for blood or other abnormal findings.
 |
Advise the patient to expect a sensation of abdominal fullness. Also inform him that he may experience a chill if the lavage solution isn’t warmed or doesn’t reach his body temperature.
Catheterize the patient with the indwelling urinary catheter. This step decreases the risk of the doctor accidentally perforating the bladder during the procedure.
Insert an NG tube. Attach this tube to the gastric suction machine (set for low intermittent suction) to drain the patient’s stomach contents. Make sure placement is verified with an X-ray. Decompressing the stomach prevents vomiting and subsequent aspiration and minimizes the possibility of bowel perforation during trocar or catheter insertion.
Clip the hair, as ordered, from the area between the patient’s umbilicus and pubis.
Stay updated, free articles. Join our Telegram channel

Full access? Get Clinical Tree


Get Clinical Tree app for offline access
