Technique |
Findings |
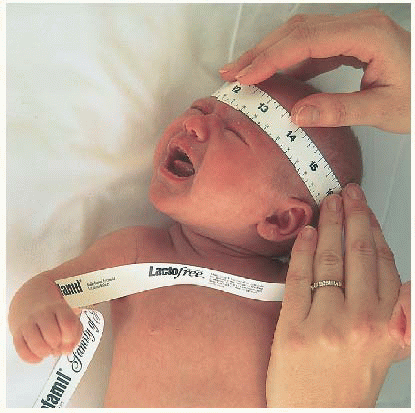
STANDING HEIGHT, HEAD CIRCUMFERENCE, AND CHEST CIRCUMFERENCE |
Use a tape measure to obtain accurate head circumference. Measure the widest part of head.
Measure the chest at the level of the nipples.
Record height and weight at each visit. Plot on growth chart.
Calculate body mass index (BMI) and plot on appropriate chart.
|
3. A variety of clinical growth charts on which to record length, head, circumference, BMI, and weight can be downloaded from www.cdc.gov/growthcharts/. Trends in growth are as important as the basic measurements.
4. BMI is calculated by following the formula on page 743, or for online pediatric BMI calculator, http://apps.mccd.cdc.gov/dnpabmi. |
GENERAL APPEARANCE |
Begin your observations with the first contact with the patient, taking into account that there are at least two people to observe (child and parent).
The patient’s interaction with the caretaker, whether it be the mother, father, a babysitter, an older sibling, or a friend of the family, is vital in the assessment of the child. As you observe for race, sex, general physical development, nutritional state, mental alertness, evidence of pain, restlessness, body position, clothes, apparent age, hygiene, and grooming, remember that many of these things are a measure of the parent’s caretaking.
|
If the child is easily distracted or sleepy, it may be naptime.
Careful observation of the general state of the child will provide many clues about the child’s relationship with the family and its response to the child.
|
SKIN AND LYMPHATICS |
Examine as you move through each body region (include hair and skin). |
Inspection |
Inspection of the skin is the same as for the adult. |
Observe for skin color, pigmentation, lesions, jaundice, cyanosis, scars, superficial vascularity, moisture, edema, color of mucous membranes, hair distribution.
Describe any variation in color, particularly in children with increased pigmentation. No pigment, or vitiligo, in darker children can be noted.
Birthmarks of any type are recorded. (May change as child grows older.)
Bruises or unusual marks, wounds or insect bites, scratch marks, or scars may have particular significance.
Draw a picture of anything unusual such as a scar and measure the dimensions of the lesion when recording the findings.
To ascertain suspected jaundice, take the child to the window to get a true picture of the color of the skin. (A room with yellow walls and artificial lighting may create a wrong impression when jaundice is suspected.)
The skin of neonates will still be covered with vernix caseosa, the oily material that covers the fetus’s body while in utero.
Postmature infants may have scaliness that persists for several weeks after birth, particularly around the feet. The color of the skin may change as the child gets a little older.
Note striae.
Dark-skinned children may have Mongolian spots at the base of spine or elsewhere.
|
In young infants, the skin is soft, smooth, and velvety in texture.
Pigmentations vary in children, depending on race, and will change as the child gets older.
A suntan, freckles, and small, light-brown patches or café-au-lait spots may occur.
Bruises are particularly important because of the possibility of child abuse.
If you have difficulty describing something, use ordinary words rather than inaccurate technical terms.
Carotenemia, which causes the nose and palms to have a yellowish tinge, may lead the parents to suspect jaundice; however, carotenemia is caused by eating a large amount of yellow vegetables (sweet potatoes, squash, carrots). In carotenemia, the sclerae are clear; this is not the case in jaundice.
Swollen sebaceous glands over the nose and chin are commonly seen immediately after birth and are called milia.
The blotchy, pink patches over the eyelid, bridge of the nose, and the back of the neck may persist until the child is almost age 2.
May indicate rapid weight gain.
Important to distinguish from child abuse.
|
Palpation |
Use the tips of your fingers to palpate—fingertips are more sensitive.
Check the tension of the skin by pinching up a fold of skin—normal skin quickly falls back, but dehydrated skin remains in pinched position.
Feel the skin for texture, moisture, temperature, turgor, elasticity, masses, tenderness.
|
3. Skin that is rough and dry in texture may actually have a discrete rash that can be felt but not seen. |
Lymph |
Observe and palpate for lymph node enlargement in lymph chain areas.
Neck.
Axilla.
Inguinal.
Epitrochlear.
Note tenderness, size, and consistency.
|
May be large or readily palpable, but should be nontender, mobile, and slightly spongy.
|
Nails |
Observe for color, shape, irregularities in surface, and general nail care; cleanliness, evidence of biting.
Palpate the skin around the fingernails for firmness. Palpate any part that appears inflamed.
|
Nail beds should be pink, nails convex.
General care of the child is frequently reflected in good care of nails.
|
Hair |
Observe for color and distribution.
Note according to the age of the child and race.
Be aware that tufts of hair over the spine or sacral area may mark an underlying abnormality.
Note changes in pigmentation.
Palpate the hair for texture and thickness.
Examine to see if there are patches on the head where hair is missing.
Separate thick hair on the head to get a good view of the scalp. Check for dandruff or scaliness in older children.
Check scalp for signs of lice infestation.
Inspect in the axillae and over the pubis and the extremities for hair and its quantity, to gauge the development and level of puberty.
|
Neonate: Normally varies from no hair to a thick bush. Infant: lanugo, a soft, downy covering commonly seen over the shoulders, back, arms, face, and sacral area, especially in dark-skinned children; lanugo is present for the first 1-2 months, after which it disappears.
Remember, children may experiment with hair dye or rinse.
Texture may be thick or thin, coarse or fine, straight or curly.
May denote underlying skin infection; however, some children pull their hair out; sometimes the hair is braided so tightly that it falls out. Infants who sleep consistently on their backs may have thinning or absent hair in the occiput.
Look carefully for broken hairs, for scaliness on the scalp, or cradle cap in infants.
Nits (louse eggs) appear on the hair as little white dots. Lice may be seen on the scalp; they move quickly and may jump.
The child does not need to be totally undressed; a prepubertal child will usually be embarrassed if all clothes are removed.
|
HEAD AND NECK |
Unless specifically requested, examine the eyes and ears last, especially in the younger child.
Also, examine the throat toward the end of the examination, unless the child exhibits concern about the “throat stick.” It is then best to examine the throat right away to “get it over with.” If a child cries you may be able to avoid using a tongue blade.
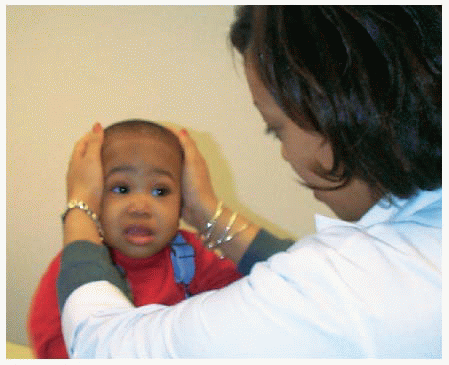
To avoid frightening the child when palpating the head, make a game out of it—ask, “Where is your nose?” “Where are your eyes?”
|
|
Inspection |
Observe the face and skull for asymmetry, deformity, and abnormal or limited movements.
Closely observe facial expressions and blinking, if the child is not crying. This may be one of your few moments to see the child when he or she is not crying. If you are examining a crying infant, watch particularly for asymmetry of the face.
Observe the movement of the head on the neck as the infant looks around. When turning an infant over, observe the head for control, position, and movement.
Because an infant’s neck is typically short and there are usually several folds of skin under the chin, it is necessary to lift the chin a little to observe the skin completely— to see that it is clear and free from perspiration rash or irritation.
|
An infant’s head may be asymmetrical because of pressure during pregnancy and delivery. The rounded head of an infant born by breech delivery contrasts with the long, pointed head of an infant who is a firstborn and whose head was molded during a prolonged labor.
In an infant born by forceps delivery, there may be signs of weakness of the facial nerve caused by pressure of the forceps over the front of the ear where the facial nerve emerges. When the infant cries, the involved side will show weakness and downturning of the mouth.
There should be very little head lag after age 3 months.
In the back, the neck should be free of webbing or extra folds of skin extending from just beneath the ear toward the shoulder.
|
Palpation |
Palpate the skull for the suture lines. Feel the face for masses, noting size, consistency, surface, temperature, and tenderness.
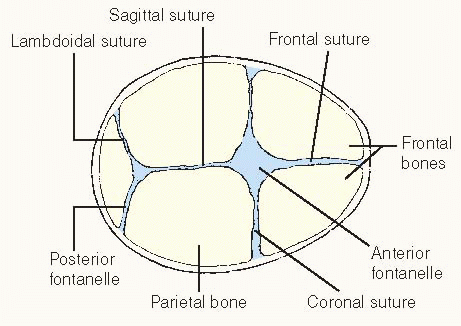
Palpate the anterior and posterior fontanelles.
Palpate along the lambdoidal suture at the back of the head between the parietal bones and the occipital bone.
Palpate the neck for swollen lymph nodes, noting tenderness, mobility, location, and consistency.

Note that there are other nodes, which are normally not palpable.
Feel the pulses in the neck for location, strength, and equality.
Check the thyroid for enlargement, position, texture, and tenderness.
Locate the trachea in the suprasternal notch for position in the center of the neck.
Palpate the sternocleidomastoids, making sure they are equal in size.
|
1. The suture lines of the skull may be felt to override as a result of the pressure applied when contractions occurred during labor. This is usually most marked between the frontal and the parietal bone, where the coronal suture is located.
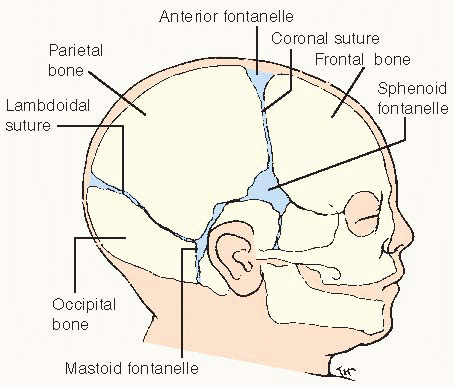
2. The fontanelles are soft and flat when the child is quiet. Tense or bulging fontanelles may indicate hydrocephalus. Depressed fontanelles are often a sign of dehydration. The posterior fontanelle usually closes by 1-2 months; anterior fontanelle by 18 months.
4. Palpation of the lymph nodes may reveal slightly enlarged nodes in the anterior cervical chain secondary to sore throat.

5. These include the preauricular and postauricular, the posterior cervical (behind the sternomastoid), the submental and submandibular (under the jaw), the supraclavicular, and the occipital nodes (along the prominence of the occiput). |
Percussion |
Percussion of the face may elicit tenderness over the sinuses.
Percuss over the head and neck directly with the fingertips, usually the middle finger of the right hand.
Percuss over the forehead for tenderness in the sinuses and across the zygoma, or cheekbone.
|
Tenderness may be caused by a tooth cavity or by a sinus infection.
Gentle tapping over the skull elicits a typical sound when the sutures are open and elicits a different sound when the sutures are closed.
Determines underlying tenderness in the frontal or maxillary sinus.
|
Auscultation |
Auscultate the skull and carotid arteries in the neck. |
To determine bruits. |
EYES AND VISION |
Inspection |
Similar to adult examination; see pages 52-55. |
Pay particular attention to the lacrimal duct and excessive tearing.
Note the distance between the eyes and the distribution of the eyebrows.
Test the eyes for light perception.
Do cover-uncover test.
Beginning at about age 3, a visual acuity screen using an age-appropriate chart should be attempted at every well-child checkup.
|
Discharge from the eyes along the lower lid or from the lacrimal duct can occur as a result of infection or reaction to silver nitrate administered to the neonate.
Hypertelorism denotes a wider than normal area between the eyes. Excessively long and full eyebrows that meet in the midline and extra-long eyelashes may signify a developmental abnormality.
It is difficult to prevent children from blinking their eyes or closing them when testing light response.
To discover strabismus.
|
Palpation |
If the child is old enough, have him or her squeeze the eyes tightly (not possible in younger children) while you try to open them. |
Weakness of the muscles around the eyes is difficult to demonstrate in the young child. Muscle strength or weakness can be evaluated when the child cries. |
Funduscopic examination |
Check to see that the child’s eyes move in conjugate fashion. Ask the mother if she has noticed signs of squinting, especially when the child is tired.
This is a difficult examination to conduct because children tend to watch the light and stare directly at you, which constricts their pupils. If the child cannot cooperate, it may be necessary to dilate the pupil to see the fundus and this is only infrequently necessary.
Start your examination at about 1 foot (0.3 m) from the patient. Look for the red reflex, which should be readily observable.
Look for opacities and then slowly approach the patient, turning the ophthalmoscope dial to the smaller plus (+) numbers. Start originally at +8 to +10.
To help guide your gaze, put your hand on top of the child’s head or at the side, with your thumb at the corner of the eye at the outer edge. If you lose the fundus, you can return to your thumb and get your bearings by directing your gaze medial to the tip of your thumbnail.
|
Loss of vision can occur if the eyes are not working together properly. Squinting can indicate vision problems.
A picture can be pinned to the wall opposite the child, who is then instructed to look at the picture during the examination. If the child is examined while lying down, a picture can be placed on the ceiling.
The corneal light reflex and red reflex should be symmetrical.
The red reflex is diminished if there is something obstructing your view. A cataract or opacity in the retina can cause this, as would a tumor filling the posterior chamber. If there is any paleness in the red reflex or difficulty in identifying it, a consultation should be sought immediately.

|
EARS AND HEARING |
Equipment |
• Otoscope with insufflator (pneumatic bulb and tubing) |
• Varying sizes of ear speculum |
• Fresh batteries to ensure a bright light |
Inspection |
When examining the external ear, the auricle, or the pinna, be sure to note the position of the ear.
If you cannot get the child to cooperate by offering an explanation or by playing a game, the child will need to be restrained. Many children will enjoy watching the light on their legs or seeing the red glow of their fingers with the light shining through or blowing the light out. If restraint is needed:
The child can be seated on the parent’s knee, facing the parent, with arms and legs wrapped around the parent. The parent can then use one hand to hold the child’s head firmly against the parent’s chest and the other hand to hold the child’s back.
An older child may be held in a supine position, with the parent controlling the head by holding the child’s arms above his head.
|
The top of the ear should cross an imaginary line drawn between the edge of the eye and the back of the occiput. If the ear is positioned more obliquely or is low-set, some underlying abnormality, particularly of the genitourinary system, may be present.
If the child is in a supine position, be sure to remove the child’s shoes because some children will kick when frightened.
This allows a good secure hold and provides the child with the security of a “hug.”
|
Inspection with otoscope |
Attach the insufflator, a small bulb and tube device, to the otoscope. Hold the otoscope gently with the handle between the thumb and forefinger. This will enable you to control the head of the otoscope while keeping your hand steady on the child’s head.
With your free hand, pull the pinna back and slightly upward to straighten the canal. Examine the canal.
Use the insufflator to inspect the eardrum and test for mobility. Do not use an insufflator if there is any suspicion of a perforated eardrum.
|
Small children will jerk about, so be careful not to push the speculum into the eardrum. The insufflator allows assessment of mobility of the tympanic membrane.
Cerumen or wax may interfere with your view of the eardrum. You may need to remove the wax with an ear curette or hydrogen peroxide instillation.
The normal eardrum moves slightly when air is introduced into the ear canal.
|
Palpation |
Palpate behind the ear over the mastoid process. |
Tenderness behind the ear may denote infection. Sometimes a lymph node can be felt in this area. |
Special testing |
Most children will be able to respond to a test of gross hearing.
More specific tests using an electric screening device are used before school age.
|
A small bell, such as that found in the Denver kit, can be used to determine hearing ability by noting if the child stops moving when the bell is rung and turns his or her head toward the sound.
|
NOSE AND SINUSES |
Equipment |
|
|
Inspection |
Observe for general deformity.
With a nasoscope, examine the nasal septum, mucous membranes and turbinates, and observe for discharge and nasal obstruction (see “Adult Physical Examination,” page 57).
Check for the presence of a foreign body. Always remember that a foul odor may indicate a foreign body in the nose, ear, or any other body orifice including the anus or the vagina.
Observe for nasal flaring.
|
2. Dry mucous membranes may bleed and cause clots of blood to form in the nares. Scratches may also occur if the child picks at his or her nose or scratches when itching occurs.
3. A foreign body in the nose will cause a foul odor, purulent discharge, and possibly cause bleeding.
4. Indicates respiratory distress. |
Palpation |
Palpate the sinuses, remembering the order of development. |
Sinuses develop in a set order; the ethmoid and maxillary sinuses are present at birth. The frontal sinuses begin to develop at about 7 years and are fully formed by adolescence. The sphenoid sinuses develop after puberty. |
MOUTH AND THROAT |
Equipment |
|
|
Inspection |
Note: The child may gag when the tongue blade is placed on the tongue. To avoid this unpleasant occurrence, encourage the child to stick out tongue, breathe deeply, and say “ah.” This may allow for easy visualization of the palate and uvula without need for the “stick.” |
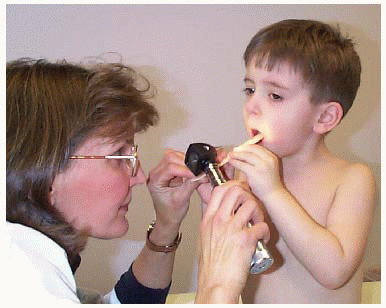 A child may also be allowed to place the tongue blade directly on own tongue while you guide with your hand. A child may also be allowed to place the tongue blade directly on own tongue while you guide with your hand.
|
Observe the lips, noting the color. (Remember that cyanosis is difficult to detect in a black child.)
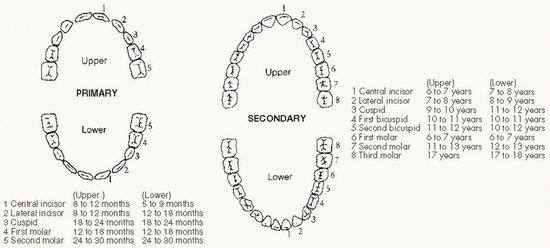
Count the teeth (see page 1397) and note any extra or missing teeth and any evidence of caries, staining, tartar, and malocclusion.
Check the gums for swelling and signs of easy bleeding. Also note mouth odor.
Check the tongue for movement, color, and taste buds on the surface. Check to see that the frenulum under the tongue is the proper length.
As the gag reflex is elicited, note how the palate moves upward and the uvula springs into view.
Examine the roof of the mouth.
Inspect the height of the arch of the palate.
Note the tonsils on each side of the uvula and immediately posterior to it for position, surface, size, equality, and color.
As the child cries, note the odor of the breath and any hoarseness of the voice; note difficulty on inspiration, as in croup, or wheezing on expiration.
|
1. Infants: There may be a protuberance on the upper lip, the so-called “sucking blister.”
Children: May have dry lips and redness around the lips caused by allergy.
4. If the frenulum is too short, the child may be tongue-tied (meaning that he or she cannot advance the tip of the tongue beyond the lips), which may interfere with sucking or speech.
5. It should be midline and single, although occasionally it will be divided or bifurcated.
6. Whitish lesions, called Epstein’s pearls, may be noted on the roof of the mouth at the junction of the hard and soft palate and persist through infancy.
7. With experience, an unusually high arch is easily recognizable.
8. Any coating with pus or ulcers or a pocket or cryptic appearance should be recorded.
9. These signs may indicate throat and chest disturbances. |
Palpation |
Palpate the lips and cheeks manually using a finger cot or glove.
Note evidence of swelling.
Palpate for submucous cleft.
|
1. By comparing one side with the other, differences caused by abnormality can be detected.
3. Submucous cleft may indicate a genetic disposition toward cleft palate. |
BREAST |
Realize that a child may be resistant to examination because of not wanting to remove clothes.
The following approaches may help overcome this problem:
Distract the child by having him or her listen to a few heartbeats.
Have the parent (while the child is sitting on parent’s knee) remove the underclothing while you stand by.
For an older child entering puberty, provide an examination sheet or gown.
|
Resistance may be due to modesty or fear of being exposed.
|
Inspection |
Check to see if there are any small extra nipples present.
In the neonate, the nipples appear a little darker than normal and breast tissue underneath may form a small knot with occasional leakage of fluid.
In the child, a lump may be found under or near one or both nipples in either males or females, causing parents to worry about cancer.
Occasionally, the breasts begin to develop earlier than normal, at about age 5 or 6 years.
|
These would appear along a line extending from the anterior axillary line through the normal nipple down toward the symphysis pubis.
This leakage is a secondary effect of the hormone level in the mother; instruct the mother not to try to express the fluid because of the danger of infection.
Such lumps are almost always secondary to hormone stimulation and occur toward puberty or during the neonatal period.
This may indicate the need for referral to an endocrinologist.
|
THORAX |
Inspection |
Observe the entire thorax as the child breathes; note symmetry and equal expansion of both sides as the lungs inflate.
Confirm the respiratory rate as you observe the child with shirt off.
Observe for substernal, suprasternal, and intercostal retractions.
|
1. Diaphragm excursion is more marked than intercostal expansion in infants (especially an infant lying on the parent’s knee) and young children. Thus, the abdomen goes up and down more than the chest expands.
3. Indicates respiratory distress. |
Percussion |
Percussion of the child’s chest is difficult. Because the underlying structures are crowded, not too much is elicited. The heart edge is difficult to outline. |
Light percussion is necessary; a hyperresonant note may be elicited over air, particularly of a stomach bubble that projects up into the left side of the chest. |
Palpation |
Use warmed hands as you palpate the shape and angle of the sternum. Note if there is depression of the sternum.
Palpate the costochondral junctions for tenderness and enlargement.
As you palpate, vibration may be felt through your hands as the child cries.
Vocal fremitus is difficult to elicit in the smaller child since it is difficult to have him or her make repetitive sounds on command.
|
The shape of the sternum may vary, although a large depression of the sternum (funnel sternum) may cause subsequent trouble because of pressure on underlying structures.
May suggest an underlying inflammatory response.
Normal inspiration and expiration do not give a sensation under the fingers, except for the expansion of the chest.
In the older child, it is worth trying to obtain transmission of sound through the lung tissue (see page 63).
|
Auscultation |
Try to examine the child before crying begins.
Warm the stethoscope before using by rubbing it between your hands.
Be aware that breathing is louder in younger children with slightly increased length of inspiration, almost to the point of bronchovesicular breathing in the adult.
Crackles (discontinuous; interrupted, explosive sounds) may be heard more easily in children.
Wheezes.
|
Note, however, that crying increases lung expansion.
A cold stethoscope will startle the child.
Bronchial breathing with equal inspiration and expiration is very loud and easy to hear in children with respiratory tract infections.
Added coarse-quality sounds in the chest are commonly associated with mucus in the trachea or in the back of the nose and usually clear with cough.
Recurrent wheeze is an important finding in children.
|
HEART |
Inspection |
In thin children, the apical beat or the point of maximal impulse can easily be seen, particularly if you look obliquely across the chest wall. |
Measurement and documentation of the distance from the midline and the exact rib space are worth noting. |
Palpation |
The apical beat may be felt in the 6th intercostal space about 2 inches (5 cm) from the midline in the school-age child. It is more difficult to feel in the infant, particularly a plump child, and would not be so far out toward the anterior axillary line. |
The apical beat will be deviated to the left with cardiac enlargement or a collapsed lung on that side. The apical pulse could be pushed toward the right by a tumor or a collapsed lung on the right. Pneumothorax under tension will push the heart away from the side of the increased pressure. |
Auscultation |
Identify the first heart sound (S1) (occurs during systole).
Locate the apical beat (closing of the mitral valve) by placing the stethoscope over the maximum impulse area, concentrating on the first heart sound. (As the ventricle on the left contracts, pushing the blood up into the aorta, the sound of the mitral valve closing is heard.)
That sound can be identified by placing the thumb on the carotid pulse of the neck, which will coincide very closely with the heart sounds.
Identify the second heart sound (S2).
Move the stethoscope up toward the sternum and to the left.
At the base of the heart, both over the aortic and pulmonic areas, S2 is louder than S1.
Move the stethoscope in small jumps from the apical area medially toward the sternum. Go up to the left side of the sternum, listening at each interspace next to the sternum.
Move next to the child’s right second intercostal space— again next to the sternum.
Listen to only one sound; concentrate on that to the exclusion of all others. Can you identify this sound? Is it clear? Compare it with your own heart sound or that of the parent.
If there is question of a heart murmur or added sounds, refer to the health care provider.
As you listen to the heart sounds, you are also listening to the rhythm to confirm your findings on pulse.
If the child breathes in and out deeply, a sinus arrhythmia will be obvious.
If the child holds his or her breath, the sinus arrhythmia will disappear.
Be sure to note a rapid heart rate that is present even when the child is at rest and quiet.
In the infant, heart sounds are just a series of taps; they occur so fast that it may be very difficult to determine which sound is S1.
|
1. Consists of the “lub” portion of the “lub-dub” heart sound.
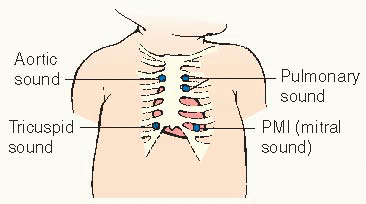
2. Represents the “dub” portion of the “lub-dub” heart sound.
b. In a child, S2 can be heard as two heart sounds because the two valves in the aorta and pulmonary vessels do not close at the same time. This split will increase with inspiration and decrease with expiration.
3. Represents the area of maximum intensity of sound of the pulmonary vessels.
4. It is at this area that you will hear the aortic sound best.
5. The child will enjoy this comparison if allowed to listen.
7. The typical rhythm of a child is called sinus arrhythmia. As the heart speeds up, the child is breathing in; the heart slows down on expiration.
8. This may be indicative of a tachycardia that requires further investigation.
9. In the infant, the S1 and S2 are equal in intensity. |
ABDOMEN |
For examination of the abdomen, the child should be lying down, relaxed, and not crying. Placing a small child, particularly those between ages 1 and 3, on a high table on cold paper can be frightening; as a result, his or her abdomen will not be relaxed.
Infants up to age 1 do not seem to be perturbed and will usually lie down and play nicely as long as they can see the parent, who should be stationed at the head of the child while you examine the abdomen.
Having the child lie across the parent’s knees with the legs dangling on one side and the head cradled in his or her arms will enable you to feel the abdomen quite well.
You may find that with the infant’s head in the parent’s left arm you can use your left hand to examine the infant’s abdomen on the right, feeling up under the right costal margin and into the right hypochondrium.
You may need to turn the infant around and use your right hand to examine the left side of the infant’s abdomen.
|
The abdomen needs to be relaxed to palpate abnormal masses or enlarged liver or spleen as well as to auscultate for abnormal sounds.
|
Inspection |
Observe the abdomen for contour and any markings while the child is standing and when lying down. As you inspect, you may see some abdominal movement with respiration. (Remember that the diaphragm, as it goes up and down, will move the contents of the abdomen.)
Check for early signs of puberty as evidenced by pubic hair over the symphysis pubis.
Carefully inspect the umbilicus for cleanliness and the presence of scar tissue.
|
Sometimes superficial veins are seen on the abdomen, particularly in a very blond infant. Striae are commonly noticed on the flank following rapid loss or gain of weight.
Early pubic hair in younger children (ages 8 to 10 years) may appear long and silky. This will ultimately become curly toward the onset of puberty.
A deep umbilicus may be difficult to keep clean. Immediately after the cord has dropped off, a granuloma may occur.
|
Auscultation |
Because percussion and palpation will stimulate the small bowel and increase bowel sounds, auscultation should precede these two techniques.
To obtain the child’s cooperation, you can conduct a running commentary as you listen, saying such things as, “I can hear the Cheerios in there.”
|
Bowel sounds are heard as tinkling, irregular sounds that indicate that fluid is moving from one section of the bowel to the next.
In a quiet infant who has just eaten, not many bowel sounds will be heard. In a hungry child, noisy bowel sounds can be heard, even without a stethoscope.
|
Percussion |
On the right side, percuss for the liver. Confirm on palpation.
Percuss over the left upper quadrant (LUQ).
Percuss the lower abdomen, particularly above the symphysis pubis.
|
Liver dullness can frequently be outlined to determine size of the liver.
Percussion over a gas-filled bowel or stomach results in a high-pitched, hollow sound.
Above the symphysis pubis, a filled bladder can produce a duller sound, as does a pregnant uterus. (A mass in the abdomen of a girl over age 10 may be a fetus.)
The liver is frequently felt about 3/8 inch (1 cm) below the right costal margin and in some instances as low as ¾ inch (2 cm). This is a common finding in the neonate and through the early school-age years.
|
Palpation |
Divide the abdomen into imaginary quadrants, palpating each with the fingertips.
In the right upper quadrant, palpate for the liver edge.
Although the liver is easily palpable in many children, you may have to press quite firmly.
In the LUQ, palpate for the spleen. Less resistance is encountered as you feel up under the left costal margin.
In the upper quadrants also try to palpate for the kidneys. Deep palpation for both kidneys should routinely be a part of the examination to make sure there is no enlargement of the kidney. Normally, the kidney is not palpable.
In the iliac fossa or the left lower quadrant, palpate for the descending bowel.
Palpate on the right lower quadrant (RLQ) where the appendix is located.
If the child has pain in any area or has pointed to the umbilicus when asked to show where the pain is, avoid the area demonstrated and leave it until last. Note whether the pain is with pressure or rebound.
Palpate around the umbilicus for any masses that may indicate a hernia, especially in preterm and black children. As you press over the protruding hernia, you can feel the sensation of gurgling under your fingers as the bowel returns to the abdomen.
|
3. Typically, only the tip of the spleen can be felt in the outer LUQ in the early months of life and in very thin children of preschool age.
4. Kidney palpation is difficult, but during the neonatal period, the lower pole of the right kidney may be felt and sometimes the left as well. (This applies to the period immediately after delivery, when the neonate’s abdomen is relaxed and the bowel is not distended.)
5. The descending colon can be felt, particularly if it’s filled with firm stool and the child is quiet. It may be slightly tender, but it should not cause severe pain on gentle palpation.
6. In the RLQ, usually the only sensation is that of gas-filled bowel. Tenderness in this area could be related to an inflamed appendix.
7. If the painful area is palpated first, the child may tense up when the other areas of the abdomen are examined.
8. Most of these hernias heal naturally by age 6. A hernia above the umbilicus can be revealed by asking the child to lift his or her head from the table. (Widening of the muscles above the umbilicus is called diastasis recti.) |
RECTUM AND ANUS |
Rectal examinations are rarely necessary in infants and young children.
If the child will be examined by a another health care provider, it is not necessary to duplicate this part of the examination.
Rectal examinations are embarrassing and uncomfortable for most children. Explain the procedure before performing the examination.
Positioning for a rectal examination:
Infants can be placed on their abdomens, sides, or backs with their legs raised to their chests.
Young children and teenagers can be positioned on their sides.
|
|
Inspection |
When examining an infant or toddler, place the child on a flat surface so that the weight is evenly distributed on the front of the pelvis. As the infant moves about on the abdomen, observe the entire back, the lower back, the upper thigh, and the tightening of the buttocks.
Check particularly the lower part of the back for hairiness or a mass.
As the child moves away, part the buttocks and look at the cleft between them.
Pay careful attention to the outer appearance of the anus and the perineum, the underside of the scrotum in the male, and the labia majora in the female.
|
If one buttock is larger than the other, you will see that side projected above the other. Weakness of one side will be obvious as the infant moves around, although a child in the early stages of crawling will tend to use one knee as a predominant leader, dragging the other.
This may indicate an underlying abnormality of the vertebrae in spina bifida.
A pilonidal dimple or sinus may be seen over the lower back. This is a common finding, but parents should be told about it for cleaning purposes. Make sure there is no drainage.
The anus is inspected for blood, fissures, or splitting in the external tissue; redness; swelling; or pads of extra flesh. On occasion, small white pinworms may be seen adhering to the anal skin.
|
Palpation |
Consider the child’s age and feelings; ask the mother to assist, if necessary. This part of the examination is not always needed.
Start by parting the buttocks with the left hand and introducing a well-lubricated finger (with finger cot) into the anus.
Gently apply pressure on the anal sphincter to allow the muscles to relax and the fingertip to slide into the rectum.
Gently palpate the inner ring, feeling for areas of thickening and tenderness and simultaneously judging the sphincter tone.
If the rectum is full of stool, it will be impossible to feel any other mass.
Palpate the walls of the rectum.
In the male, gently turn your finger through 180 degrees and feel the posterior surface of the prostate. Note size, consistency, tenderness, and contour.
In the female, perform a bimanual examination and palpate the cervix.
|
2. When an infant is being examined, the small finger should be used.
3. Apply pressure with pulp of the finger rather than jab at the anus with the fingertip.
4. As the perianal area is pressed on from the inside, tenderness will be elicited if a deep fissure exists or if an infection has occurred around a fissure.
5. In a young child, particularly an infant, dilatation provided by the finger may result in a bowel movement. In an older child, a suppository or even an enema may be required.
6. The mucosal walls should be smooth and deep palpation should elicit mild tenderness and no acute pain. |
EXAMINING MALE GENITALIA |
This part of the examination requires a direct, matterof-fact approach. Acknowledge that it is normal to feel embarrassed during an examination of the genitals. Explain what you are looking for as you proceed through the examination with a teenager.
Reassure the child after the examination that his genitals are normal. This decreases anxiety.
When examining the testes in a young boy, you may need to block the canals to prevent them from retracting into the abdomen.
|
|
Scrotum and testes |
Inspection |
Before touching the child, determine by observation of the testes whether they are in the scrotum.
Observe the skin over the scrotum for color and surface appearance, noting the presence of wrinkles, or rugae.
|
Retraction of the testes into the abdomen occurs frequently in young children; the development of the scrotum depends on the presence of the testes.
The skin over the scrotum varies in color, being a darker brown to black in the more pigmented races and reddish in children with light complexions. The wrinkles, or rugae, are more developed as the child grows older.
|
Palpation |
Check the scrotum wall for swelling or sensitivity. Gently feel the testes, palpating across the upper pole and feeling for the epididymis. (Remember the scrotum is extremely sensitive to pressure.)
Estimate the size of the testes and identify the spermatic cord, tracing it from the testis up toward the groin.
Make a special effort to locate the testis in a young child whose testes may be retracted into the abdomen via a hyperactive cremasteric reflex. You may need to have the child in a sitting or standing position. Occasionally, you may need to ask a parent to check at home with the child sitting in a warm bathtub.
If the testes cannot be felt in the scrotum, gently run the skin of the upper scrotum between your fingers, moving superiorly and approaching the external inguinal ring.
Try to milk the testis down toward the scrotum from above with your hand.
If this fails, have the child sit cross-legged to abolish the reflex of the cremaster muscle.
When examining a boy in the early stages of puberty, it is important to note the size of the testis as well as the greater number of rugae on the scrotum and the appearance of pubic hair around the penis.
|
The epididymis is a ridge of soft, bumpy tissue extending from the superior pole and running down and behind the testis.
The spermatic cord, with the vas deferens, feels firm and is accompanied by softer nerves, arteries, veins, and a few muscle fibers.
Ascertaining the presence of the testes in the scrotum is vital in older infant or toddler. Nondescent of the testes requires further evaluation.
During this period the testis is about ½-¾ inch (1.5-2 cm) in length. In the quiescent period before puberty, the male genitalia remain fairly infantile.
In early puberty, the testes start to grow. Onset of puberty varies, occurring between the ages of 10 and 14 years. In most teenagers, the findings are similar to those in adults.
|
Penis |
Evaluate the penis on all sides by lifting up the shaft.
If the child is not circumcised, partially retract the foreskin to observe the glans and meatus.
Observe the position of the meatus and evert the lips of the meatus to reveal an adequate orifice.
In the older child, inspect the penis for ulcers, sores, or discharge from the meatus.
|
The shaft of the penis contains the urethra on the under, or ventral, surface and is easily palpable.
The foreskin may adhere to the glans for the first few years of life. It is not necessary for the parent to “stretch” the foreskin by retraction.
Whitish discharge around the glans under the foreskin is normal and not a sign of infection. The foreskin should completely encircle the glans.
The meatus may be positioned off center. If the meatus is located on the dorsal or ventral surface of the shaft, the child should be evaluated by a pediatric urologist.
Consider sexually transmitted diseases in children of all ages; the possibility of sexual abuse must be considered.
|
Inguinal area |
Palpation |
Palpate for a hernia over the external inguinal ring. Have the child cough to enhance your observation.
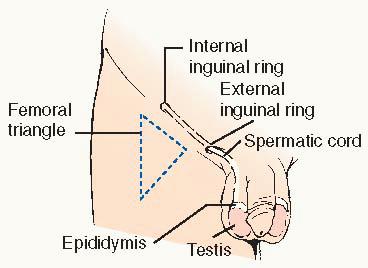
An increased cough reflex or swelling in the area should be checked by carefully placing a finger on the scrotal skin and invaginating the skin over your fingers toward the external ring. You are trying to follow the course of a hernia that would descend into the scrotum while you feel the external ring from below. A hernia in the inguinal region presents as a bulge that can be either seen or felt from below by placing the finger in the scrotum pointing up toward the external inguinal ring.
Also palpate for the inguinal lymph nodes.
|
1. Having the child stand either with the parent holding him or placing him against the parent’s knee will help you in locating a hernia in the inguinal area.
3. The inguinal lymph nodes in an infant are palpable as small and “shotty.” Anything more than this should alert you to possible infection because the perianal area drains into the superficial inguinal lymph nodes. For example, diaper rash may explain enlargement of the lymph nodes, which should be noted and reported. |
Femoral area |
Palpation |
Palpate the femoral triangle carefully for a hernia and for lymph nodes. |
In the femoral area, a swelling that can be reduced with a gurgling sound is an unusual finding. |
Auscultation |
If you are trying to reduce a mass, listen over the scrotum to determine if there is a gurgling sound. |
This will locate the bowel and confirm a hernia. |
Transillumination |
To locate the testis, darken the room and shine a bright light from behind the scrotum. In a normal child, the testis will stand out as a darker area.
Transilluminate any suspicious mass to help locate a hernia.
|
A scrotal sac that is swollen by fluid (hydrocele) will transilluminate. Fluid around the testes or cord must be differentiated from a hernia.
Any mass in this area must be reported to a health care provider immediately.
|
EXAMINING FEMALE GENITALIA |
If the child will be examined by a health care provider, it is not necessary to duplicate this part of the examination.
Place the infant or toddler on the table or on her parent’s knee while the parent holds the child’s knees in an abducted and flexed position.
A preschool child can be allowed to lean over her parent’s knee. However, remember that the structures are being visualized upside down.
The older child or teenager should be draped as an adult would and should be placed in a lithotomy position with the aid of stirrups.
|
|
Equipment |
Disposable gloves
Speculum
Light source
|
|
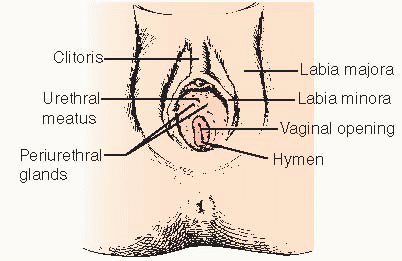
Carefully inspect the perineal area for cleanliness, inflammation, and abnormality.
If the mother of a neonate has noted a bloody discharge from the infant’s vagina during the first few days of life, reassure her that this is not an uncommon occurrence; the discharge will disappear, as will swelling of the labia majora and clitoris and enlargement of the infant’s breasts.
Note the vaginal opening, which may vary in size because of the presence of a thin membrane, the hymen. The hymen varies in appearance according to the child’s age.
In the young child it is usually unnecessary to examine inside the vagina. If a young child requires an extensive vaginal exam, it is frequently done under sedation.
|
This includes the mons pubis, clitoris, labia, urethra, and perineum. The labia minora are seen as two slender folds of tissue inside the labia majora. In some instances, adhesions of the labia minora occur because of the lack of natural hormones.
Hormone stimulation from the mother’s body accounts for this occurrence. The discharge usually stops after the hormones are excreted. The bloody appearance on the diaper may be confused with the presence of urates, which are also orange-red and appear normally in urine.
The lack of an opening into the vagina may result in the retention of menstrual fluid when the child reaches puberty. In the sexually active adolescent, vestigial remains on the hymen may appear as small particles (caruncles) at the fringe of the vagina.
The possibility of sexual abuse should always be considered and, if necessary, the child referred to a specialist in sexual abuse.
A foreign body or sexually transmitted infection may be suspected if there is a vaginal discharge, bleeding, or odor.
|
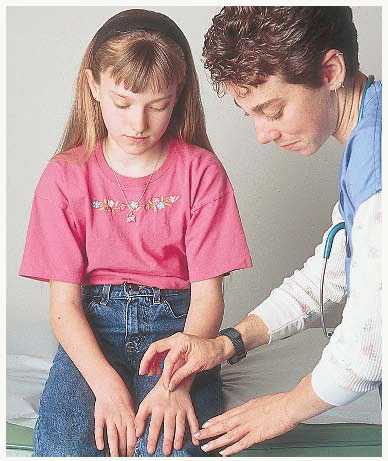
MUSCULOSKELETAL SYSTEM |
Evaluation of the musculoskeletal system can be done both in an informal manner, while watching the child at rest and at play, and in a formal manner as specific findings are methodically checked.
In the neonate, observe the position of the extremities during sleep and the quality of movement when the child is awake.
Various aspects of size, shape, and movement are evaluated as the child is observed pushing up on his or her arms and turning his or her head toward the mother.
A child in the early stages of walking offers many opportunities for evaluation of muscle strength and movement.
At the same time, rapport with the mother can be reinforced by your admiring the child’s ability and by inquiring if she is concerned about the manner in which the child is walking.
A more mobile child can be evaluated as you watch him or her play and explore the room.
Having the older child reach for crayons, run after a ball, or walk around the room enables you to evaluate the musculoskeletal system and the child’s sense of balance.
|
|
Upper extremities |
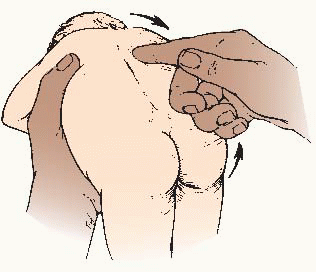
In the infant, evaluate the status of the clavicles when examining the skull and neck.
Carefully examine the hands to note the shape of the hand, shape and length of the fingers, changes in the nails, and creases on the palms.
|
During a difficult delivery, the clavicle that has been exposed to traction may snap. A lump can be felt on the bone at about age 3 weeks.
Variation in the hands or unusual length of the fingers should be noted. An incurved little finger or low-set thumb with the single simian crease may reflect Down syndrome.
|
Lower extremities |
Examine the appearance of the infant’s foot, noting arch formation.
Inspect the angle of the foot and lower leg and then manipulate the ankle to evaluate the range of motion.
Place the legs together and see how far the ankles and knees are separated.
Evaluate the child’s ability to walk, noting the appearance of his or her legs and foot placement. Remember to look at the child’s shoes and see which side of the sole is worn down.
|
The foot of an infant is usually flat and appears broad because the arch on the inside of the foot is covered by a fat pad. Parents may need reassurance about this.
Full flexibility of the foot (plantar flexion) rules out underlying abnormality. The foot should return to the neutral position after manipulation. Typically, the foot will turn in, or adduct. Such a finding should be recorded.
Toddlers typically have external hip rotation and internal knee rotation, which results in a “bowed” appearance. The preschooler has a normally knock-kneed walk, but with knees touching, ankles should be no more than two fingerbreadths apart.
Infants commonly appear to be bow-legged when they first start to walk because the feet are kept wide apart and turn slightly in. The ankles appear curved when viewed from behind.
|
Hip |
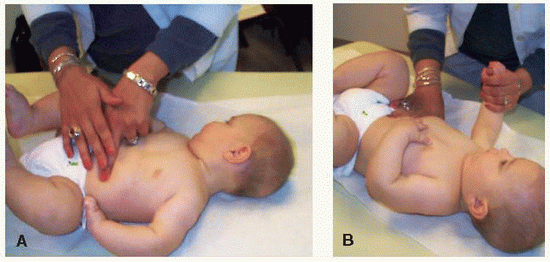
When examining children under age 1, check for signs of hip dislocation. See page 1759. |
|
Spine |
Check the spine for signs of abnormal curvature.
Observe the child from the side and back in the standing position to see forward curving of the shoulders.
Have the child bend forward with the arms hanging down. A unilateral rib prominence will be seen in children with scoliosis.
|
The normal young child has a curve inward at the lumbar region (lordosis), but this should not be exaggerated. It is normally more exaggerated in black children.
These appear most commonly during school-age years and adolescence.
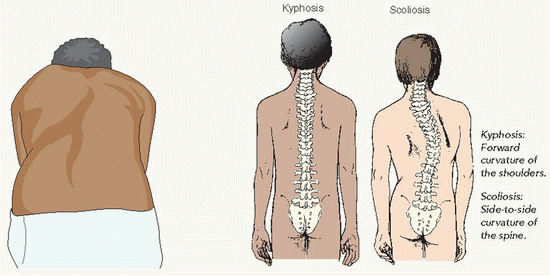 Kyphosis: Forward curvature of the shoulders. Kyphosis: Forward curvature of the shoulders.
Scolios is: Side-to-side curvature of the spine. |
NEUROLOGIC EXAMINATION |
The neurologic system at birth is different from that in an infant age 3 months. There is an even greater contrast between the infant and children and adults.
The central nervous system at birth is underdeveloped and the functions tested are below the level of the cortex.
|
|
Equipment |
Flashlight
Ophthalmoscope
Tuning fork
|
Noisemaker
Tongue depressor
|
|
Procedure for the neonate and young infant |
Observe the neonate for general appearance, positioning, activity, crying, and alertness. Take note of the posture—including head, neck, and extremities.
Note the pitch, volume, and character of his or her cry.
Observe the infant’s facial expression and the symmetry of his or her face when crying or sucking.
Most of the cranial nerves are difficult to check at this early age.
|
Stiffness of the neck or marked extension of the head will cause a position of opisthotonos and necessitates referral.
The high-pitched cry of the infant who has intracranial irritation is distinctive.
Poor sucking, with dribbling, is abnormal. Transient weakness of the mouth caused by cranial nerve VII paralysis is commonly seen as a result of a forceps delivery in which the forceps is pressed on the facial nerve where it emerges from the ear.
|
Automatic reflexes |
Blinking reflex due to loud noise
Clap your hands or produce a loud clicking noise. Be careful not to clap near the infant to prevent a wave of air from causing a blinking of the eyes.
Blinking reflex due to bright light
Shine a bright light into the infant’s eyes to elicit the blinking reflex.
Cranial nerve X can be checked by using a tongue blade to gag the infant.
Palmar grasp reflex
Place your fingers across the infant’s palm from the ulnar side. The infant needs to be in a relaxed position with head in a central position. Reinforcement may be offered by having the infant suck on a bottle at the same time.
Rooting reflex
Touch the edge of the infant’s mouth.
Incurving of the trunk (Galant reflex)
Hold the infant horizontally and prone in one arm while using the other hand to stimulate one side of the infant’s back from the shoulders to the buttocks. The trunk curves toward the stimulated side as the shoulders and pelvis move toward the stroking hand (persists until the infant is about age 2 months).
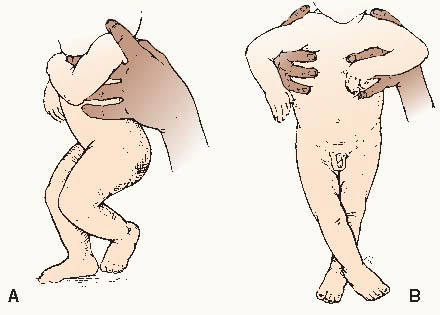
Vertical suspension position
Place your hands under the infant’s axillae with thumbs supporting the back of the head and hold the infant upright.
Stepping response
Hold the infant under its axillae with thumbs supporting the back of the head. Allow the infant’s foot to touch a firm surface.
Tonic neck reflex
Hold the infant in a supine position with the head turned to one side and the jaw held in place over the shoulder.
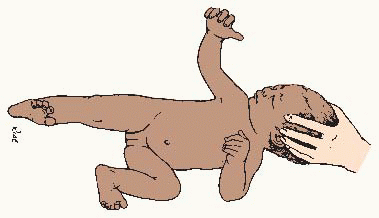
Mass reflexes (Moro or startle reflex)
Hold the infant along your arm with the other hand below the lower legs. Lower the feet and body in a sudden motion.
Perez reflex
Hold the infant in a prone position along your arm; place the thumb of the other hand on the sacrum and move it firmly toward the head, along the entire length of the spine.

|
1. Lack of a blink in response to a loud noise may indicate deafness.
2. Failure to blink may indicate blindness.
3. Palate moves upward.
4. Both hands will flex and can be compared for strength. Weakness on one side may be indicated by a failure to grasp when the palm is stimulated.
5. The infant’s mouth will open and the head will turn toward the side stimulated. This reflex is marked during the early weeks of life.
7. The legs flex at the hips and knees (persists for about 4 months).
8. Normally, the infant responds by lifting one knee and hip into a flexed position and moving the opposite leg forward—making a series of stepping movements (see 8A).
Difficulty with the stepping reflex and stiffness or spasticity connected with crossing of the feet and scissoring (see 8B) is indicative of spastic paraplegia or diplegia.
It should be noted that the stepping response may be affected by breech delivery. (It may also be affected by weakness.)
The stepping response is evident toward the end of the first week after birth and persists for a variable time.
9.
The arm and leg on the side to which the head is turned will extend, whereas those on the other side will flex (the so-called “fencing reflex”).
This reflex persists for about 5-6 months; it may be present at birth or delayed until the infant is age 6 or 8 weeks.
Persistence beyond 6 months suggests major cerebral damage.
10. The arms will spring up and out, abducting and extending; the fingers are also extended. The arms then return forward over the body with a clasping motion. At the same time, the legs flex slightly and the hips abduct.
The Moro reflex is present at birth and disappears at approximately the end of the third month. Persistence beyond 6 months is significant.
Asymmetrical response may be caused by paralysis of the arm after difficult delivery, tension and injury to the brachial plexus, or a fracture of the clavicle or humerus. A dislocated hip would produce an asymmetrical response in the lower extremities.
11. The head and spine will extend and the knees will flex upward. |
Summary |
Some of the jerking and shaking movements seen in neonates are normal, but they should be rechecked frequently during the first few weeks of life.
Variants in the findings caused by the infant’s sleepiness or hunger should be taken into account and reevaluations should be carried out under different conditions.
Severe neurologic damage may be completely asymptomatic and impossible to detect during the first few weeks of life.
|
|
Procedure for the toddler and early school-age child |
The neurologic examination for the toddler and the early school-age child is similar to that for the adult (see page 78).
The Draw-A-Person Test and the Denver Developmental Assessment are both well-accepted methods for testing areas in the development of the child.
Beyond the neonatal period, specific gross and fine motor coordination testing, accompanied by appropriate evaluation of the Denver test, will assist in assessing the child’s level of development.
These tests also assess social and language development and are important screening devices.
Interview techniques can also be useful in assessing development in the preschool child.
|
2. See www.denverii.com for instructions and findings of the Denver Development Assessment. |


