P
PACEMAKER, CARE OF PERMANENT
A pacemaker is implanted when the heart’s natural pacemaker fails to work properly. It provides electrical impulses to the cardiac muscle as a means to stimulate contraction and support cardiac output.
Many types of pacemakers are available for use; the majority can be programmed to perform various functions. When caring for a patient with a pacemaker, it’s important to know what type of pacemaker he has, what its rate is, and how it works. This information will help you ensure that the pacemaker is functioning properly and detect complications more quickly. The patient should have a manufacturer’s card with pacemaker information; his medical records may also contain this information. You can obtain this information from the patient or his family.
ESSENTIAL DOCUMENTATION
Record the date and time of your entry. Chart the date of insertion, type of pacemaker (demand or fixed rate), rate of pacing, chambers paced, chambers sensed, how the pulse generator responds, and whether it’s rate-responsive. If the patient knows the three or four-letter pacemaker code, record it. (See Pacemaker codes, page 272.) Document your patient’s apical pulse rate, noting whether it’s regular or irregular. If the patient is on a cardiac monitor, place a rhythm strip in the chart. Note the presence of pacemaker spikes, P waves, and QRS complexes and their relationship to each other. Ask the patient about and record symptoms of pacemaker malfunction, such as dizziness, fainting, weakness, fatigue, chest pain, and prolonged hiccups. Check the pacemaker insertion site and describe its
condition. Assess and document your patient’s understanding of his pacemaker.
condition. Assess and document your patient’s understanding of his pacemaker.
PACEMAKER CODES
A permanent pacemaker’s three-letter (or sometimes five-letter) code refers to how it’s programmed.The first letter represents the chamber that’s paced; the second letter, the chamber that’s sensed; and the third letter, how the pulse generator responds.The fourth and fifth letters describe special functions, as listed below.
First letter (chamber paced)
A = atrium
V = ventricle
D = dual (both chambers)
O = not applicable
Second letter (chamber sensed)
A = atrium
V = ventricle
D = dual (both chambers)
O= not applicable
Third letter (mode of response to sensing)
I = inhibited
T = triggered
D = dual (inhibited and triggered)
O= not applicable
Fourth letter (programmability)
R = rate responsiveness, or pacing rate that varies in response to physiologic variables such as skeletal muscle activity; an R is added in the fourth position only if the pacemaker is rate-responsive.
P = simple programmable
M = multiprogrammable
C = communicating
O = none
Fifth letter (antitachycardia and shock functions)
Letter codes in this position refer to functions of implantable cardioverter-defibrillator devices.
|

PACEMAKER, CARE OF TRANSCUTANEOUS
Completely noninvasive and easily applied, a transcutaneous pacemaker proves especially useful in an emergency. Large skin electrodes are placed on the patient’s anterior and posterior chest; then they’re connected to a pulse generator to initiate pacing.
Nursing care of the patient receiving temporary transcutaneous pacing includes proper lead placement and attachment, assessment of the patient’s response and cardiac rhythm, and monitoring for possible pacemaker malfunction. Because external pacing may be uncomfortable for the conscious patient, a sedative should be given.
ESSENTIAL DOCUMENTATION
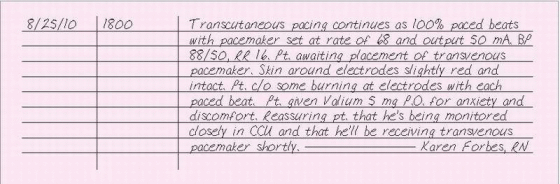
Record the date and time. Chart the patient’s heart rate and rhythm. Note the pacemaker rate and the output, in milliamperes (mA), at which capture occurs. Describe whether or not all QRS complexes are captured: record as percentage (such as 100% capture). Place a rhythm strip showing pacemaker function in the chart, if available. Describe the condition of the skin at the electrode sites and any skin care performed. Record your assessment of the patient, including skin color and temperature, mental status, and urine output. Document measures to reduce anxiety and provide comfort as well as the patient’s response to these measures. Record patient teaching and emotional support given.
|
PACEMAKER, CARE OF TRANSVENOUS
Transvenous pacing is accomplished by threading a pacing wire through a vein, such as the subclavian, antecubital, femoral, or jugular vein, to the right atrium (for atrial pacing), right ventricle (for ventricular pacing), or
both (for dual chamber pacing). Some pulmonary artery catheters also have a lumen for a transvenous pacing electrode. The pacing wire is then connected to a pulse generator outside the body.
both (for dual chamber pacing). Some pulmonary artery catheters also have a lumen for a transvenous pacing electrode. The pacing wire is then connected to a pulse generator outside the body.
If your patient has a transvenous pacemaker, you’ll need to monitor him for complications, such as pneumothorax, hemothorax, cardiac perforation and tamponade, diaphragmatic stimulation, pulmonary embolism, thrombophlebitis, and infection. Also, if the doctor threads the electrode through the antecubital or femoral vein, venous spasm, thrombophlebitis, or lead displacement may occur. Nursing interventions also focus on protecting the patient from microshock, preventing and detecting pacemaker malfunction, and patient education.
ESSENTIAL DOCUMENTATION
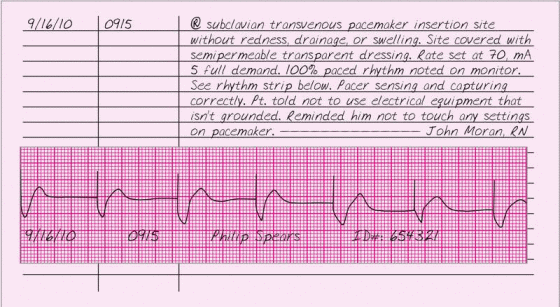
Record the date and time of pacemaker care. Chart the pacemaker’s settings. Document the patient’s vital signs and include a rhythm strip in your note. Place a rhythm strip in the chart whenever pacemaker settings are changed or when the patient is treated for a complication caused by the pacemaker. Document interventions to prevent shock and pacemaker malfunction. Chart your assessment of the pacemaker insertion site, noting drainage, redness, and edema. Describe site care and document dressing changes. Include signs and symptoms of other complications, the name of the doctor notified, the time of notification, orders given, your interventions, and the patient’s response. Record patient education and emotional support rendered.
|
PACEMAKER, INITATION OF TRANSCUTANEOUS
A temporary pacemaker is usually inserted in an emergency. In a lifethreatening situation, when time is critical, a transcutaneous pacemaker is the best choice. This device sends an electrical impulse from the pulse generator to the patient’s heart by way of two electrodes, which are placed on the front and back of the patient’s chest. Transcutaneous pacing is quick and effective, but it’s only a temporary measure.
ESSENTIAL DOCUMENTATION
Chart the date and time transcutaneous pacing is initiated. Record the reason for transcutaneous pacing and the location of the electrodes. Chart the pacemaker settings. Note the patient’s response to the procedure along with complications and interventions. If possible, obtain rhythm strips before, during, and after pacemaker use; whenever settings are changed; and when the patient is treated for a complication caused by the pacemaker. Describe the frequency of paced or captured beats. As you monitor the patient, record his response to temporary pacing and note changes in his condition. Record patient teaching, emotional support, and comfort measures provided.
|

PACEMAKER, INSERTION OF PERMANENT
A permanent pacemaker is a self-contained unit designed to operate for 3 to 20 years. In an operating room or cardiac catheterization laboratory, a surgeon implants the device in a pocket under the patient’s skin.
A permanent pacemaker allows the patient’s heart to beat on its own but prevents pacing from falling below a preset rate. Pacing electrodes can be placed in the atria, the ventricles, or both. Pacemakers may pace at a rate that varies in response to intrinsic conditions such as skeletal muscle activity, and may also have antitachycardia and shock functions.
Candidates for permanent pacemakers include patients with myocardial infarction and persistent bradyarrhythmia and patients with complete heart block or slow ventricular rates stemming from congenital or degenerative heart disease or cardiac surgery. Patients who suffer Stokes-Adams attacks and those with Wolff-Parkins on-White syndrome may also benefit from a permanent pacemaker.
ESSENTIAL DOCUMENTATION
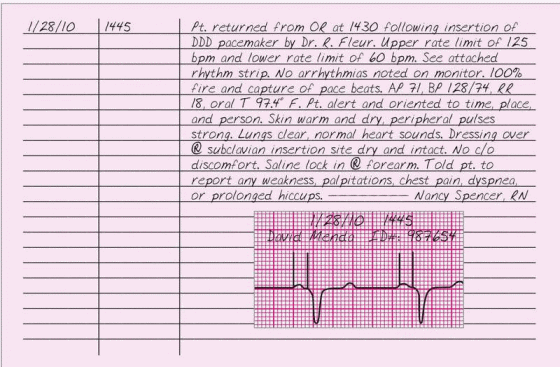
Record the date and time of your entry. Record the time that your patient returned to the unit. Document the type of pacemaker used, pacing rate, and doctor’s name. Verify that the chart contains information on the pacemaker’s serial number and its manufacturer’s name. Note whether the pacemaker reduces or eliminates the arrhythmia and include other pertinent observations, such as the condition of the incision site and the percentage of paced or captured beats. Chart the patient’s vital signs and level of consciousness every 15 minutes for the first hour, every hour for the next 4 hours, every 4 hours for the next 48 hours, and then once every shift, or according to facility policy or doctor’s order. You may record these frequent assessments on a critical care or frequent vital signs flow sheet. Assess for and record signs and symptoms of complications, such as infection, lead displacement, perforated ventricle, cardiac tamponade, or lead fracture and disconnection. Record the name of the doctor notified, the time of notification, interventions, and the patient’s response. Document your patient teaching. This may be recorded on a patientteaching flow sheet.
|
PACEMAKER, INSERTION OF TRANSVENOUS
A transvenous pacemaker is usually inserted in an emergency or during cardiac surgery by threading an electrode catheter through a vein, such as the brachial, femoral, subclavian, or jugular vein, into the patient’s right atrium, right ventricle, or both. The electrodes are then attached to an external battery-powered pulse generator. Some pulmonary artery catheters have transvenous pacing electrodes.
ESSENTIAL DOCUMENTATION
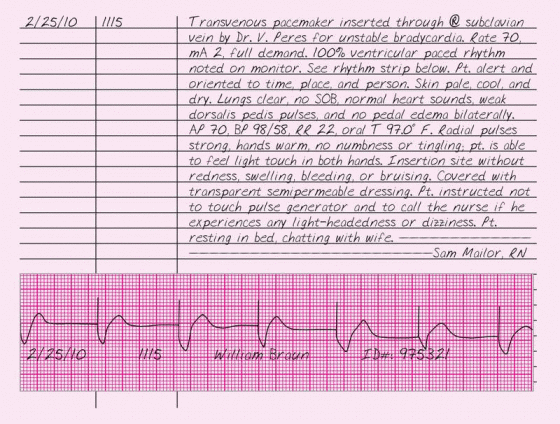
Record the date and time that the pacemaker was inserted, the reason for pacing, and the location of the insertion site. Chart the pacemaker settings and the frequency of paced or captured beats. Document the patient’s level of consciousness and cardiopulmonary assessment, including vital signs. Note the patient’s response to the procedure, complications, and interventions. Include a rhythm strip in your note. Document your assessment of the insertion site and your neurovascular assessment of the involved limb, if appropriate. Record your patient teaching and the support you gave.
|
PACEMAKER MALFUNCTION
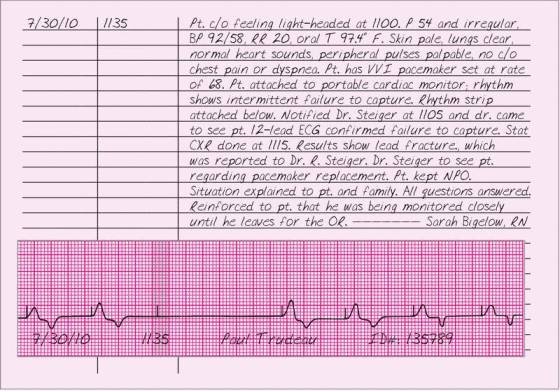
Occasionally, a pacemaker fails to function properly. To determine whether your patient’s pacemaker is malfunctioning, you’ll need to know its mode of function and its settings. If a malfunction occurs, you’ll need to notify the doctor immediately, obtain a 12-lead ECG, call for a stat chest X-ray, begin continuous ECG monitoring, and prepare for temporary pacing.
ESSENTIAL DOCUMENTATION
Record the date and time of the malfunction. Record your patient’s signs and symptoms, such as dizziness, syncope, irregular pulse, pale skin, dyspnea, chest pain, hypotension, heart rate below the pacemaker’s set rate, palpitations, hiccups, and chest or abdominal muscle twitching. Place a cardiac rhythm strip in the chart, if possible, noting the percentage of captured beats or malfunctioning of the pacemaker, such as firing without capturing. Note the name of the doctor notified, the time of notification, and the orders given, such as obtaining a stat ECG, placing a magnet over a permanent pacemaker, and preparing for temporary pacing. If a
temporary pacemaker malfunctions, chart your troubleshooting actions, such as repositioning the patient and checking connections and battery settings; the results of these efforts; and the patient’s response. Be sure to include patient education and emotional support provided.
temporary pacemaker malfunctions, chart your troubleshooting actions, such as repositioning the patient and checking connections and battery settings; the results of these efforts; and the patient’s response. Be sure to include patient education and emotional support provided.
|
PAIN MANAGEMENT
When a person feels pain, he typically seeks medical help not only because he wants relief, but also because he believes the pain signals a serious problem. This perception produces anxiety, which in turn may increase the patient’s perception of pain. Your primary goal is to eliminate or minimize your patient’s pain. You can use a number of tools to assess pain. Always document the results of your assessments. (See Assessing and documenting pain, page 280.)
Interventions to manage pain include administering analgesics, providing emotional support and comfort measures, and using cognitive techniques to distract the patient. Patients with severe pain usually require an opioid analgesic. Invasive measures, such as epidural or patientcontrolled analgesia, may also be required.
 ASSESSING AND DOCUMENTING PAIN
Used appropriately, standard assessment tools, such as the McGill-Melzack Pain Questionnaire and the Initial Pain Assessment Tool (developed by McCaffery and Beebe), provide a solid foundation for your nursing diagnoses and care plans. If your health care facility doesn’t use standardized pain questionnaires, you can devise other pain measurement tools, such as the pain flow sheet or the visual and graphic rating scales that appear below. Whichever pain assessment tool you choose, remember to document its use and include the graphic record in your patient’s chart.
PAIN FLOW SHEET
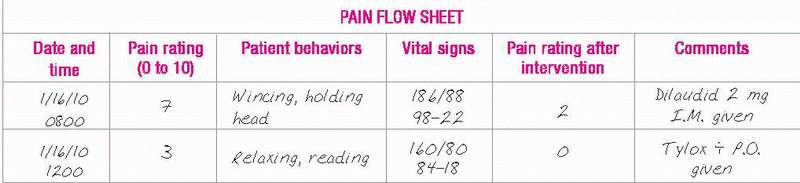
Possibly the most convenient tool for pain assessment, a flow sheet provides a standard for reevaluating a patient’s pain at regular intervals. It’s also beneficial for patients and families, who may feel too overwhelmed by the pain experience to answer a long, detailed questionnaire.
If possible, incorporate the pain assessment into the flow sheet you’re already using. Generally, the easier the flow sheet is to use, the more likely you and your patient will be to use it.
|
VISUALANALOG PAIN SCALE
With a visual analog pain scale, the patient marks a linear scale containing words or numbers that correspond to his perceived degree of pain. Draw a scale to represent a continuum of pain intensity. Verbal anchors describe the pain’s intensity; for example, “no pain” begins the scale and “pain as bad as it could be” ends it. Ask the patient to mark the point on the continuum that best describes his pain.
|


ESSENTIAL DOCUMENTATION
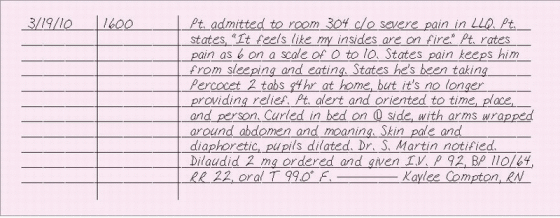
When charting pain levels and characteristics, describe the location of the pain and note if it’s internal, external, localized, or diffuse. Record whether the pain interferes with the patient’s sleep or activities of daily living. In the chart, describe what the pain feels like in the patient’s own words. Chart the patient’s description of how long the pain lasts and how often it occurs. Record the patient’s ranking of his pain using a pain rating scale.
Describe the patient’s body language and behaviors associated with pain, such as wincing, grimacing, or restlessness. Note sympathetic responses commonly associated with mild to moderate pain, such as pallor, elevated blood pressure, dilated pupils, skeletal muscle tension, dyspnea, tachycardia, and diaphoresis. Record parasympathetic responses commonly associated with severe, deep pain, including pallor, decreased blood pressure, bradycardia, nausea and vomiting, dizziness, and loss of consciousness.
Chart situations that worsen the pain as well as interventions that relieve or decrease the pain, including heat, cold, massage, or drugs.
Document interventions taken to alleviate your patient’s pain and the patient’s responses to these interventions. Also, note patient teaching and emotional support provided.
|
PARACENTESIS
Paracentesis is a bedside procedure in which fluid from the peritoneal space is aspirated through a needle, trocar, or cannula inserted in the abdominal wall. Paracentesis is used to diagnose and treat massive ascites when other therapies have failed. Additionally, it’s used as a prelude to
other procedures, including radiography, peritoneal dialysis, and surgery. It’s also used to detect intra-abdominal bleeding after traumatic injury and to obtain a peritoneal fluid specimen for laboratory analysis.
other procedures, including radiography, peritoneal dialysis, and surgery. It’s also used to detect intra-abdominal bleeding after traumatic injury and to obtain a peritoneal fluid specimen for laboratory analysis.
ESSENTIAL DOCUMENTATION
Document that the procedure and its risks have been explained to the patient and that a consent form has been signed. Chart what you taught the patient about the procedure. Your facility may require you to document patient education on a patient-teaching flow sheet. Record baseline vital signs, weight, and abdominal girth. Indicate that the abdominal area measured was marked with a felt-tipped marking pen.
Record the date and time of the procedure. Describe the puncture site and record the amount, color, viscosity, and odor of the aspirated fluid. Also, record the amount of fluid aspirated in the fluid intake and output record. Record the number of specimens sent to the laboratory. Note whether the wound was sutured and the type of dressing that was applied.
Record the patient’s tolerance of the procedure, vital signs, and signs and symptoms of complications (such as shock and perforation of abdominal organs) that occur during the procedure. If peritoneal fluid leakage occurs, document that you notified the doctor, any orders given, your actions, and the patient’s response.
Keep a record of the patient’s vital signs and nursing activities related to drainage and dressing changes. Document drainage checks and the patient’s response to the procedure every 15 minutes for the first hour, every 30 minutes for the next 2 hours, every hour for the next 4 hours, and then every 4 hours for the next 24 hours (or according to your facility’s policy). Continue to document drainage characteristics, including color, amount, odor, and viscosity. Document daily patient weight and abdominal girth measurements after the procedure.
|

PARENTERAL NUTRITION ADMINISTRATION, LIPIDS
Lipid emulsions are a source of calories and essential fatty acids. A deficiency in essential fatty acids can hinder wound healing, adversely affect the production of red blood cells, and impair prostaglandin synthesis. Typically given as separate solutions in conjunction with parenteral nutrition, lipid emulsions may also be given alone. They can be administered through a peripheral or central venous line.
ESSENTIAL DOCUMENTATION
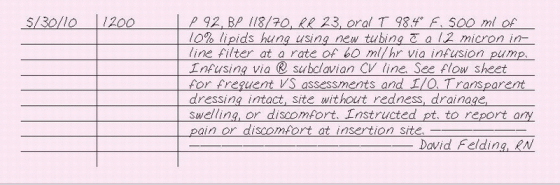
Record the date and time of your entry. Note the type of lipid solution, its volume, and the infusion rate. Document whether the lipids are being given peripherally or centrally, and note the location of the line. Record vital signs before starting the infusion, at regular intervals during the infusion (according to your facility’s policy), and following the infusion. In the intake and output record, chart the amount of lipids infused. Document site care and describe the condition of the insertion site, cleaning the site, and the type of dressing applied. Also, record tubing and lipid solution changes. Monitor the patient for adverse reactions, and document your observations, interventions, and the patient’s response. Record what you teach the patient about lipids.
|
PARENTERAL NUTRITION ADMINISTATION, TOTAL
Total parenteral nutrition (TPN) is the administration of a solution of dextrose, proteins, electrolytes, vitamins, trace elements, and frequently insulin in amounts that exceed the patient’s energy expenditure, thereby achieving anabolism. Because this solution has about six times the solute concentration of blood, it requires dilution by delivery into a high-flow central vein to avoid injury to the peripheral vasculature. Typically, the solution is delivered to the superior vena cava through an indwelling subclavian vein catheter. Generally, TPN is prescribed for any patient who can’t absorb nutrients through the GI tract for more than 10 days.
Because TPN solution supports bacterial growth and the central venous (CV) line gives systemic access, contamination and sepsis are always a risk. Strict surgical asepsis is required during solution, dressing, tubing, and filter changes. Site care and dressing changes should be performed according to your facility’s policy and whenever the dressing becomes wet, soiled, or nonocclusive. Tubing and filter changes should be performed every 24 hours, according to your facility’s policy. Most facilities require that two nurses verify the contents of the TPN solution and the prescribed administration rate against the physician’s order before hanging the solution.
ESSENTIAL DOCUMENTATION
Record the date and time of your entry. Document the type and location of the CV line and the volume and rate of the solution infused. Record the amount of TPN infused on the intake and output record. Document site care, describing the condition of the insertion site, cleaning of the site, and the type of dressing applied. Many facilities document all this information on an I.V. flow sheet. (See I.V. flow sheet, page 232.) Monitor a patient receiving TPN for adverse reactions, such as hyperglycemia, hypoglycemia, air embolism, extravasation, phlebitis, pneumothorax, hydrothorax, septicemia, and thrombosis, and document your observations, interventions, and the patient’s response to them. Record what you teach the patient about TPN.
When you discontinue a CV or peripheral I.V. line for TPN, record the date and time and the type of dressing applied. Also, describe the appearance of the infusion site.
|

PATIENT-CONTROLLED ANALGESIA
Some patients receive opioids by way of a patient-controlled analgesia (PGA) infusion pump that allows patients to self-administer boluses of an opioid analgesic I.V., subcutaneously or epidurally within limits prescribed by the doctor. To avoid overmedication, an adjustable lockout interval inhibits premature delivery of additional boluses. PCA increases the patient’s sense of control, reduces anxiety reduces drug use over the postoperative course, and gives enhanced pain control. Indicated for patients who need parenteral analgesia, PGA therapy is typically given to patients postoperatively, terminal cancer patients, and others with chronic diseases.
ESSENTIAL DOCUMENTATION
Be sure to document the name of the opioid used, lockout interval, maintenance dose, amount the patient receives when he activates the device, and amount of opioid used during your shift. Record the patient’s assessment of pain and pain relief and patient teaching you perform. Document your patient’s vital signs and level of consciousness according to your facility’s policy. Record your observations of the insertion site. See PCA flow sheet, page 286, for an example of documentation.
 PCA FLOW SHEET
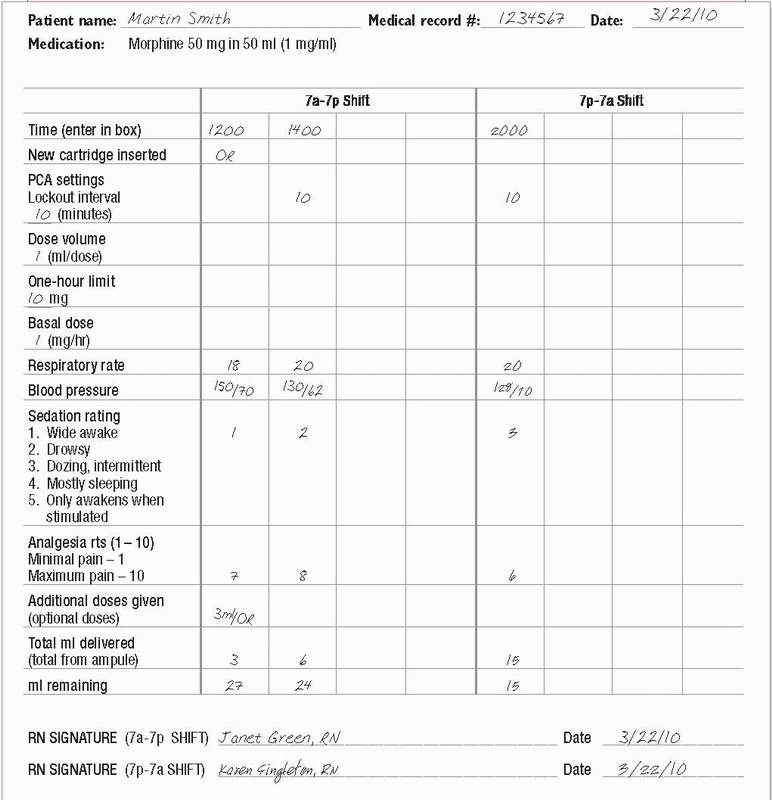
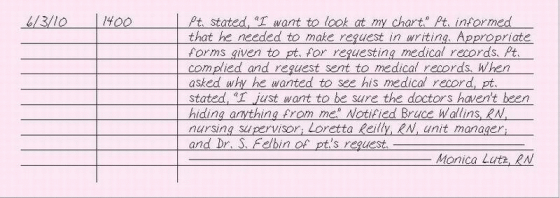
PATIENT REQUESTING ACCESS TO MEDICAL RECORDS
According to the Health Insurance Portability and Accountability Act (HIPAA) of 1996, the patient has the right to view and obtain copies of his medical records. Many states have since enacted laws allowing patients access to such records, and health care providers are required to honor such requests. Psychologists, however, may deny a patient access to his psychotherapy records.
When a patient requests to see his medical record, assess why he wants to see it. He may simply be curious, or his request may reflect hidden fears about his treatment that you or another member of the health care team may be able to address. Be sure to follow facility policies for a patient viewing his own medical record. These policies may dictate that you notify your nursing supervisor or office manager of the request and that you notify the risk manager to alert administrative staff and legal counsel, if necessary. Also, notify the doctor and medical records of the request.
Explain the procedure for accessing medical records, and provide the patient with the appropriate forms to complete. Advise him when you expect the records to be available. Also, let him know whether the facility charges a fee for copying the records.
When the medical record is available, be sure to properly identify the patient and remain with him, or have someone from medical records remain with him, while he reads the record. Explain to the patient that he has the right to request that incorrect information be changed or that missing information be added. If the doctor or health care facility believes that the medical record is correct, the patient can note his disagreement in the medical record. Observe how the patient responds while he reads. Offer to answer any questions he may have; assure him that the doctor will also answer questions. While the patient reads, help him interpret the abbreviations and medical terminology.
ESSENTIAL DOCUMENTATION
If your patient asks to see his medical record, use your facility’s form or have the patient draft a written request to see his medical record, according to your facility’s policy. Chart the parts of the medical record that the
patient requested and whether copies were given to the patient. Record the names of the nursing supervisor, manager, and doctor who were notified of the patient’s request. Record the date and time that the patient reviewed his record and the name of the person who stayed with the patient while he read it. Document the patient’s response to reading his record and whether he had questions or concerns.
patient requested and whether copies were given to the patient. Record the names of the nursing supervisor, manager, and doctor who were notified of the patient’s request. Record the date and time that the patient reviewed his record and the name of the person who stayed with the patient while he read it. Document the patient’s response to reading his record and whether he had questions or concerns.
|
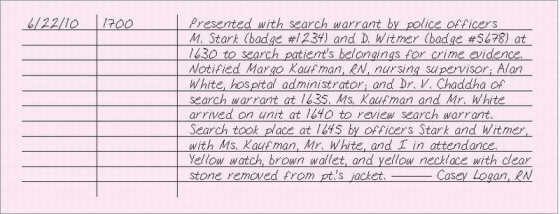
PATIENT SEARCH, LEGALLY NECESSARY
The fourth amendment to the Constitution protects individuals from unreasonable searches of their person, house, office, or vehicle. A search is justified when there are reasonable grounds to believe that the search will produce evidence of a violation of the law or rules of the institution. It’s generally accepted that the police may not enter a person’s home without a search warrant. Typically, this applies to the patient’s hospital room as well.
If a patient’s belongings are to be searched by law enforcement authorities, immediately notify the nursing supervisor, facility administrator, and legal affairs department. No search or seizure should occur until it’s ensured that the patient’s legal rights are protected and a search warrant is presented by the law enforcement agency that would like to perform the search. The facility is required to cooperate with law enforcement agencies in the preservation or collection of evidence involving patients in accordance with appropriate medical ethics and legal statutes.
ESSENTIAL DOCUMENTATION
Record the date and time of your entry. Document the presentation of a search warrant by law enforcement agents. Chart the time of the presentation of a search warrant and the names of the nursing supervisor, hospital
administrator, and doctor who witnessed the presentation. Record the rationale given for searching the patient’s belongings. Document compliance with your facility and local law enforcement policies and procedures before instituting the search. Record the time that the search occurred, the name of the person conducting the search, and the names of others present. Complete an incident report if required by your facility.
administrator, and doctor who witnessed the presentation. Record the rationale given for searching the patient’s belongings. Document compliance with your facility and local law enforcement policies and procedures before instituting the search. Record the time that the search occurred, the name of the person conducting the search, and the names of others present. Complete an incident report if required by your facility.
|
PATIENT SELF-DOCUMENTATIN OF CARE
Self-documentation can be effective for patients who must perform considerable self-care (those with diabetes, for example) or for those trying to discover what precipitates a problem such as chronic headaches.
By using self-documentation, a patient with diabetes may record information about his diet, insulin dose, self-tested blood glucose levels, and activity level. This information can help him avoid insulin reactions and delay, prevent, or even reverse complications of hyperglycemia or hypoglycemia. Self-documentation may provide valuable information for the doctor or nurse as well.
A patient with chronic headaches may be asked to record when a headache occurred, what warning signs he noticed, what pain-relief measures he tried, and their effect. Analyzing this information may help prevent headaches.
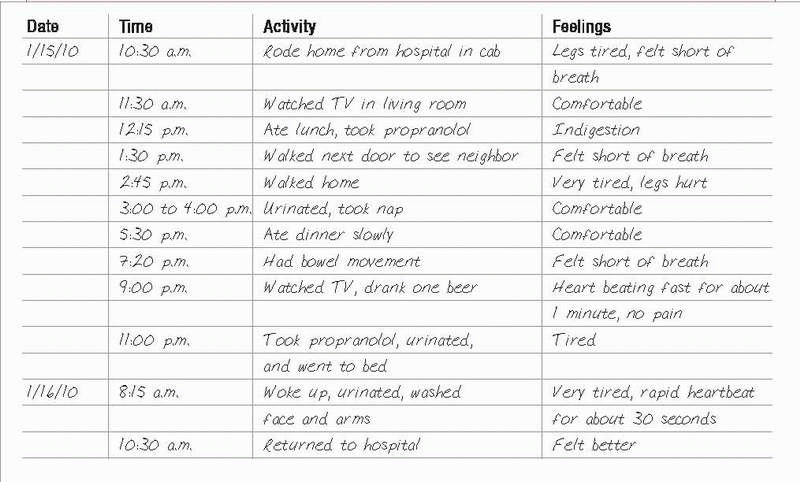
The patient can document entries on preprinted forms or in a journal. Such records can be used in both inpatient and outpatient care settings. Depending on your facility’s policy, these entries may or may not become a permanent part of the medical record. (See Keeping a record of monitored activities, page 290.)
 KEEPING A RECORD OF MONITORED ACTIVITIES
In many situations, your patient can provide information more accurately than a member of the health care team (case in point: a patient who wears a Holter monitor to evaluate the effect of medication on his heart and his daily activities).
Keeping this in mind, some health care facilities prepare patient instructional materials to be used in conjunction with a diary-like chart (such as the one below), which the patient refers to and completes for the medical record.
|
ESSENTIAL DOCUMENTATION
Record the date and time that you taught the patient about self-documentation. In your note, describe what you instructed the patient to measure or time or the symptoms to record and how frequently this should be done. Record the patient’s response to this teaching. Describe the type of record keeping he’s using. Document that the patient is able to verbalize understanding or give a return demonstration. Include any written materials given to the patient. Record that the patient knows who to call with questions or for emergency services.
|
PATIENT SELF-GLUCOST TESTING
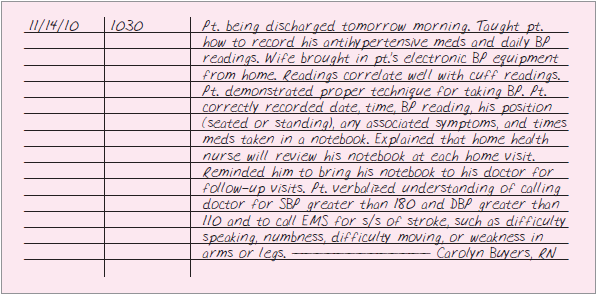
A patient with an established diagnosis of diabetes may prefer to use his own glucose meter to test his daily glucose levels. Per policy your facility will require a doctor’s order stating that the patient may use his own glucose meter.
If your patient is permitted to use his own FDA approved glucose meter, you must verify his competency by having him demonstrate the procedure to ensure that he’s performing it correctly and using the meter properly. Advise the patient to perform quality control testing on the meter each day. If the patient is using the meter for the first time during this admission, correlate the first glucose result from his meter with a fasting blood glucose level drawn by your facility’s laboratory.
Confirm with the patient how to record his blood glucose levels, and stress the importance of bringing results to all follow-up appointments. (See Keeping a record of blood glucose levels, page 292.) Review blood glucose levels that should be reported immediately. Frequency of testing is determined by whether the patient has type 1 or type 2 diabetes as well as his doctor’s instructions.
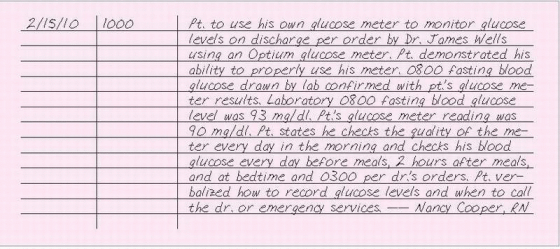
ESSENTIAL DOCUMENTATION
Verify the doctor’s order allowing the patient to use his glucose meter as well as the patient’s ability to use his meter by demonstration. Compare the patient’s first glucose meter reading with the fasting blood glucose level drawn by your facility’s laboratory to correlate the patient’s glucose
meter accuracy. Then, record the date and time that the patient performs self-glucose monitoring. Be sure to document how often the patient tests the quality control of his meter. Also, document the results of the patient’s glucose testing as ordered or per your facility’s policy.
meter accuracy. Then, record the date and time that the patient performs self-glucose monitoring. Be sure to document how often the patient tests the quality control of his meter. Also, document the results of the patient’s glucose testing as ordered or per your facility’s policy.
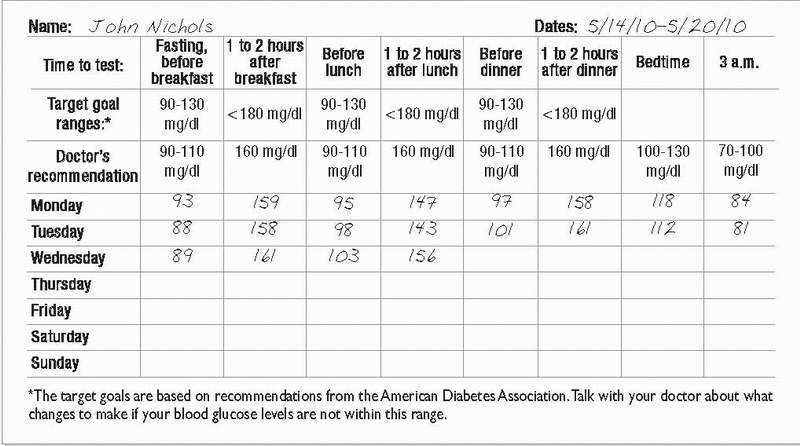
 KEEPING A RECORD OF BLOOD GLUCOSE LEVELS
Recommendations for the best time of day to test your blood glucose level depend on your medicine, meal times, and glucose control. On the chart below, your doctor will check the times when you should test your glucose level. Your doctor may also suggest different goals, depending on your situation.
|
|
PATIENT TEACHING
Patient and caregiver teaching is essential for maintaining the patient’s health, preventing or detecting early signs of complications, and promoting self-care and independence. Patient teaching is every patient’s right in any setting. Teaching is most effective when it’s specific to the patient’s and family’s physical, financial, emotional, intellectual, cultural, and social circumstances and when the patient and family are ready to learn, mentally alert, and free from discomfort and distraction.
Keep teaching sessions short, and reinforce all instructions using verbal explanations, demonstrations, videos, and written materials. Evaluate the patient’s understanding by asking him to restate material, answer your questions, or give a return demonstration.
Documentation of your teaching is important and lets other health care team members know what the patient has been taught and what materials need to be reinforced. It also serves as a record to back you up if the patient files a lawsuit claiming he was injured because he didn’t receive instruction. (See Documenting what you teach, page 294.)
ESSENTIAL DOCUMENTATION
Check your facility’s policies and procedures regarding when, where, and how to document your teaching. Despite their similar content, patientteaching forms vary according to the health care facility. The forms may ask you to document information by filling in blanks, checking boxes, or writing brief narrative notes. Typically, you’ll need to document information about the patient’s learning abilities, barriers to learning, goals to be met, equipment or supplies used, specific content taught, response to
teaching, and skills to be acquired by the time of discharge. You’ll also need to chart how you evaluated the patient’s learning such as by return demonstration or verbalization of understanding Before discharge, document the patient’s remaining learning needs, and note whether you provided him with printed material or other patient-teaching aids.
teaching, and skills to be acquired by the time of discharge. You’ll also need to chart how you evaluated the patient’s learning such as by return demonstration or verbalization of understanding Before discharge, document the patient’s remaining learning needs, and note whether you provided him with printed material or other patient-teaching aids.
Stay updated, free articles. Join our Telegram channel

Full access? Get Clinical Tree


