Orthopedic care
Orthopedics began as a specialty for the prevention and treatment of children’s musculoskeletal deformities. However, this branch of medicine has expanded dramatically to include prevention, treatment, and care of musculoskeletal conditions affecting patients of all ages.
The American Nurses Association defines orthopedic nursing as the diagnosis and treatment of human responses to actual and potential health problems related to musculoskeletal function. More specifically, orthopedic nursing focuses on promoting wellness and self-care and on preventing further injury and illness in patients with degenerative, traumatic, inflammatory, neuromuscular, congenital, metabolic, and oncologic disorders.
Traditionally, orthopedic nurses have needed to operate special mechanical and traction equipment. Today, they need to understand principles of internal and external fixation, prosthetics, orthotics, immobilization, and implantation.
Despite the evolution of complex surgical procedures and mechanical devices that characterize modern orthopedic care, some things remain the same. A patient hospitalized for an orthopedic procedure — whether it’s cast application, traction, or arthroplasty — is vulnerable to similar complications, such as:
joint stiffness and skin breakdown from impaired physical mobility
dislocations and fractures from mishandling osteoporotic extremities
pain management issues and adverse reactions
neurovascular compromise from pressure on major blood vessels and nerves caused by immobilization devices or compartmental edema
infection of surgical wounds or skeletal pin tracts
prolonged healing from failure to observe sound principles of immobilization.
In addition, the patient’s level of understanding and effectiveness of coping skills must be assessed.
In this chapter, you’ll find recommendations that will allow you to provide the best nursing care for your patients with orthopedic disorders or injuries. Some recommendations are evidence-based EB, grounded in current research; others are based on fundamental principles of science SCIENCE. Numerous best practices have the support of organizations, such as the American Pain Society APS, the Agency for Healthcare Research and Quality AHRQ, the National Association of Orthopedic Nurses NAON, the Joint Commission on Accreditation of Health Care Organizations JCAHO, the National Institute for Neurologic Disorders and Stroke NINDS, the Arthritis Foundation AF, the National Institutes of Health NIH, and the American Hospital Association’s Patient Care Parnership PCP Equipment manufacturers MFR may have specific guidelines or recommendations for the use of their equipment.
Consistent care
Without exception, orthopedic complications can be prevented or minimized by appropriate and consistent assessment, monitoring, and therapy. For example, the orthopedic patient’s neurovascular status must be assessed at regular intervals; otherwise, signs and symptoms of neurovascular compromise may go undetected until irreversible damage occurs. Consistent orthopedic care remains the surest way to promote rapid healing and successful rehabilitation.
Ready for an emergency
Orthopedic nursing care is characterized by the high incidence of emergency procedures you’re likely to perform. The first step in administering emergency care at the scene of an accident is to immediately assess the patient for a life-threatening condition. Don’t move him before completing an assessment unless
danger is imminent because this might worsen the injury and increase pain. If the patient must be moved, assess him for possible spinal injury so that the appropriate transfer techniques can be used. After determining that no life-threatening injury exists, conduct an initial head-to-toe assessment, comparing bilaterally where applicable.
danger is imminent because this might worsen the injury and increase pain. If the patient must be moved, assess him for possible spinal injury so that the appropriate transfer techniques can be used. After determining that no life-threatening injury exists, conduct an initial head-to-toe assessment, comparing bilaterally where applicable.
Always evaluate the patient’s neurovascular status. Check the five P’s: pain, pallor, pulse, paresthesia, and paralysis. Assess the injury thoroughly, and use strict sterile technique when caring for open wounds to prevent infection. If you suspect a bone injury, apply a splint to reduce injury and immobilize the bone.
In nonemergencies, performing orthopedic procedures correctly can ease pain, prevent further injury, and encourage proper healing.
Arthroplasty care
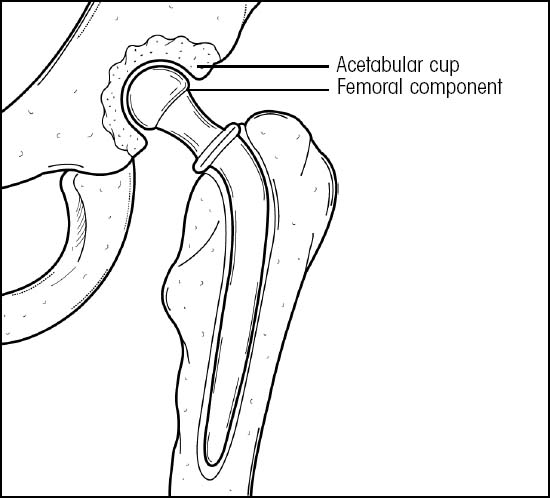
Arthroplasty involves surgical replacement of all or part of the joint. Joint arthroplasty is done to decrease or eliminate pain and improve functional status. Two of the most commonly replaced joints are the hip and the knee. Hip replacement may be total, replacing the femoral head and acetabulum, or partial, replacing only one joint component. (See Total hip replacement.) Knee replacement may also be partial, replacing either the medial or lateral compartment of the knee joint, or total, replacing the entire knee joint. Total knee replacement is commonly used to treat severe pain, joint contractures, and deterioration of joint surfaces — conditions that prohibit full extension or flexion.
According to the National Institutes of Health (NIH), to be considered for total hip replacement (THR), a patient should have some radiographic evidence of joint damage and moderate to severe pain or disability (or both) that isn’t relieved by nonsurgical measures. The measures should include use of assistive devices (walkers), nonsteroidal anti-inflammatory drugs, physical therapy, and a reduction in physical activity. NIH statistics show that THR is most commonly used for patients with osteoarthritis. Other indications include:
rheumatoid arthritis
avascular necrosis
traumatic arthritis
certain hip fractures
benign and malignant bone tumors
arthritis associated with Paget’s disease
ankylosing spondylitis
juvenile rheumatoid arthritis. NIH
Arthroplasty care includes maintaining alignment of the affected joint, assisting with exercises, and providing routine postoperative care.
Nursing responsibilities include teaching the patient safe mobility while performing activities of daily living, home care, and exercises that may continue for several years, depending on the type of arthroplasty performed and the patient’s conditioning.
Equipment
Traction frame with trapeze • comfort device (such as static air mattress overlay, low-air-loss bed, or sheepskin) • bed sheets • incentive spirometer • continuous passive motion (CPM) machine (total knee replacement) • compression stocking • sterile dressings • hypoallergenic tape • ice bag • skin lotion • warm water • crutches or walker • pain medications • closed-wound drainage system • I.V. antibiotics • pillow •
abduction splint • anticoagulants • optional: closed drainage system, slings
abduction splint • anticoagulants • optional: closed drainage system, slings
After total knee replacement, a knee immobilizer may be applied in the operating room, or the leg may be placed in CPM.
Preparation of equipment
After the patient goes to the operating room, make a Balkan frame with a trapeze on his bed frame. This will allow him some mobility after the operation. Make the bed, using a comfort device and clean sheets. Have the bed taken to the operating room. This enables immediate placement of the patient on his hospital bed after surgery and eliminates the need for an additional move from his recovery room bed.
Implementation
Check the patient’s vital signs every 15 minutes twice, every 30 minutes until they stabilize, and then every 2 to 4 hours and routinely thereafter, according to facility protocol. Report changes in his vital signs because they may indicate infection, hemorrhage, or postoperative complications. NAON
Encourage the patient to perform deep-breathing and coughing exercises. Assist with incentive spirometry as ordered to prevent respiratory complications. SCIENCE
Assess the patient’s neurovascular status every 2 hours for the first 48 hours and then every 4 hours for signs of complications. Check the affected leg for color, temperature, toe movement, sensation, edema, capillary refill, and pedal pulse. Investigate complaints of pain, burning, numbness, or tingling. NAON
Apply the compression stocking to the unaffected leg, as ordered, to promote venous return and prevent phlebitis and pulmonary emboli. Once every 8 hours, remove it, inspect the leg — especially the heel — for pressure ulcers, and reapply it. SCIENCE
Administer pain medication, as ordered. APS
For 24 hours after surgery, administer I.V. antibiotics, as ordered, to minimize the risk of wound infection.
Administer anticoagulant therapy, as ordered, to minimize the risk of thrombophlebitis and embolus formation. Observe for bleeding. Observe the leg for signs and symptoms of phlebitis, such as warmth, swelling, tenderness, redness, and a positive Homans’ sign. NAON SCIENCE
Check dressings for excessive bleeding. Circle any drainage on the dressing and mark it with your initials, the date, and the time. As needed, apply more sterile dressings, using hypoallergenic tape. Report excessive bleeding to the practitioner.
Observe the closed-wound drainage system for discharge color and amount. Proper drainage prevents hematoma. Purulent discharge and fever may indicate infection. Empty and measure drainage as ordered, using clean technique.
Monitor fluid intake and output every shift; include wound drainage in the output measurement.
Apply an ice bag, as ordered, to the affected site for the first 48 hours to reduce swelling, relieve pain, and control bleeding. APS SCIENCE
Reposition the patient every 2 hours. These position changes enhance comfort, prevent pressure ulcers, and help prevent respiratory complications. SCIENCE
Help the patient use the trapeze to reposition himself every 2 hours. Provide skin care for the back and buttocks, using warm water and lotion, as indicated.
Instruct the patient to perform muscle-strengthening exercises for affected and unaffected extremities, as ordered, to help maintain muscle strength and range of motion and to help prevent phlebitis. NAON
Before ambulation, give an analgesic as ordered, 30 minutes before activity, because movement is very painful. Encourage the patient during exercise. APS
Help the patient with progressive ambulation, using adjustable crutches or a walker when needed.
After hip arthroplasty
Keep the affected leg in abduction and in the neutral position to stabilize the hip and keep the cup and femur head in the acetabulum. Place a pillow between the patient’s legs to maintain hip abduction. NAON SCIENCE
No adduction past midline
No flexion greater than 90 degrees
No external rotation past midline
For the posterior approach:
No adduction past midline
No flexion greater than 60 to 90 degrees
No internal rotation past midline
No extension past neutral
Keep the patient in the supine position, with the affected hip in full extension, for 1 hour three times per day and at night. This will help prevent hip flexion contracture. NAON SCIENCE
On the day after surgery, have the patient begin plantar flexion and dorsiflexion exercises of the foot on the affected leg. When ordered, instruct him to begin quadriceps exercises. Progressive ambulation protocols vary. In most cases, the patient is permitted to begin transfer and progressive ambulation with assistive devices on the first day.
After total knee replacement
Elevate the affected leg, as ordered, to reduce swelling. SCIENCE
Instruct the patient to begin quadriceps exercises and straight leg-raising, when ordered (usually on the first postoperative day). Encourage flexion-extension exercises, when ordered (usually after the first dressing change).
If the practitioner orders use of the CPM machine, he’ll adjust the machine daily to gradually increase the degree of flexion of the affected leg. Typically, patients can dangle their feet on the first day after surgery and begin ambulation with partial weight bearing as tolerated (cemented knee) or toe-touch ambulation only (uncemented knee) by the second day. The patient may need to wear a knee immobilizer for support when walking; otherwise, he should be in CPM for most of the day and night or during waking hours only. Check your facility’s protocol.
The degree of flexion, extension, and weight bearing status will depend on the practitioner’s specific orders, surgical approach used, and the surgeon’s preference.
Special considerations
Before surgery, explain the procedure to the patient. Emphasize that frequent assessment — including monitoring his vital signs, neurovascular integrity, and wound drainage — is normal after the operation.
Inform the patient that he’ll receive I.V. antibiotics for about 2 days. Make sure that he understands that he’ll receive medication around the clock for pain control. Explain the need for immobilizing the affected leg and exercising the unaffected one.
Before discharge, instruct the patient regarding home care and exercises.
Nursing diagnoses
Acute pain
Impaired physical mobility
Expected outcomes
The patient will:
express feelings of comfort and pain relief
maximize mobility and ambulate safely.
Complications
Immobility after arthroplasty may result in such complications as pulmonary embolism, pneumonia, phlebitis, paralytic ileus, urine retention, and bowel impaction. A deep wound or infection at the prosthesis site is a serious complication that may force the removal of the prosthesis. Although these are the most common complications, the incidence of occurrence has been significantly reduced because of the use of prophylactic antibiotics and anticoagulants and early mobilization.
Dislocation of a total hip prosthesis may occur after violent hip flexion or adduction or during internal rotation. Signs and symptoms of dislocation include the inability to rotate the hip or bear weight, shortening of the leg, and increased pain.
Fat embolism, a potentially fatal complication resulting from release of fat molecules in response to increased intermedullary canal pressure from the prosthesis, may develop within 72 hours after surgery. Watch for such signs and symptoms as apprehension, diaphoresis, fever, dyspnea, pulmonary effusion, tachycardia, cyanosis, seizures, decreased level of consciousness, and a petechial rash on the chest and shoulders.
Documentation
Record the patient’s neurovascular status. Describe his position (especially the position of the affected leg), skin care and condition, respiratory care and condition, and the use of compression stockings. Document all exercises performed and their effect, and record ambulatory efforts and the type of support used.
On the appropriate flowchart, record the patient’s vital signs and fluid intake and output. Record discharge instructions and how well the patient seems to understand them.
Electrical bone growth stimulation
Electrical bone growth stimulation may be invasive or noninvasive.
Invasive system
An invasive system involves placing a spiral cathode inside the bone at the fracture site. A wire leads from the cathode to a battery-powered generator, also implanted in local tissues. The patient’s body completes the circuit.
 |
Supportive references
Geerts, W.H., et al. Seventh ACCP Conference on Antithrombotic and Thrombolytic Therapy. “Prevention of Venous Thromboembolism”, Chest 126(3 Suppl):338S-400S, September 2004.
Maher, A., et al. Orthopaedic Nursing, 3rd ed. Philadelphia: W.B. Saunders Co., 2002.
National Institutes of Health Consensus Development Conference on Total Hip Replacement. NIH Consensus Statement 12(5):1-31, September 1994.
Bone growth stimulation, electrical
The use of electricity as an aid in bone healing was first acknowledged in 1812. However, full realization of the process didn’t occur until 1953. Indications for the use of bone stimulators include augmentation of open reduction with internal and external fixation, promotion of bone growth, treatment of infected nonunions and failed arthrodesis and, most recently, treatment of disuse osteoporosis. By limiting the body’s natural electrical forces, this procedure initiates or accelerates the healing process.
Three basic electrical bone stimulation techniques are available: fully implantable direct current stimulation, semi-invasive percutaneous stimulation, and noninvasive electromagnetic coil stimulation. (See Electrical bone growth stimulation.) Choice of technique depends on the fracture type and location, the practitioner’s preference, and the patient’s ability and willingness to comply. The invasive device requires little or no patient involvement. With the other two methods, however, the patient must manage his own treatment schedule and maintain the equipment. Treatment time averages 3 to 6 months.
Equipment
Direct current stimulation: The equipment set consists of a small generator and leadwires that connect to a titanium cathode wire surgically implanted into the nonunited bone site.
Percutaneous stimulation: The set consists of an external anode skin pad with a leadwire, lithium battery pack, and one to four Teflon-coated stainless steel cathode wires that are surgically implanted.
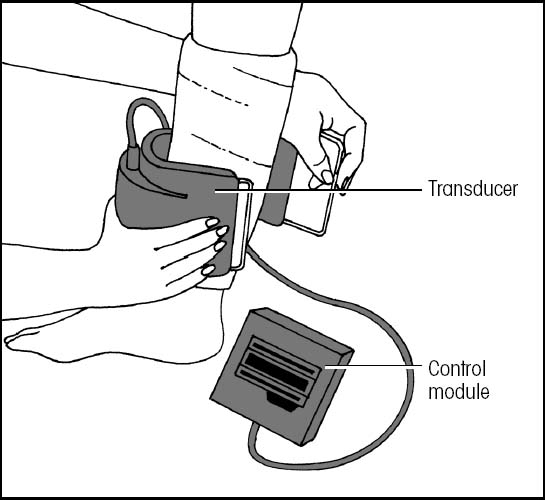
Electromagnetic stimulation: The set consists of a generator that plugs into a standard 110-volt outlet
and two strong electromagnetic coils placed on either side of the injured area. The coils can be incorporated into a cast, cuff, or orthotic device. (See Using an external bone growth stimulator, page 490.)
and two strong electromagnetic coils placed on either side of the injured area. The coils can be incorporated into a cast, cuff, or orthotic device. (See Using an external bone growth stimulator, page 490.)
Preparation of equipment
All equipment comes in sets with instructions provided by the manufacturer. Follow the instructions carefully. MFR Make sure that all parts are included and are sterilized according to facility policy and procedure.
Implementation
Confirm the patient’s identity using two patient identifiers according to facility policy. JCAHO
Tell the patient whether he’ll have an anesthetic and, if possible, which kind. PCP
Direct current stimulation
Implantation is performed with the patient under general anesthesia. Afterward, the practitioner may apply a cast or external fixator to immobilize the limb. The patient is usually hospitalized for 2 to 3 days after implantation. Weight bearing may be ordered as tolerated.
After the bone fragments join, the generator and leadwire can be removed under local anesthesia. The titanium cathode remains implanted.
Percutaneous stimulation
Remove excessive body hair from the injured site before applying the anode pad. Avoid stressing or pulling on the anode wire. Instruct the patient to change the anode pad every 48 hours. Tell him to report local pain to his practitioner and not to bear weight for the duration of treatment.
Electromagnetic stimulation
Show the patient where to place the coils, and tell him to apply them for 3 to 10 hours each day as ordered by his practitioner.
Urge the patient not to interrupt the treatments for more than 10 minutes at a time.
Teach the patient how to use and care for the generator.
Relay the practitioner’s instructions for weight bearing. Usually, the practitioner will advise against bearing weight until evidence of healing appears on X-rays.
Special considerations
A patient with direct current electrical bone stimulation shouldn’t undergo electrocauterization, diathermy, or magnetic resonance imaging (MRI). Electrocautery may “short” the system; diathermy may potentiate the electrical current, possibly causing tissue damage; and MRI will interfere with or stop the current.
Percutaneous electrical bone stimulation is contraindicated if the patient has any kind of inflammatory process. Ask the patient if he’s sensitive to nickel or chromium because both are present in the electrical bone stimulation system.
Electromagnetic coils are contraindicated for a pregnant patient, a patient with a tumor, or a patient with an arm fracture or a pacemaker.
Nursing diagnoses
Impaired physical mobility
Expected outcomes
The patient will:
maximize mobility and ambulate safely
maintain muscle strength and joint mobility.
Complications
Complications associated with any surgical procedure, including increased risk of infection, may occur with direct current electrical bone stimulation equipment. Local irritation or skin ulceration may occur around cathode pin sites with percutaneous devices. No complications are associated with the use of electromagnetic coils.
Documentation
Record the type of electrical bone stimulation equipment provided, including the date, time, and location, as appropriate. Note the patient’s skin condition and tolerance of the procedure. Record instructions given to the patient and his family as well as their ability to understand and act on those instructions.
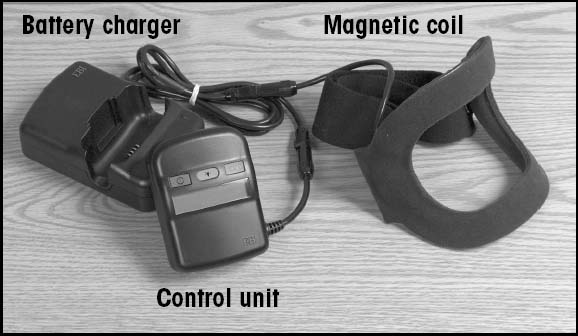
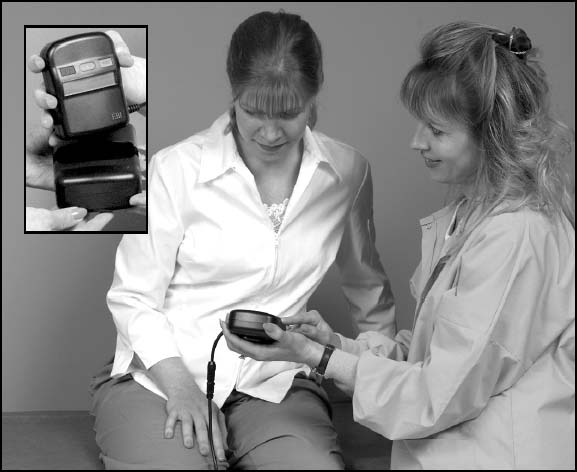
Using an external bone growth stimulator
An external bone growth stimulator (EBGS) is a noninvasive and painless alternative to surgical bone grafting to promote healing. To use it, first gather the necessary equipment and familiarize the patient with the components of the EBGS system.
 |
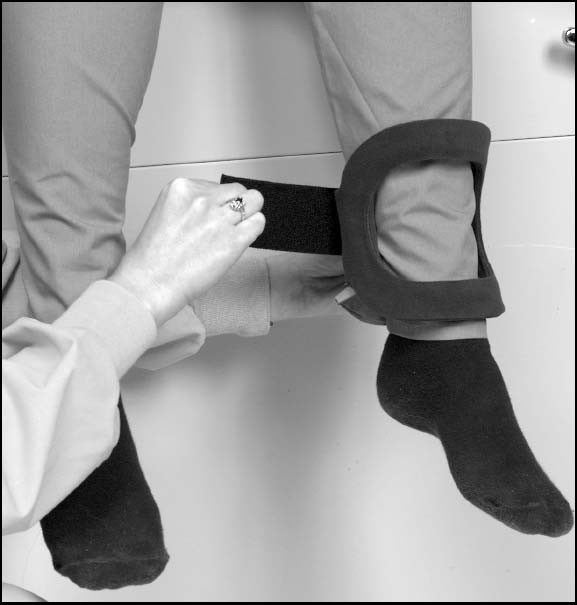
Teach the patient where and how to place the coil. Inform her that she may place the coil over her cast or against her skin. A layer of clothing between the coil and her skin will provide adequate protection against skin irritation. Show her how to secure the coil with the strap and connect the control unit to the coil.
 |
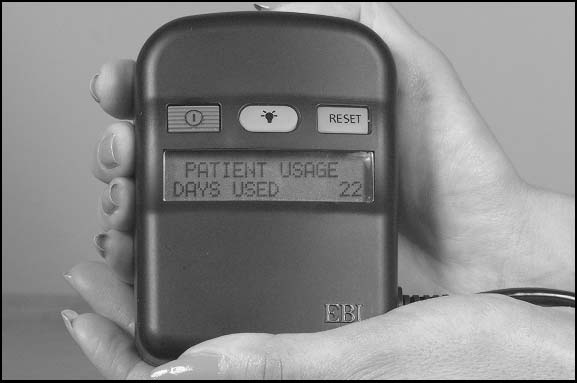
Pressing the button will start the unit, which will begin transmitting and recording. Be sure to show the patient when the battery needs changing. Depending on the type of unit, she may need to do this after each use or when the words “recharge battery” appear on the light-emitting diode (LED) screen. To charge the unit, tell her to plug it into an outlet at home and leave it plugged in for at least 2 hours.
 |
On the patient’s return visits, turn on the control unit. The LED screen should display the hourly use per day and the number of days used and not used. Use these data to determine if she has used the EBGS according to her prescribed regimen. Be sure to document the usage times in her medical record.
 |
Adapted with permission from Patterson, M. “What’s the Buzz on External Bone Growth Stimulators?” Nursing2000 30(6):44-45, June 2000.
Supportive references
LeeEvans, R.D., et al. “Electrical Stimulation with Bone and Wound Healing”, Clinics in Podiatric Medicine and Surgery 18(1):79-95, January 2001.
Patterson, M. “What’s the Buzz on External Bone Growth Stimulators?” Nursing2000 30(6):44-45, June 2000.
Ryaby, J. “Clinical Effects of Electromagnetic and Electric Fields on Fracture Healing”, Clinical Orthopaedics and Related Research (355 Suppl):S205-15, October 1998.
External fixation
External fixation is a system of percutaneous pins and wires that are inserted through the skin and muscle into the bone and affixed to an adjustable external frame, which maintains the bones in proper alignment. Specialized types of external fixators may be used to lengthen leg bones or immobilize the cervical spine. (See External fixation devices.)
An advantage of external fixation over other immobilization techniques is that it stabilizes the fracture while allowing full visualization and access to open wounds. It also facilitates early ambulation, thus reducing the risk of complications from immobilization.
The Ilizarov Fixator is a special type of external fixation device. This device is a combination of rings and tensioned transosseous wires used primarily in limb lengthening, bone transport, and limb salvage. Highly complex, it provides gradual distraction resulting in good-quality bone formation with a minimum of complications.
Equipment
Sterile cotton-tipped applicators • prescribed antiseptic cleaning solution • ice bag • sterile gauze pads • analgesic or opioid • antimicrobial solution and ointment
Equipment varies with the type of fixator and the type and location of the fracture. Typically, sets of pins, stabilizing rods, and clips are available from manufacturers. Don’t reuse pins.
Preparation of equipment
Make sure that the external fixation set includes all the equipment it’s supposed to include and that the equipment has been sterilized according to your facility’s policy.
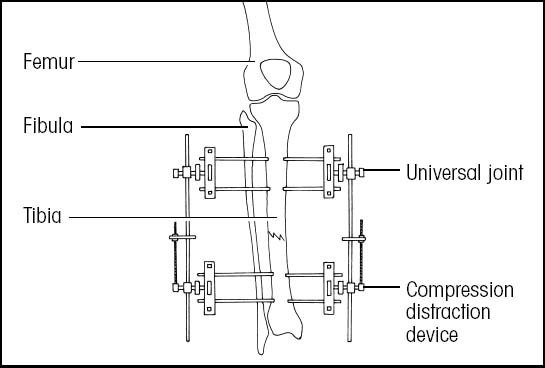
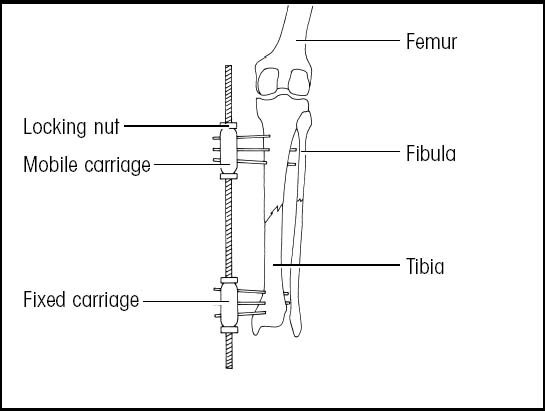
External fixation devices
The practitioner’s selection of an external fixation device depends on the severity of the patient’s fracture and on the type of bone alignment needed.
Universal day frame
A universal day frame is used to manage tibial fractures. The frame allows the practitioner to readjust the position of bony fragments by angulation and rotation. The compression-distraction device allows compression and distraction of bony fragments.
 |
Implementation
Confirm the patient’s identity using two patient identifiers according to facility policy. JCAHO
Explain the procedure to the patient to reduce his anxiety. Emphasize that he’ll feel little pain after the fixation device is in place. Assure him that his feelings of anxiety are normal. PCP
Tell the patient that he’ll be able to move with the apparatus in place, which may help him resume normal activities more quickly.
After the fixation device is in place, perform neurovascular checks every 2 to 4 hours for 24 hours and then every 4 to 8 hours, as appropriate, to assess for possible neurologic damage. Assess color, sensation, warmth, movement, edema, capillary refill, and pulses of the affected extremity. Compare with the unaffected side. NAON
Apply an ice bag to the surgical site, as ordered, to reduce swelling, relieve pain, and lessen bleeding. SCIENCE
Administer analgesics or opioids, as ordered, 30 minutes to 1 hour before exercising or mobilizing the affected extremity to promote comfort. APS SCIENCE
Monitor the patient for pain not relieved by analgesics or opioids and for burning, tingling, or numbness, which may indicate nerve damage, circulatory impairment, or compartment syndrome. SCIENCE
Elevate the affected extremity, if appropriate, to minimize edema. SCIENCE
Perform pin-site care, as ordered, to prevent infection. Pin-site care varies, but you’ll usually follow guidelines such as these: Use sterile technique; avoid digging at pin sites with the cotton-tipped applicator; if ordered, clean the pin site and surrounding skin with a cotton-tipped applicator dipped in ordered antiseptic solution; if ordered, apply antimicrobial ointment to pin sites; and apply a loose sterile dressing, or dress with sterile gauze pads with antimicrobial solution as ordered. Perform pin-site care as often as necessary, depending on the amount of drainage. NAON
Check for redness, tenting of the skin, prolonged or purulent drainage from the pin site, swelling, elevated body or pin-site temperature, and any bowing or bending of pins, which may stress the skin.
Special considerations
Patient with an Ilizarov Fixator
When the device has been placed and preliminary calluses have begun to form at the insertion sites (in 5 to 7 days), gentle distraction is initiated by turning the appropriate screws one-quarter turn (1 mm) every 4 to 6 hours as ordered.
Teach the patient that he must be consistent in turning the screws every 4 to 6 hours around the clock. Make sure that he understands that he must be strongly committed to compliance with the protocol for the procedure to be successful. Because the treatment period may be prolonged (4 to 10 months), discuss with the patient and his family the psychological effects of long-term care.
Don’t administer nonsteroidal anti-inflammatory drugs (NSAIDs) to patients being treated with the Ilizarov Fixator. NSAIDs may decrease the necessary inflammation caused by the distraction, resulting in delayed bone formation.
Encourage the patient to stop smoking and provide smoking-cessation materials because smoking delays bone healing.
All patients
Before discharge, teach the patient and his family how to provide pin-site care. This is a sterile procedure in the hospital, but the patient can use clean technique at home. Also, provide him with written instructions and have him demonstrate the procedure before leaving the hospital. NAON Teach him to recognize signs of pin-site infection. Tell him to keep the affected limb elevated when sitting or lying down.
Nursing diagnoses
Risk for infection
Risk for peripheral neurovascular dysfunction
Expected outcomes
The patient will:
remain free from infection
maintain circulation in the extremity
not experience disability related to peripheral neurovascular dysfunction.
Complications
Complications of external fixation include loosening of pins and loss of fracture stabilization, infection of the pin tract or wound, skin breakdown, nerve damage, and muscle impingement.
Ilizarov Fixator pin sites are more prone to infection because of the extended treatment period and because of the pins’ movement to accomplish distraction. The pins are also more likely to break because of their small diameter. The large number of pins used increases the patient’s risk of neurovascular compromise.


