Obstetric, neonatal, and postpartum care
More than 4 million infants are born in the United States each year. Many of them are born with considerably less medical intervention than was customary in previous decades, yet many are conceived with considerably more medical intervention. Accompanying changes in maternal care are changes in neonatal care — thanks to the advanced knowledge and techniques for improving fetal monitoring and promoting neonatal survival.
If you’re working with a pregnant patient, you’ll need to employ all your teaching skills. You’ll also need to be aware of what the best practice is for caring for the pregnant patient as recommended by such organizations as the American College of Obstetricians and Gynecologists ACOG and the Association of Women’s Health, Obstetric, and Neonatal Nurses AWHONN. Care of the neonate requires knowledge of new clinical evaluation methods and electronic and biochemical monitoring techniques as well as knowledge of best practices as recommended by the National Association of Neonatal Nurses NANN and the American Academy of Pediatrics AAP. Organizations, such as the National Institutes of Health NIH, the Centers for Disease Control and Prevention CDC, the Joint Commission on Accreditation of Health Care Organizations JCAHO, and the American Hospital Association AHOSPA also offer guidelines to best practices in obstetric and neonatal care. Additional practices are evidence-based EB, grounded in the principles of fundamental science SCIENCE, or related to the American Hospital Association’s Patient Care Partnership PCP. In addition, equipment manufacturers MFR may have specific guidelines or recommendations for the use of their equipment.
Because of its profound impact on mother and child, maternal-neonatal care requires expertise that goes beyond clinical skills. Such care requires clinical competence, sensitivity, and good judgment. It must consider the patient’s sexuality and self-image and recognize changing social attitudes and values — especially those concerning childbirth and alternative methods of conception and childbirth. The information presented in this chapter covers the fundamentals of maternal-child care and presents evidence-based information so that you can provide the best care for both of your patients.
Amnioinfusion
Amnioinfusion is the replacement of amniotic fluid volume through an intrauterine infusion. It involves the infusion of a warmed isotonic solution, such as normal saline or lactated Ringer’s solution, via an intrauterine pressure catheter into the amniotic cavity.
Amnioinfusion is indicated when umbilical cord compression is a factor or when repetitive variable decelerations aren’t alleviated by maternal position change and oxygen administration. It also helps to relieve umbilical cord compression in such conditions as oligohydramnios associated with postmaturity, intrauterine growth retardation, preterm labor, and premature rupture of membranes. Although this procedure can be done to dilute meconium before aspiration occurs, a recent study suggests that for women in labor who have thick meconium staining of their amniotic fluid, amnioinfusion didn’t decrease the risk of perinatal death, severe meconium aspiration syndrome, or other major neonatal or maternal disorders. EB1
Contraindications include amnionitis, placental abnormalities, hydramnois, and multiple gestation.
Equipment
Fetal heart rate (FHR) monitor • sterile intrauterine pressure catheter • normal saline solution or lactated Ringer’s solution at room temperature • I.V. tubing
Implementation
Confirm the patient’s identity using two patient identifiers according to facility policy. JCAHO
Explain the procedure and rationale for its use.
Prepare the patient for the procedure, and encourage her to lie in a lateral recumbent position.
Inform the patient that she’ll feel fluid flowing out of her vagina during the procedure. PCP
Be sure that the solution for the infusion is warmed to the patient’s body temperature to avoid chilling.
Institute continuous FHR monitoring if not already in place; obtain a baseline FHR tracing.
The practitioner ruptures the membranes if they haven’t ruptured spontaneously.
The practitioner inserts a sterile pressure catheter through the cervix into the uterus.
The catheter is attached via I.V. tubing to warmed isotonic solution.
The fluid is administered rapidly over 20 to 30 minutes, usually 250 to 500 ml initially, and then the flow rate is adjusted based on FHR patterns. EB2
Assist with infusion, and adjust flow rate as ordered to maintain fetal heart rate pattern demonstrating no variable decelerations.
After the procedure
Continuously monitor FHR and uterine contractions.
Assess temperature at least every hour to detect infection.
Monitor the patient for a continuous flow of fluid via the vagina.
Provide comfort measures, including frequent bed linen changes.
Notify the practitioner if the fluid suddenly stops, an indication that the fetal head is engaged and fluid is collecting in the uterus — this could lead to hydramnios and, possibly, uterine rupture.
Nursing diagnoses
Deficient knowledge (procedure)
Risk for infection
Expected outcomes
The patient will:
state an understanding of procedure and reason for doing it
remain free from infection
not exhibit an increase in body temperature.
Complications
Amnioinfusion is considered safe and effective, and complications are rare. Possible complications include umbilical cord prolapse, uterine scar disruption, iatrogenic polyhydramnios, elevated intrauterine pressure leading to fetal bradycardia, and amniotic fluid embolism.
Documentation
Document that the patient has signed an informed consent form. Keep accurate intake and output records during the procedure. Document FHR along with the maternal vital signs and response to treatment.
Supportive references
Fraser, W.D. et al. “Amnioinfusion for the Prevention of Meconium Aspiration Syndrome”, New England Journal of Medicine 353(9):909-17, September 2005. EB1
Pillitteri, A. Maternal & Child Health Nursing: Care of the Childbearing & Childrearing Family, 5th ed. Philadelphia: Lippincott Williams & Wilkins, 2007. EB2
Apgar scoring
The Apgar assessment is a screening tool to assist health care providers in determining which medical and nursing interventions are needed to help the neonate successfully adapt from an intrauterine to an extrauterine environment.
Named after its developer, Virginia Apgar, the Apgar score quantifies the neonatal heart rate, respiratory effort, muscle tone, reflexes, and color. Each category is assessed 1 minute after birth and again 5 minutes later. Scores in each category range from 0 to 2. The highest Apgar score is 10 — the greatest possible sum of the five categories.
in the Apgar score are developmentally determined. These include muscle tone, which increases with gestational age; reflex irritability, which is more pronounced in a full-term neonate; and respiratory effort, which is decreased in a preterm neonate because of a decrease in surfactant production. Second, Apgar scores have been used to document birth asphyxia. The American Academy of Physicians (AAP) states that neither Apgar score nor low pH values alone can define the degree of perinatal asphyxia in a neonate. The AAP suggests that the term asphyxia should be reserved to describe a neonate with these conditions:
profound metabolic or mixed acidemia (pH less than 7.0)
Apgar score of 0 to 3 for longer than 5 minutes
neonatal neurologic manifestations (seizures, coma, or hypotonia) AAP
multisystem organ dysfunction.
Recording the Apgar score
Use this chart to record the neonatal Apgar score — assigning 0, 1, or 2 points for each of five signs — at 1 minute and at 5 minutes after birth. A score of 7 to 10 indicates good condition; 4 to 6, fair condition — the infant may have moderate central nervous system depression, muscle flaccidity, cyanosis, and poor respirations; 0 to 3, danger — the infant needs immediate resuscitation, as ordered.
| Sign | Apgar score | ||
|---|---|---|---|
| 0 | 1 | 2 | |
| Heart rate | Absent | Less than 100 beats/minute (slow) | More than 100 beats/minute |
| Respiratory effort | Absent | Slow, irregular | Good crying |
| Muscle tone | Flaccid | Some flexion and resistance to extension of extremities | Active motion |
| Reflex irritability | No response | Grimace or weak cry | Vigorous cry |
| Color | Pallor, cyanosis | Pink body, blue extremities | Completely pink |
Finally, the Apgar score should be assigned by health care providers who haven’t provided direct nursing or medical care to the mother or fetus during labor. These individuals have direct involvement with birth outcomes, which may bias the scoring.
The evaluation at 1 minute indicates the neonate’s initial adaptation to extrauterine life. The evaluation at 5 minutes gives a clearer picture of overall status after medical interventions have been implemented based on the appearance of the neonate at birth. If the neonate doesn’t breathe or his heart rate is less than 100 beats/minute, call for help and begin resuscitation at once. Don’t wait for a 1-minute Apgar test score.
Equipment
Apgar score sheet or neonatal assessment sheet • stethoscope • a clock with a second hand or Apgar timers • gloves (see Recording the Apgar score)
Preparation of equipment
If you use Apgar timers, make sure both timers are on at the instant of birth.
Implementation
Note the exact time of delivery. Wear gloves for protection from blood and body fluids. Dry the neonate to prevent heat loss. AWHONN CDC
Place the neonate in a 15-degree Trendelenburg position to promote mucus drainage. Position his head with the nose slightly tilted upward to straighten the airway. SCIENCE
Assess the neonate’s respiratory efforts. If necessary, supply stimulation by rubbing his back or gently flicking his foot. NANN
If the neonate exhibits abnormal respiratory responses, begin neonatal resuscitation according to the
guidelines of the American Heart Association (AHA) and the AAP. Use the Apgar score and the neonatal resuscitation AHA guidelines to judge the progress and success of resuscitation efforts. Should resuscitation efforts prove futile, you’ll need to implement measures for dealing with stillbirth. (See Dealing with a stillbirth.)
Dealing with a stillbirth
If a fetus that’s mature enough to survive extrauterine life dies before or during delivery, the event is called a stillbirth and the fetus a stillborn. Features of maturity include gestational age of 16 weeks or more and length of 6¼″ (16 cm) or more. Delivery of a less-mature fetus is called a spontaneous abortion.
Nursing interventions
In addition to measuring, weighing, identifying, and preparing the stillborn for the morgue, you’ll need to provide emotional support to the parents. Whether the parents expected the stillbirth, they’ll need comfort and care.
If the parents expected the stillbirth, help them continue working through their grief — especially if they have delayed grieving while waiting for delivery. If the parents didn’t expect the stillbirth, help them to express their anger and relieve grief in positive ways. Refer them to appropriate support groups.
Offer bereaved parents the opportunity to hold the stillborn. If possible, provide a photograph, identification bracelet, or other memento. If they refuse these mementos now, file them with the chart so that they may obtain them later if desired.
If the neonate exhibits normal responses, proceed to assign the Apgar score at 1 minute after birth.
Repeat the evaluation and record the score at 5 minutes after birth.
Assessing heart rate
Using a stethoscope, listen to the heartbeat for 30 seconds, and record the rate. To obtain beats per minute, double the rate. Alternatively, palpate the umbilical cord where it joins the abdomen, monitor pulsations for 6 seconds, and multiply by 10 to obtain beats per minute. Assign a 0 for no heart rate, a 1 for a rate less than 100 beats/minute, and a 2 for a rate greater than 100 beats/minute. NANN
Assessing respiratory effort
Count unassisted respirations for 60 seconds, noting quality and regularity (a normal rate is 30 to 60 respirations/minute). Assign a 0 for no respirations; a 1 for slow, irregular, shallow, or gasping respirations; and a 2 for regular respirations and vigorous crying.
Assessing muscle tone
Observe the extremities for flexion and resistance to extension. This can be done by extending the limbs and observing their rapid return to flexion — the neonate’s normal state. Assign a 0 for flaccid muscle tone, a 1 for some flexion and resistance to extension, and a 2 for normal flexion of elbows, knees, and hips, with good resistance to extension.
Assessing reflex irritability
Observe the neonate’s response to nasal suctioning or to flicking the sole of his foot. Assign a 0 for no response, a 1 for a grimace or weak cry, and a 2 for a vigorous cry.
Assessing color
Observe skin color, especially at the extremities. Assign a 0 for complete pallor and cyanosis, a 1 for a pink body with blue extremities (acrocyanosis), and a 2 for a completely pink body. To assess color in a dark-skinned neonate, inspect the oral mucous membranes and conjunctivae, the lips, the palms, and the soles.
Special considerations
If the patient and her support person don’t know about the Apgar score, discuss it with them during early labor, when they’re more receptive to new information. To prevent confusion or misunderstanding at delivery, explain to them what will occur and why. Explain to the parents that Apgar scores serve as a guide to assess the neonate’s initial adaptation to extrauterine life.
If the neonate requires emergency care, make sure a member of the delivery team provides appropriate support.
Nursing diagnoses
Anticipatory grieving
Risk for delayed development
Expected outcomes
The patient will:
express and accept feelings about anticipated death.
The neonate will:
have an Apgar score between 7 and 10.
Complications
Neonate will have a score of less than 7. If the heart rate is less than 100 beats/minute or the neonate doesn’t breath, begin resuscitation efforts.
Documentation
Record the Apgar score on the Apgar score sheet or the neonatal assessment sheet required by your facility. Be sure to indicate the total score and the signs for which points were deducted to guide postnatal care.
Supportive references
American Academy of Pediatrics and American College of Obstetricians and Gynecologists. Guidelines for Perinatal Care, 5th ed. Elk Grove Village, Ill.: AAP; Washington, D.C.: ACOG, 2002.
Casy, B.M., et al. “The Continuing Value of Apgar Score for the Assessment of Newborn Infants”, New England Journal of Medicine 344(7):461-71, February 2001.
Olds, S.B., et al. Clinical Handbook, Maternal-Newborn Nursing. A Family and Community Based Approach, 6th ed. Upper Saddle River, N.J.: Prentice Hall Health, 2000.
Wong, D.L., et al. Maternal-Child Nursing Care, 3rd ed. St. Louis: Mosby–Year Book, Inc., 2006.
Apnea monitoring
Categories of apnea NIH
Apnea has long been recognized as a clinical problem in neonates. Considerable investigative and clinical attention has been directed toward this condition. Although progress has been made and certain categories of apnea have been delineated, the cause remains unclear in many situations.
Apnea is the cessation of respiratory airflow. This pause in respiration can be the result from central or diaphragmatic (no respiratory effort), obstructive (usually due to upper airway obstruction), or mixed causes. Short (15 seconds), central apnea can be normal at all ages.
Pathologic apnea is characterized by cyanosis; abrupt, marked pallor or hypotonia; or bradycardia and a prolonged respiratory pause.
Periodic breathing is a breathing pattern in which there are three or more respiratory pauses of greater than 3 seconds’ duration with less than 20 seconds of respiration between pauses. Periodic breathing can be a normal event.
Apnea of prematurity is periodic breathing with pathologic apnea in a premature neonate. Apnea of prematurity usually ceases by 37 weeks’ gestation but occasionally persists to several weeks past term.
Apparent life-threatening event is an episode characterized by some combination of apnea (central or occasionally obstructive), color change (usually cyanotic or pallid but occasionally erythematous or plethoric), marked change in muscle tone (usually marked limpness), choking, or gagging.
Apnea of infancy is an unexplained episode of cessation of breathing for 20 seconds or longer, or a shorter respiratory pause associated with bradycardia, cyanosis, pallor, and marked hypotonia.
Source: “Infantile Apnea and Home Monitoring.” NIH Consensus Statement Online 6(6):1-10, September-October, 1986.
Apnea in a neonate is defined as cessation of breathing for 20 seconds or longer, or for a shorter period if accompanied by cyanosis or bradycardia. (See Categories of apnea.) Apnea monitors provide an early alert to the caregiver when the breathing rate ceases, allowing for immediate life-saving interventions. These monitors may be used for vulnerable neonates, such as those born prematurely, those who have survived a life-threatening medical emergency, and those who have a neurologic disorder, neonatal respiratory distress syndrome, bronchopulmonary dysplasia, congenital heart disease with heart failure, a tracheostomy, a history of sleep-induced apnea, a family history of sudden infant death syndrome, or acute drug withdrawal.
According to the American Academy of Pediatrics, cardiorespiratory monitoring shouldn’t be done at home for neonates to prevent sudden infant death syndrome. Research hasn’t proven that monitoring has prevented sudden infant death. AAP
According to the American Academy of Pediatrics, cardiorespiratory monitoring shouldn’t be done at home for neonates to prevent sudden infant death syndrome. Research hasn’t proven that monitoring has prevented sudden infant death. AAP
Using a home apnea monitor
When a neonate in your care requires the use of a home apnea monitor, you’ll need to prepare his parents to operate the equipment safely, correctly, and confidently. First, review the neonate’s breathing problem with his parents. Explain that the monitor warns them of breathing or heart rate changes. Then offer the following guidelines:
Advise the parents to prepare their home and family for the equipment — for example, by providing a sturdy, flat surface for the monitor and by posting emergency telephone numbers (physician, nurse, equipment supplier, and ambulance) accessibly.
Teach other responsible family members how to use the monitor safely. Suggest that older siblings, grandparents, babysitters, and other caregivers learn cardiopulmonary resuscitation (CPR).
Instruct the parents to notify local service authorities — police, ambulance, telephone company, and electric company — if their neonate uses an apnea monitor so that alternative power can be supplied if a failure occurs.
Explain to the parents how a monitor with electrodes works. Advise them to make sure the respiration indicator goes on each time the neonate breathes. If it doesn’t, describe troubleshooting techniques, such as moving the electrodes slightly. Tell them to try this technique several times.
Show the parents how to respond to either the apnea or bradycardia alarm. Direct them to check the color of the neonate’s oral tissues. If the tissues appear bluish and the neonate isn’t breathing, tell them to call loudly and touch him — gently at first, then more urgently as needed. Tell them to stop short of shaking him. If he doesn’t respond, urge them to begin CPR.
Also, advise the parents to keep the operator’s manual attached to or beside the monitor and to consult it as needed. Explain that an activated loose-lead alarm, for example, may indicate a dirty electrode, a loose electrode patch, a loose belt, or a disconnected or malfunctioning wire or monitor.
Two types of monitors are used most commonly. The thoracic impedance monitor uses chest electrodes to detect conduction changes caused by respirations. The newest models have alarm systems and memories that record cardiorespiratory patterns. The apnea mattress, or underpad monitor, relies on a transducer connected to a pressure-sensitive pad, which detects pressure changes resulting from altered chest movements.
To guard against potentially life-threatening apneic episodes in vulnerable neonates, monitoring begins in the hospital or birthing center and continues at home. Parents need to learn how to operate the monitor, which actions to take when the alarm sounds, and how to revive a neonate with cardiopulmonary resuscitation (CPR). Crucial steps for correctly using a monitor include testing the alarm system, positioning the sensor properly, and setting the controls correctly. (See Using a home apnea monitor.)
According to the National Institutes of Health (NIH), the criteria for discontinuing monitoring should be based on the neonate’s clinical condition. NIH Clinical experience and the literature support monitor discontinuation when neonates with apparent life-threatening events have had 2 to 3 months free from significant alarms or apnea (vigorous stimulation or resuscitation wasn’t needed). Additionally, assessing the neonate’s ability to tolerate stress (such as immunizations and illnesses) during this time is advisable. Requiring one or more normal pneumograms before discontinuing the monitor may needlessly prolong the monitoring period.
Equipment
Monitor unit • electrodes • lead wires • electrode belt • electrode gel, if needed • pressure transducer pad, if using apnea mattress • stable surface for monitor placement
Prepackaged and pretreated disposable electrodes are available.
Implementation
Confirm the neonate’s identity using two patient identifiers according to facility policy. JCAHO
Explain the procedure to the parents, as appropriate, and wash your hands. CDC PCP
Plug the monitor’s power cord into a grounded wall outlet. Attach the leadwires to the electrodes, and attach the electrodes to the belt. If appropriate, apply conduction gel to the electrodes. (Or, apply gel to the neonate’s chest, place the electrodes atop the gel, and attach the electrodes to the leadwires. Secure the belt.) MFR
To hold the electrodes securely in position, wrap the belt snugly but not restrictively around the neonate’s chest at the point of greatest movement — optimally at the right and left midaxillary line about ¾″ (2 cm) below the axillae. Be sure to position the leadwires according to the manufacturer’s instructions.
Follow the color code to connect the leadwires to the patient cable. Connect the cable to the proper jack at the rear of the monitoring unit.
Turn the sensitivity controls to maximum to facilitate tuning when adjusting the system.
Set the alarms according to recommendations so that an apneic period lasting for a specified time activates the signal.
Turn on the monitor. If the monitor has two alarms — one to signal apnea, one to signal bradycardia — both will sound until you adjust the monitor and reset the alarms according to the manufacturer’s instructions.
Adjust the sensitivity controls until the indicator lights blink with each breath and heartbeat.
If you use an apnea mattress, assemble the monitor and pressure transducer pad according to the manufacturer’s directions.
Plug the monitor into a grounded wall outlet. Plug the cable of the transducer pad into the monitor.
Touch the pad to make sure it works. Watch for the monitor’s respiration light to blink.
Follow the manufacturer’s instructions for pad placement.
If you have difficulty obtaining a signal, place a foam rubber pad under the mattress, and sandwich the transducer pad between the foam pad and the mattress.
If you hear the apnea or bradycardia alarm during monitoring, immediately check the neonate’s respirations and color, but don’t touch or disturb him until you confirm apnea.
If he’s still breathing and his color is good, readjust the sensitivity controls or reposition the electrodes, if necessary.
If he isn’t breathing but his color looks normal, wait 10 seconds to see if he starts breathing spontaneously. If he isn’t breathing and he appears pale, dusky, or blue, immediately try to stimulate breathing in these ways: Sequentially, place your hand on the neonate’s back, rub him gently, or flick his soles gently. If he doesn’t begin to breathe at once, start CPR. (For detailed instructions, see “Cardiopulmonary resuscitation”, page 217.)
Special considerations
To ensure accurate operation, don’t put the monitor on top of another electrical device. Make sure that it’s on a level surface and that it can’t be easily bumped.
Avoid applying lotions, oils, or powders to the neonate’s chest, where they could cause the electrode belt to slip. Periodically check the alarm by disconnecting the sensor plug. Listen for the alarm to sound after the preset time delay.
In addition to apnea monitoring, the neonate will frequently receive a respiratory stimulant, such as theophylline or caffeine. EB
Remove the electrodes when the neonate isn’t attached to the monitor.
Unplug the cord from the electrical outlet when the cord isn’t plugged into the monitor.
Use safety covers over electrical outlets to prevent injury to children.
Supervise children when in contact with the neonate on the home apnea monitor.
Teach children that the apnea monitor isn’t a toy.
Nursing diagnoses
Ineffective breathing pattern
Expected outcomes
The neonate will:
show no signs of respiratory distress
exhibit a normal respiratory rate.
Complications
An apneic episode resulting from upper airway obstruction may not trigger the alarm if the neonate continues to make respiratory efforts without gas exchange. However, the monitor’s bradycardia alarm may be triggered by the decreased heart rate resulting from the vagal stimulation (which accompanies obstruction).
If you’re using a thoracic impedance monitor without a bradycardia alarm, you may interpret bradycardia during apnea as shallow breathing. That’s because this type of monitor fails to distinguish between respiratory movement and the large cardiac stroke volume associated with bradycardia. In this case, the alarm won’t sound until the heart rate drops below the apnea limit. Use of thoracic impedance apnea monitors would require an additional cardiac respiratory monitor so that bradycardia could be assessed when the heart rate begins to drop at 100 beats/minute.
Documentation
Record all alarm incidents. Document the time and duration of apnea. Describe the neonate’s color, the event that occurred before the apneic episode, the stimulation measures implemented, and other pertinent information. Document any medications given.
Supportive references
American Academy of Pediatrics. “Policy Statement: Apnea, Sudden Infant Death Syndrome, and Home Monitoring”, Pediatrics 111(4):914-17, April 2003.
Bhatia, J. “Current Options in the Management of Apnea of Prematurity”, Clinical Pediatrics 39(6):327-36, June 2000. EB
Pillitteri, A. Maternal & Child Health Nursing: Care of the Childbearing & Childrearing Family, 5th ed. Philadelphia: Lippincott Williams & Wilkins, 2007.
Wong, D.L., et al. Maternal-Child Nursing Care, 3rd ed. St. Louis: Mosby–Year Book, Inc., 2006.
Circumcision
Steeped in controversy and history, circumcision (the removal of the penile foreskin) is thought to promote a clean glans and to minimize the risk of phimosis (tightening of the foreskin) in later life.
Current scientific evidence indicates potential medical benefits for the circumcised male neonate. Studies have shown that circumcision may reduce the risk of penile cancer, decreases the risk of contracting a urinary tract infection, and reduces the risk of contracting a sexually transmitted disease. After reviewing available research, however, the American Academy of Pediatrics (AAP) concluded that there are no absolute medical indications for routine circumcision. They recommend that the parents should be provided with information about the potential benefits and risks and counseled to make a decision that’s in the best interest of their child. The AAP also states that if the decision is made for circumcision, procedural analgesia should be provided. AAP
In Judaism, circumcision is a religious rite (known as a bris) performed by a mohel (a specialist trained in both the medical procedure and Jewish law) on the 8th day after birth, when the neonate officially receives his name. Because most neonates are discharged before this time, the bris rarely occurs in the hospital.
There are two methods used in practice for performing circumcision. These include use of the Gomco or Mogen clamp and use of the Plastibell.
Circumcision using a Gomco or Mogen clamp involves using the clamp to stabilize the penis while removing the foreskin. With this device, a cone that fits over the glans provides a cutting surface and protects the glans penis. The other technique uses a plastic circumcision bell (Plastibell) over the glans and a suture tied tightly around the base of the foreskin. This method prevents bleeding. The resultant ischemia causes the foreskin to slough off within 5 to 8 days. This method is thought to be painless because it stretches the foreskin, which inhibits sensory conduction.
Circumcision is contraindicated in neonates who are ill or who have bleeding disorders, ambiguous genitalia, or congenital anomalies of the penis, such as hypospadias or epispadias, because the foreskin may be needed for later reconstructive surgery. AAP
Equipment
Circumcision tray (contents vary but usually include circumcision clamps, various-sized cones, scalpel, probe, scissors, forceps, sterile basin, sterile towel, and sterile drapes) • povidone-iodine solution or chlorhexidine solution • restraining board with arm and leg restraints • sterile gloves • petroleum gauze • sterile 4″ × 4″ gauze pads • optional: sutures, plastic
circumcision bell, antimicrobial ointment, topical or local anesthetic • sterile marker • sterile labels • overhead warmer
circumcision bell, antimicrobial ointment, topical or local anesthetic • sterile marker • sterile labels • overhead warmer
Preparation of equipment
Circumcision using a Gomco clamp: Assemble the sterile tray and other equipment in the procedure area. Open the sterile tray, and pour povidone-iodine solution into the sterile basin. Using sterile technique, place sterile 4″ × 4″ gauze pads and petroleum gauze on the sterile tray. Arrange the restraining board, and direct adequate light on the area.
Circumcision using a plastic circumcision bell: Assemble sterile gloves, sutures, restraining board, petroleum gauze and, if ordered, antibiotic ointment.
A mohel usually brings his own equipment.
Preparing for analgesia administration AAP
Several methods are available to provide analgesia to the neonate during a circumcision.
Label all medications, medication containers, and other solutions on and off the sterile field. JCAHO
Eutectic mixture of local anesthetics (EMLA) cream consists of the application of a cream containing 2.5% lidocaine and 2.5% prilocaine, administered 60 to 90 minutes before the procedure along with the application of an occlusive dressing. Research indicates that neonates who receive EMLA cream spend less time crying and have less of an increase in heart rate during the procedure.
Dorsal penile nerve block (DPNB) is administered using a 27G needle to inject 0.4 ml of 1% lidocaine at both the 10 and 2 o’clock positions at the base of the penis. Bruising at the injection site is the most reported complication.
Subcutaneous ring block (SRB) involves administration of 0.8 ml of 1% lidocaine at the midshaft of the penis. The SRB appears to prevent crying and increases in heart rate more consistently than DPNB or EMLA cream. No complications have been reported to date.
Neonates should also be given acetaminophen immediately postcircumcision for pain relief.
Implementation
Confirm the neonate’s identity using two patient identifiers according to facility policy. JCAHO
Make sure the parents understand the procedure and have signed the proper consent form. PCP
Withhold feeding for at least 1 hour before the procedure to reduce the possibility of emesis and aspiration. AAP
Place the neonate on a padded restraining board. To decrease distress during the procedure, restrain his arms and legs only while the procedure is in progress. Remain with the neonate to offer comfort and provide a safe environment. NANN
Assist the physician as necessary throughout the procedure, and comfort the neonate as needed.
Using a Gomco clamp
After putting on sterile gloves, the physician cleans the penis and scrotum with povidone-iodine or chlorhexidine solution and drapes the neonate. AAP AWHONN CDC
He then applies a Gomco clamp to the penis, loosens the foreskin, inserts the cone under it to provide a cutting surface and to protect the penis, and removes the foreskin.
He covers the wound with sterile petroleum gauze to prevent infection and control bleeding.
Using a plastic bell
The physician slides the plastic bell device between the foreskin and the glans penis.
He then ties a suture tightly around the foreskin at the coronal edge of the glans. The foreskin distal to the suture becomes ischemic and then atrophic. After 5 to 8 days, the foreskin drops off with the plastic bell attached, leaving a clean, well-healed excision. No special care is required, but watch for swelling that may indicate infection or interfere with urination.
Providing aftercare
Remove the neonate from the restraining board, and assess for bleeding.
If povidone-iodine was used before the procedure, wash it off with sterile water. AWHONN
Place him on his back to minimize pressure on the excision area. Leave him diaperless for 1 to 2 hours to observe for bleeding and to reduce possible chafing and irritation.
Show the neonate to his parents to reassure them that he’s all right.
When you rediaper the neonate, change his diaper as soon as he voids. If the dressing falls off, clean the
wound with warm water to minimize pain from urine on the circumcised area and prevent irritation. Don’t remove the original dressing until it falls off (usually after the first or second voiding).
Check for bleeding every 15 minutes for the 1st hour and then every hour for the next 24 hours. If bleeding occurs, apply pressure with sterile gauze pads. Notify the physician if bleeding continues. NANN
Loosely diaper the neonate to prevent irritation. At each diaper change, apply ordered antimicrobial ointment, petroleum jelly, or petroleum gauze until the wound appears healed. Avoid leaving the neonate under the radiant warmer after placing petroleum gauze on the penis because the area might burn.
Watch for drainage, redness, or swelling. Don’t remove the thin, yellow-white exudate that forms over the healing area within 1 to 2 days. This normal incrustation protects the wound until it heals in 3 to 4 days. NANN
Don’t discharge the neonate until he has voided.
Special considerations
Show parents the circumcision before discharge so they can ask questions and you can teach them how to care for the area.
If the neonate’s mother has human immunodeficiency virus (HIV) infection, circumcision is delayed until the physician knows the neonate’s HIV status. The neonate whose mother has HIV infection has a higher-than-normal risk of infection.
Instruct the mother to observe the circumcision site regularly for pus or bloody discharge, which may indicate delayed healing or infection. If these signs occur, she should notify the physician.
Tell the mother that the rim of the Plastibell device used for circumcision may remain in place after discharge from the facility. Reassure her that the rim will fall off harmlessly in 1 week. However, if the rim doesn’t fall off after 1 week, tell her to notify the physician. A retained rim may lead to infection.
Instruct the mother to clean the circumcised area with cotton balls moistened with tap water for the first 3 to 4 days to prevent irritation. AWHONN Don’t apply soap to the area until it’s well healed.
Nursing diagnoses
Risk for infection
Expected outcomes
The neonate will:
remain free from infection.
Complications
After a Gomco clamp procedure, bleeding, the most frequent complication, is observed in about 0.1% of all circumcisions. Infection is the second most common complication and is usually minor. The skin of the penile shaft can adhere to the glans, resulting in scarring or fibrous bands. The most severe complications are urethral fistulae, penile necrosis, necrotizing fasciitis, sepsis, and meningitis. Incomplete amputation of the foreskin can follow application of the plastic circumcision bell.
Documentation
Note the time, date, and type of circumcision performed. Record the neonate’s vital signs, the appearance of the circumcision site, parent teaching, and any excessive bleeding. Most neonates are observed until their first voiding postprocedure and then discharged home.
Supportive references
American Academy of Pediatrics. “Prevention and Management of Pain and Stress in the Neonate”, Pediatrics 105(2):454-61, February 2000.
Anand, K.J.S., and the International Evidence-Based Group for Neonatal Pain. “Consensus Statement for the Prevention of Pain in the Newborn”, Archives of Pediatric and Adolescent Medicine 155:1730-780, 2001.
Association of Women’s Health, Obstetric and Neonatal Nurses (AWHONN). Neonatal Skin Care. Evidence-based Clinical Practice Guideline. Washington, D.C.: AWHONN, January 2001. www.guideline.gov.
Byers, J.F., and Thornley, K. “Cuing into Infant Pain”, The American Journal of Maternal/Child Nursing 29(2):84-89, March-April 2004.
Kaufman, M.W., et al. “Neonatal Circumcision — Benefits, Risks, and Family Teaching”, The American Journal of Maternal Child/Nursing 26(4):197-201, July-August 2001.
Emergency delivery
Emergency delivery, the unplanned birth of a neonate outside of a health care facility, may occur when labor progresses quickly or when circumstances prevent the mother from entering a facility. Whether assisting at an emergency delivery or instructing the person who is, your objectives include establishing a clean, safe, and private birth area; promoting a controlled delivery; preventing injury, infection, and hemorrhage; and maintaining a calm, supportive environment.
Equipment
Unopened newspaper or a large, clean cloth (such as a tablecloth, towel, or curtain) • bath towel, blanket, or coat • gloves • at least two small, clean cloths • clean, sharp object (such as scissors, new razor blade, knife, or nail file) • ligating material (such as string, yarn, ribbon, or new shoelaces) • a clean blanket or towel (to cover the neonate) • boiling water
Preparation of equipment
Boil the ligating and cutting materials for at least 5 minutes, if possible.
Implementation
Offer support and reassurance to help relieve the patient’s anxiety. Encourage the patient to pant or blow during contractions to promote a controlled delivery. As possible, provide privacy, wash your hands, and put on gloves. CDC
Position the patient comfortably on a bed, a couch, or the ground. Open the newspaper or the large, clean cloth, and place it under the patient’s buttocks to provide a clean delivery area. Elevate the buttocks slightly with the bath towel, blanket, or coat to cushion and support the patient’s buttocks.
The mother should lie on her side until the neonate is nearly ready to be delivered.
Check for signs of imminent delivery — bulging perineum, an increase in bloody show, urgency to push, and crowning of the presenting part. ACOG
As the fetal head reaches and begins to pass the perineum, instruct the patient to pant or blow through the contractions because forceful bearing down could cause extensive maternal lacerations. Place one hand against the area below the vaginal opening, and apply gentle pressure during each contraction. Your other hand should be placed gently against the vaginal opening over the neonate’s head, which controls how quickly the neonate’s head is delivered. ACOG
Avoid forcibly restraining fetal descent because undue pressure can cause cephalohematoma or scalp lacerations, head trauma, and vagal stimulation. Undue pressure may also occlude the umbilical cord, which may cause fetal bradycardia, circulatory depression, and hypoxia.
As the fetal head emerges, immediately break the amniotic sac if it’s intact. Support the head as it emerges. Instruct the patient to continue blowing and panting. ACOG
Locate the umbilical cord. Insert one or two fingers along the back of the emergent head to be sure the cord isn’t wrapped around the neck. If the cord is wrapped loosely around the neck, slip it over the head to prevent prolonged cord compression, tearing of the cord, or interrupted delivery. If it’s wrapped tightly around the neck, ligate the cord in two places using string, yarn, ribbon, or new shoelaces. Carefully cut between the ligatures, using a clean, sharp object or, if possible, a sterile one. ACOG
Carefully support the head with both hands as it rotates to one side (external rotation). Gently wipe mucus and amniotic fluid from the nose and mouth with a clean, small cloth to prevent aspiration. ACOG
Instruct the patient to bear down with the next contraction to aid delivery of the shoulders. Position your hands on either side of the neonate’s head, and support the neck. Exert gentle downward pressure to deliver the anterior shoulder. Exert gentle upward pressure to deliver the posterior shoulder.
Remember that amniotic fluid and vernix are slippery, so take care to support the neonate’s body securely after freeing the shoulders.
Keep the neonate in a slightly head-down position to encourage mucus to drain from the respiratory tract. Wipe excess mucus from his face. If the neonate
doesn’t breathe spontaneously, gently pat the soles of his feet or stroke his back. Never suspend a neonate by his feet. ACOG
Dry and cover the neonate quickly with the blanket or towel. Ensure that his head is well covered to minimize exposure and prevent heat loss.
Cradle the neonate at the level of the maternal uterus until the umbilical cord stops pulsating. This prevents the neonatal blood from flowing to or from the placenta and leading to hypovolemia or hypervolemia, respectively. Hypovolemia can lead to circulatory collapse and neonatal death; hypervolemia can cause hyperbilirubinemia.
Place the neonate on the mother’s abdomen in a slightly head-down position.
Ligate the umbilical cord at two points, 1″ to 2″ (2.5 to 5 cm) apart. Place the first ligature 4″ to 6″ (10 to 15 cm) from the neonate. Ligation prevents autotransfusion, which may cause hemolysis and hyperbilirubinemia.
Use sterile instruments to cut the umbilical cord. Using unsterile ones may cause infection.
Watch for signs of placental separation, such as a slight gush of dark blood from the vagina, cord lengthening, and a firm uterine fundus rising within the abdominal area. Usually, the placenta separates from the uterus within 5 minutes after delivery (although it may take as long as 30 minutes). When you see these signs, encourage the patient to bear down to expel the placenta. As she does, apply gentle downward pressure on her abdomen to aid placental delivery. Never tug on the umbilical cord at this time because doing so may invert the uterus or sever the cord from the placenta. ACOG
Examine the expelled placenta for intactness. Retained placental fragments may cause hemorrhage or lead to intrauterine infection. ACOG AWHONN
Place the cord and the placenta inside the towel or blanket covering the neonate to provide extra warmth and also to ensure that the cord and placenta will be transported to the hospital for closer examination.
Palpate the maternal uterus to make sure it’s firm. Gently massage the atonic uterus to encourage contraction and prevent hemorrhage. Encourage breast-feeding, if appropriate, to stimulate uterine contraction.
Check the patient for excessive bleeding from perineal lacerations. Apply a perineal pad, if available, and instruct the patient to press her thighs together. Provide comfort and reassurance, and offer fluids, if available. Have someone summon an emergency medical service, or arrange transportation to the hospital for the mother and neonate. Make sure the mother and neonate are warm and dry while they await transport. AWHONN
Special considerations
Never introduce an object into the vagina to facilitate delivery. This increases the risk of intrauterine infection as well as injury to the cervix, uterus, fetus, umbilical cord, and placenta.
In a breech presentation, make every effort to transport the patient to a nearby hospital. If the patient begins to deliver, carefully support the fetal buttocks with both hands. Gently lift the body to deliver the posterior shoulder. Lower the neonate slightly to deliver the anterior shoulder. Flexion of the head usually follows. Never apply traction to the body to avoid lodging the head in the cervix. Allow the neonate to rotate and emerge spontaneously.
If the umbilical cord emerges first, elevate the presenting part, using your fingers to move the presenting part off of the umbilical cord to prevent cord compression, which causes fetal hypoxia. Because this obstetric emergency usually necessitates a cesarean delivery, arrange for immediate transport to a nearby hospital.
If the neonate fails to breathe spontaneously after birth, clear the airway and begin to breathe for him. Place your opened mouth over his nose and mouth. Using air collected in your cheeks, deliver two effective breaths (produce visible chest rise). Next, check the umbilical cord for pulsation. If the neonate’s heart rate is less than 60 beats/minute, begin cardiopulmonary resuscitation (CPR). Compressions should be delivered on the lower third of the sternum, with the depth of compressions equaling ½″ to ¾″ (1 to 2 cm). There are two techniques for external cardiac massage. One method involves placing two thumbs on the sternum, superimposed or adjacent to each other depending on the neonate’s size, with fingers encircling the chest and supporting the back. Administer
a breath of air, and then use your thumbs gently but firmly to pump the heart. The second method involves placing the tips of the middle and index fingers of one hand on the lower third of the sternum for compressions. Pump three times for each ventilation. Continue performing CPR until the neonate breathes and his heart rate is 60 beats/minute or higher. AHA
Nursing diagnoses
Risk for injury
Expected outcomes
The patient will:
establish a good labor pattern
deliver the neonate without complications.
Complications
Injury to mother or neonate, infection, and hemorrhage are all possible complications.
Documentation
Give the medical care team the following information if possible: the time of delivery; the presentation and position of the fetus; delivery complications, such as the cord wrapped around the neonate’s neck; the color, character, and amount of amniotic fluid; and the mother’s blood type and Rh factor, if known. Note the time of placental expulsion, the placental appearance and intactness, the amount of postpartum bleeding, the status of uterine firmness (tone) and contractions, and the mother’s response.
Document the sex of the neonate, estimate the Apgar score, and define any resuscitative measures used. Record whether the mother began breast-feeding the neonate. Identify and quantify fluids given to the mother.
Supportive references
American Academy of Pediatrics and American College of Obstetricians and Gynecologists. Guidelines for Perinatal Care, 5th ed. Elk Grove Village, Ill.: AAP; Washington, D.C.: ACOG, 2002.
Kattwinkel, J., et al. Maternal and Fetal Evaluation and Immediate Newborn Care. Charlottesville, Va.: Perinatal Continuing Education Program, 2001. www.pcep.org/ book_1.html.
Olds, S.B., et al. Clinical Handbook, Maternal-Newborn Nursing. A Family and Community Based Approach, 6th ed. Upper Saddle River, N.J.: Prentice Hall Health, 2000.
Wong, D.L., et al. Maternal-Child Nursing Care, 3rd ed. St. Louis: Mosby–Year Book, Inc., 2005.
Eye prophylaxis
The instillation of antibiotic ointment into the neonate’s eyes prevents blindness and eye damage from conjunctivitis due to Neisseria gonorrhoeae and Chlamydia, which the neonate may have acquired from the mother as he passed through the birth canal. This treatment is legally required in most states. CDC It’s recommended to prevent gonococcal ophthalmia, but whether it’s effective against chlamydial eye infections is unclear. The best way to prevent gonococcal and chlamydial ophthalmia is to treat pregnant women prenatally, but because many women don’t get prenatal care, eye prophylaxis is required. CDC EB
The Centers for Disease Control and Prevention recommends a single application of erythromycin (0.5%) ointment or tetracycline ophthalmic ointment (1%).
Equipment
Antibiotic ointment or aqueous solution in a single dose ointment tube • sterile gloves • dry gauze pads
Implementation
Confirm the neonate’s identity using two patient identifiers according to facility policy. JCAHO
Explain the procedure to the parents if present, informing them that the neonate will probably cry and that eye irritation may occur. PCP
Wash your hands and put on gloves.
Wipe the neonate’s face with dry gauze.
To ensure comfort and effectiveness, shield the neonate’s eye’s from direct light and tilt his head slightly to the side of the intended treatment.
Using your nondominant hand, gently raise the neonate’s upper eyelid with your index finger and pull the lower eyelid down with your thumb.
Using your dominant hand, instill a 1- to 2-cm ribbon of ointment along the lower conjunctival sac, from the inner canthus to the outer canthus. (See Instilling eye medication, page 564.)
Instilling eye medication
Using your nondominant hand, gently raise the neonate’s upper eyelid with your index finger and pull down the lower eyelid with your thumb. Using your dominant hand, apply the ordered ophthalmic antibiotic ointment in a line along the lower conjunctival sac (as shown below). Then close the eyes to allow ointment to spread across the conjunctiva. Repeat the procedure for the other eye.
 |
Close the neonate’s eye to allow the ointment to be distributed across the conjunctiva.
Repeat the steps with the other eye.
Special considerations
Use a single-dose ointment tube to prevent contamination and the spread of infection.
Keep in mind that although the procedure may be administered in the birthing room, treatment can be delayed for up to 1 hour to allow initial parent-child bonding.
Assess the neonate’s eyes for chemical conjunctivitis evidenced by redness, swelling, and drainage or discoloration of the skin around the neonate’s eyes.
If chemical conjunctivitis or discoloration occurs, inform the parents that these effects are temporary and will subside within a few days.
Document the procedure appropriately on the birthing room record or in the progress notes.
Nursing diagnoses
Risk for infection
Expected outcomes
The neonate will:
remain free from infection.
Complications
Failure to instill the eye prophylaxis can result in the neonate developing blindness or eye damage from conjunctivitis from Neisseria gonorrhoeae.
Documentation
Document the drug, dose, route, site, date, and time of administration.
Supportive references
Department of Health and Human Services, Centers for Disease Control and Prevention. “Sexually Transmitted Diseases Treatment Guidelines 2002.” www.cdc.gov/STD/treatment/4-2002TG.htm. EB
Fetal heart rate
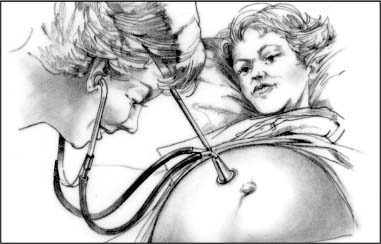
Fetal heart rate (FHR) is the best way to determine fetal well-being during gestation and labor. It may be assessed by auscultating with a fetoscope or a Doppler ultrasound stethoscope placed on the maternal abdomen. The fetoscope relies on bone conduction to assist with hearing the opening and closing of the fetal ventricular heart valves. The Doppler device uses ultrasound technology to detect heart motion, such as moving heart walls or valves. Both methods have been approved by the American College of Obstetricians and Gynecologists and the Association of Women’s Health, Obstetric, and Neonatal Nurses.
Normal FHR ranges from 110 to 160 beats/minute. Auscultation can easily be used to detect fetal tachycardia (heart rate greater than 160 beats/minute) and bradycardia (heart rate less than 110 beats/minute), and it allows the examiner to determine whether the rhythm is regular or irregular.
Auscultation requires the ability to distinguish among the fetal heart sounds generated. FHR must also be distinguished from similar sounds created by the maternal pulse in the uterine vessels. The uterine bruit, or souffle sounds that are simultaneous with the maternal pulse, could be confused with the FHR. Practitioners should check maternal and fetal heart rates because false conclusions about fetal status could be reached if the maternal sounds are considered to be fetal heart sounds. ACOG AWHONN
Instruments for hearing fetal heart sounds
The fetoscope and the Doppler stethoscope are basic instruments for auscultating fetal heart sounds and assessing fetal heart rate (FHR).
Fetoscope
A fetoscope can detect fetal heartbeats as early as the 20th gestational week. As an assessment tool during labor, the fetoscope is helpful for hearing fetal heart sounds when contractions are mild and infrequent.
 |
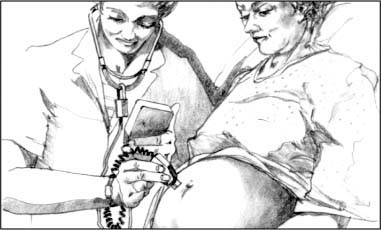
Doppler stethoscope
The Doppler stethoscope can detect fetal heartbeats as early as the 10th gestational week. Useful throughout labor, the Doppler stethoscope is more sensitive than the fetoscope.
With a clear sound that both the mother and the examiner can easily hear, this device provides a digital display of the FHR. Features include a “freeze” button to hold the reading until it’s recorded, an optional 10-second manual count mode, and an automatic shutoff to save power.
 |
Baseline rhythm can also be assessed with auscultation. The presence of an irregularity in the baseline rate can best be detected when listening with an auscultation device that allows practitioners to hear the actual heart sounds. AWHONN
Because auscultation can detect gross (but in many instances late) fetal distress signs (tachycardia and bradycardia), the technique remains useful in an uncomplicated, low-risk pregnancy. In a high-risk pregnancy, indirect external or direct internal electronic fetal monitoring gives more accurate information on fetal status.
Equipment
Fetoscope or Doppler stethoscope (see Instruments for hearing fetal heart sounds) • water-soluble lubricant
(for ultrasound instrument) • watch with second hand
(for ultrasound instrument) • watch with second hand
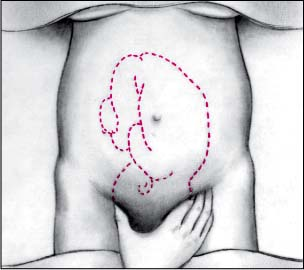
Performing Leopold’s maneuvers
You can determine fetal position, presentation, engagement, and attitude by performing Leopold’s maneuvers. Ask the patient to empty her bladder, assist her to a supine position, and place a small rolled towel under her right hip to prevent supine hypotension syndrome. Expose her abdomen, and then perform the four maneuvers in order.
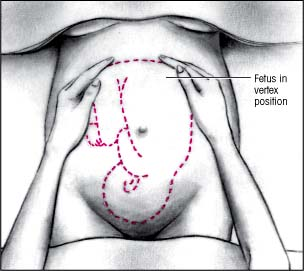
First maneuver
Face the patient and warm your hands. Place them on her abdomen to determine fetal presentation in the uterine fundus. Curl your fingers around the fundus. With the fetus in vertex position, the buttocks feel irregularly shaped and firm. With the fetus in breech presentation, the head feels hard, round, and movable.
 |
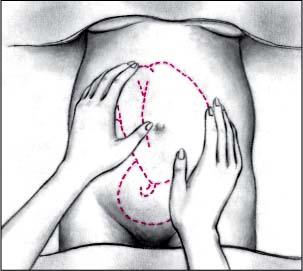
Second maneuver
Move your hands down the sides of the abdomen, and apply gentle pressure. If the fetus lies in vertex position, you’ll feel a smooth, hard surface on one side — the fetal back. Opposite, you’ll feel lumps and knobs — the knees, hands, feet, and elbows. If the fetus lies in breech position, you may not feel the back at all.
 |
Third maneuver
Spread apart the thumb and fingers of one hand. Place them just above the patient’s symphysis pubis. Bring your fingers together. If the fetus lies in vertex presentation (and hasn’t descended), you’ll feel the head. If the fetus lies in vertex presentation (and has descended), you’ll feel a less distinct mass. Apply gentle pressure to the fundus with your other hand to help facilitate the maneuver.
 |


Get Clinical Tree app for offline access
