Nursing Management During Labor and Delivery
THE LABOR PROCESS
The phases of pregnancy, labor, and birth are normal physiologic processes. A pregnant woman typically approaches the birth process with possible concerns of personal well-being, that of her unborn child, and fear of labor pain. Addressing these concerns, minimizing her discomfort, and optimizing patient safety should be of paramount importance to all participants involved in the care of the mother and her fetus during the intrapartum period.
General Considerations
 Evidence Base
Lowdermilk, D., & Perry, S. (2012). Maternity and women’s health care (10th ed.). St. Louis, MO: Elsevier.
Mattson, S., & Smith, J. E. (2011). Core curriculum for maternal-newborn nursing (4th ed.). St. Louis, MO: Elsevier.
Prepared Childbirth
Historically, the term natural childbirth has evolved to mean (1) delivery outside in nature, (2) home birth, (3) nonhospital birth (birthing center), (4) facility birth—no medical intervention (ie, no intravenous [IV] medications), and, most recently, (5) facility birth without analgesia or anesthesia. Preparation through education and training prior to labor gives the pregnant woman a method of coping with the discomforts of labor and delivery. This method is known as prepared childbirth and incorporates analgesia and anesthesia into the process. The latter method dominates current culture in the United States. Variances in prepared childbirth are outlined.
Psychoprophylactic or Lamaze Method
Psychoprophylactic childbirth has a rationale based on Pavlov’s concept of pain perception and his theory of conditioned reflexes (the substitution of favorable conditioned reflexes for unfavorable ones). The Lamaze method is an example of this technique.
The woman is taught to replace responses of restlessness, fear, and loss of control with more controlled measures, which can excite the cerebral cortex efficiently to inhibit other stimuli such as pain in labor.
The mother-to-be is taught exercises that strengthen the abdominal muscles and relax the perineum.
Various breathing techniques to help the process of labor are practiced.
The woman is conditioned to respond with respiratory measures and disassociation or relaxation of the uninvolved muscles, while controlling her perception of the stimuli associated with labor.
The Bradley Method of Delivery
Commonly referred to as “husband-coached childbirth.” A coach may be any significant other such as a friend, mother, sister, boyfriend, aunt, grandmother, or husband.
Involves the concepts of leading, guiding, supporting, caring, and fostering specific skills and confidence.
Coaches attend classes and learn to help the woman prior to initiation of labor.
The coach serves as a conditioned stimulus using the sound of his or her voice, use of particular words, and repetition of practice.
Medications are not encouraged for pain relief. Relaxation is the core component. Increased tolerance to pain is accomplished by decreased mental anxiety and fear, which ultimately decreases the awareness of the pain stimulus. This occurs through cognitive and physical rehearsal.
Home Delivery
Motivations for home delivery:
Increases patient choices and flexibility during the birth process while decreasing patient separation and fear of intrusive intervention.
Desire to avoid such practices as routine cesarean delivery for breech presentation, episiotomy, forceps delivery, oxytocin stimulation, routine monitoring of the fetal heart tones, and other practices associated with facilities.
Risk of in-hospital infections; belief that infant is immune to own-home bacteria.
Rising costs of hospitalization.
Contraindications:
High-risk pregnancy.
History of premature or postdate delivery in previous or current pregnancy or previous cesarean delivery, preeclampsia, gestational diabetes.
Woman with medical, surgical, or emotional complications.
Fetal complications: cardiac anomalies, placental abnormalities, and so on.
Alternatives to home delivery:
Family-centered hospital setting.
Birthing centers with adequate facilities for emergency care for low-risk women.
Initiation of Labor
 Evidence Base
Cunningham, F. G., Leveno, K., Bloom, S., et al. (2010). Williams obstetrics (23rd ed.). New York: McGraw-Hill.
Parturition is a multifactorial physiologic process involving both maternal and fetal influences. The exact mechanism initiating labor is unknown. The following four phases outline the labor process:
Phase 0, Quiescence (inhibition)—inhibition of labor is maintained by a constant release of progesterone and other uterotonic inhibitors (ie, PgI2, relaxin, nitric oxide, and parathyroid hormone).
Phase 1, Activation (preparation)—levels of uterotonic inhibitors decrease while myometrial preparatory processes evolve (ie, gap junction development, oxytocin receptors, prostaglandin [PG] receptors, and calcium channels). This phase leads to uterine contractility, cervical ripening, and stimulation of fetal membranes.
Phase 2, Stimulation (contractions)—initiation of coordinated and rhythmic contractions by two uterotonics, primarily oxytocin and PG.
Phase 3, Involution (restitution)—oxytocin initiates resolution of the uterus to its prepregnant state.
Factors Affecting Labor
 Evidence Base
Davidson, M. W., London, M. L., & Ladeweig, P. W. (2012). Olds’ maternal-newborn nursing and women’s health across the lifespan (9th ed.). Upper Saddle River, NJ: Pearson Education.
The success of labor and delivery depends on three concepts: passage, adequacy of maternal pelvic dimensions; passenger, fetal dimensions and presentation; and power, uterine contractions.
Passage: Pelvic Dimensions
Pelvic inlet (anteroposterior diameter): The obstetric conjugate anterior-posterior measurement is typically more than 10 cm. Over 50% of women have a gynecoid-shaped pelvis to accommodate proper descent.
Midpelvis (ischial spines): Intraspinous diameter is typically more than 10 cm; protrusion of the spines into the birthing canal may complicate descent.
Pelvic outlet (intertuberous diameter + suprapubic arch): Dimensions are estimated as the anterior-posterior diameter from the coccyx to the symphysis pubis. This is typically 13 centimeters in length, but again one must subtract 1.5 to 2 cm from the calculation due to the thickness of the symphysis. A prominent coccyx may impede descent.
Passenger: Fetal Dimensions
Size—assessed via palpation using Leopold’s maneuvers or ultrasound. Excessive size may lead to inadequate or asynclitic descent, labor dystocia, shoulder dystocia, or postpartum hemorrhage.
Posture—typically, the fetal head and extremities are flexed while the back is rounded. Flexion of the head allows for the smallest diameter (occiput) to present and pass through the birth canal with ease (see Figure 37-1). Nonflexed presentations may increase risk of asynclitic conditions.
Lie—constitutes the comparison of the fetal long axis to the long axis of the mother. Variances include transverse, longitudinal, or oblique; 99% of fetuses present as a longitudinal lie parallel to the mother’s spine. This improves ease of access into the birth canal.
Presentation—the fetal body part presenting into the birth canal first and is felt on vaginal exam (see Figure 37-2).
Cephalic (head)—occiput, sinciput, brow, face, or chin (mentum).
Breech (feet)—frank, complete, or footling (single or double).
Shoulder (transverse).
Compound—two or more parts presenting at same time.
Position—Specific landmark of fetal presenting part (occiput, mentum, sacrum, scapula) in comparison to the anterior, posterior, or transverse portion of the woman’s pelvis and the maternal left or right side; designated by a three-letter abbreviation.
The first letter L or R represents the side (right or left) in the maternal pelvis the presenting part is facing.
The second letter represents the landmark that is presenting: O for occiput, M for mentum (chin), S for sacrum, Sc for scapula or shoulder.
The third letter represents the direction (anterior [A], posterior [P], or transverse [T]) the presenting part is facing in the pelvis.
For example, the fetus with the head presenting and facing toward the maternal right anterior pelvis is ROA.
 Evidence Base
American College of Obstetricians and Gynecologists. (2003/Reaffirmed 2011). Dystocia and augmentation of labor (Practice Bulletin #49). Washington, DC: Author.
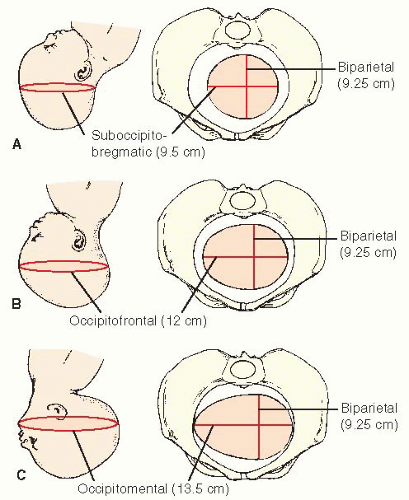 Figure 37-1. (A) Complete flexion allows smallest diameter of head to enter pelvis. (B) Moderate extension causes larger diameter to enter pelvis. (C) Marked extension forces largest diameter against pelvic brim, but head is too large to enter pelvis. |
Passenger: Fetal Head (Vertex)
In approximately 95% of all births, the fetal head (vertex) presents first. Sutures and fontanelles provide important landmarks for determining fetal position during a vaginal examination (see Figure 37-3).
Bones of the fetal skull:
One occipital bone posteriorly.
Two parietal bones bilaterally.
Two temporal bones bilaterally.
Two frontal bones anteriorly.
Sutures of the fetal skull—membranous spaces between the bones of the fetal skull:
Frontal—between the two frontal bones.
Sagittal—between the two parietal bones.
Coronal—between the frontal and parietal bones.
Lambdoidal—between the back of the parietal bones and the margin of the occipital bone.
Fontanelles of the fetal skull—irregular spaces formed where two or more sutures meet. Sutures and fontanelles allow fetal skull bones to overlap in order to pass through the maternal pelvis.
Anterior—largest fontanelle; junction of the sagittal, frontal, and coronal sutures; closes by age 18 to 24 months; “diamond” shaped.
Posterior—located where the sagittal suture meets the lambdoidal suture (smaller than anterior); closes by 1 year; “triangle” shaped.
Power: Uterine Contractions
Successful labor depends on regular uterine contractions of adequate intensity that lead to cervical advancement and facilitate fetal descent. The following are characteristics of labor contractions:
Uterine contractions typically increase in intensity, frequency, and duration as labor progresses.
Uterine contractions may cause vasoconstriction of the umbilical cord leading to potential alterations in the fetal heart rate (ie, variable decelerations).
The active upper portion of the uterus (fundus) stimulates activation of contractions during labor (referred to as fundal dominance).
At the completion of a contraction, the upper uterine segment retains its shortened, thickened cell size and, with each succeeding contraction, becomes thicker and shorter. As a result, the upper uterine segment never totally relaxes during labor. Cells of the lower uterine segment become thinner and longer with each contraction. This mechanism is greatly responsible for the progress of the fetus through the birth canal.
The differentiation point between the upper and lower uterine segment is known as the “physiologic retraction ring.”
Preparatory Events to Labor
Lightening (the settling of the fetus in the lower uterine segment) occurs 2 to 3 weeks before term in the primigravida and typically later, during labor, in the multigravida.
Breathing becomes easier as the fetus falls away from the diaphragm.
Lordosis of the spine is increased as the fetus enters the pelvis and falls forward. Walking may become more difficult; leg cramping may increase.
Urinary frequency may occur due to pressure on the adjacent bladder.
Vaginal secretions may increase due to hormonal changes.
Mucus plug is discharged from the cervix along with a small amount of blood from surrounding capillaries—referred to as “bloody show.”
Cervix becomes soft, effaces (shortens), and gradually moves from a posterior to an anterior position.
Membranes may rupture spontaneously.
False labor contractions may occur (see Table 37-1) in preparation for true labor.
Backaches may occur due to fetal size and lightening.
GI alterations (ie, diarrhea) may occur.
Weight loss of 1 to 3 lb (0.5 to 1.5 kg) with advanced pregnancy.
Energy may increase (referred to as “nesting”) or decrease in the last few weeks.
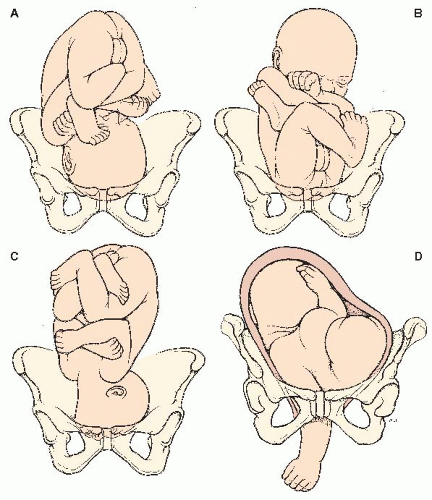 Figure 37-2. Fetal presentations. (A) Cephalic; (B) breech; (C); face; (D) transverse. |
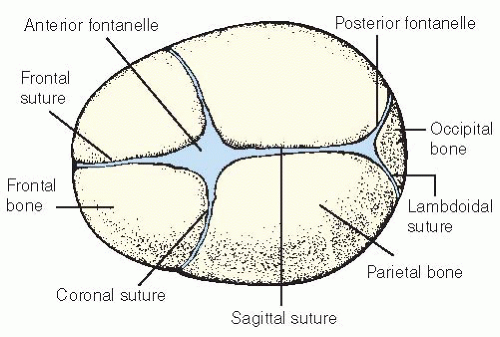 Figure 37-3. Fetal head. |
Table 37-1 True and False Labor Contractions | ||||||||||||||||
|---|---|---|---|---|---|---|---|---|---|---|---|---|---|---|---|---|
|
Stages of Labor
First Stage of Labor (Cervical Completion, Dilation, and Effacement)
Begins with regular and rhythmic true labor contractions and ends with complete effacement (100%) and dilation of the cervix (10 cm).
The length of the first stage varies and is almost double in a primiparous patient; this stage of labor consists of two phases:
Latent phase (early):
Dilation from 0 to 3 cm; effacement tends to precede dilation in the primiparous patient.
At the end of the phase, contractions typically occur regularly every 5 minutes on average and are mild via palpation.
Active phase:
Dilation from 4 to 7 cm; completion of effacement evolves over this period in multiparous patients.
Contractions are more frequent at every 2 to 5 minutes, lasting 40 to 60 seconds and of moderate to strong intensity (60 to 80 mm Hg) via palpation.
Dilation averages 1.2 cm/hour in the nullipara and 1.5 cm/hour in the multipara.
Transition (final segment of active phase): Dilation from 8 to 10 cm with contractions occurring every 2 to 3 minutes, lasting 50 to 60 seconds and of moderate to strong intensity (<90 mm Hg and typically nonindentable by palpation). Some contractions may last up to (but not exceed) 120 seconds.
Second Stage of Labor (Fetal Expulsion)
Begins with complete effacement and dilation ending with delivery of the fetus.
The second stage may last from 1 to 4 hours in the nullipara and typically less than 1 hour in the multipara. Variance in time depends on maternal pushing efforts, contraction pattern, anesthesia, and fetal descent.
Third Stage of Labor (Placental Expulsion)
Begins with delivery of the fetus and ends with delivery of the placenta.
The third stage may last from a few minutes to 30 minutes (typical). Prolonged periods may be attributable to abnormal placentation (ie, placenta accreta).
Fourth Stage (Immediate Postpartum)
This period lasts from delivery of the placenta until the postpartum condition of the woman has become stabilized (typically 1 to 2 hours after delivery).
Seven Cardinal Fetal Movements of Labor
When the biparietal diameter (BPD) of the fetal head has passed through the pelvic inlet, engagement occurs. Once the fetus enters the pelvis, seven “cardinal movements” are performed to assist in proper passage through the maternal pelvis during labor and birth (see Figure 37-4).
Descent
The downward movement of the fetus through the birth canal.
Accomplished by force of uterine contractions in the fundus and pressure of the amniotic fluid; during second stage of labor, “maternal bearing down” efforts increase intra-abdominal pressure, thus augmenting effects of uterine contractions.
Station refers to the relationship of the presenting part to the ischial spines. Subsequently, station has a direct correlation to the degree of descent, as described below (see Figure 37-5):
Floating—fetal presenting part is not engaged in pelvic inlet; may be ballotable via cervical exam.
Engagement—fetal presenting part enters the pelvis as the BPD passes through the inlet.
The pelvis is divided into sections measured in centimeters; a 5 cm scale is used (see Figure 37-6).
Flexion
Resistance to descent causes the fetal head to flex down, leading to convergence onto the chest. This results in the smallest head diameter, the suboccipitobregmatic, to present through the canal. This position relocates the posterior fontanelle to the center of the cervix, easily palpable on vaginal examination. Flexion begins at the pelvic inlet and continues until the fetal head (or presenting part) reaches the pelvic floor.
Internal Rotation
To accommodate the birth canal, the fetal occiput rotates 45 or 90 degrees from its original position toward the symphysis. The rotation is usually anteriorly, but if the pelvis cannot accommodate the occiput anteriorly due to a narrow forepelvis, it will rotate posteriorly, resulting in an occipitoposterior (OP) position of the fetus. This movement results from the shape of the fetal head and maternal pelvis, as well as the contour of the perineal muscles. The ischial spines project into the midpelvis, causing the fetal head to rotate anteriorly to accommodate the available space.
Extension
As the fetal head meets the pelvic floor, it meets resistance from the perineal muscles and is forced to extend up and outward. The fetal head becomes visible at the vulvovaginal ring; its largest diameter is encircled (crowning) and later emerges from the vagina.
External Rotation
Initial phase is called restitution. Once the fetal head realigns with the shoulders, restitution is complete. After restitution, the second phase of external rotation occurs as the body rotates so that the shoulders are in the anteroposterior diameter of the pelvis.
Expulsion
After delivery of the fetal head and internal rotation of the shoulders, the anterior shoulder resets beneath the symphysis pubis. The posterior shoulder is expelled, followed by the anterior shoulder, leading to total body expulsion.
NURSING ASSESSMENT AND INTERVENTIONS
Initiation of Labor
Nursing responsibilities begin with an initial assessment once a patient presents in labor.
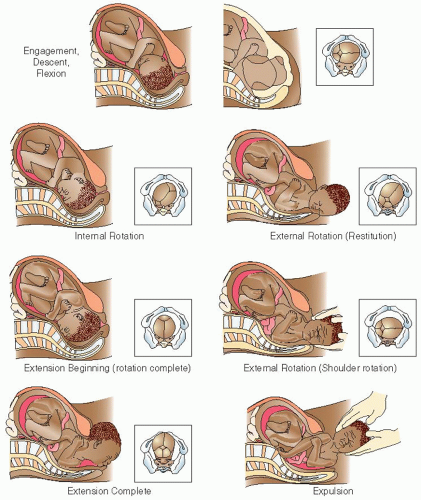 Figure 37-4. Seven fetal cardinal movements of labor (vertex presentation). |
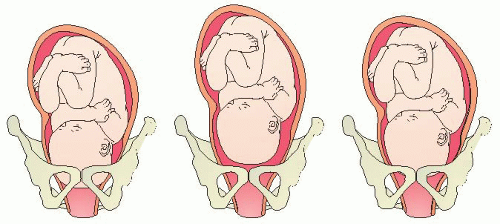 Figure 37-5. Engagement, floating, and dipping. |
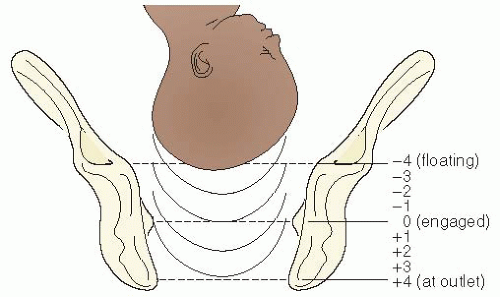 Figure 37-6. Stations of presenting part. The location of the presenting part in relation to the level of the ischial spines is designated station and indicates the degree of advancement of the presenting part through the pelvis. Stations are expressed in centimeters above (minus) or below (plus) the level of the ischial spines (zero). |
Collection of History and Baseline Data
 Evidence Base
Lowdermilk, D., & Perry, S. (2012). Maternity and women’s health care (10th ed.). St. Louis, MO: Elsevier.
Mattson, S., & Smith, J. E. (2011). Core curriculum for maternal-newborn nursing (4th ed.). St. Louis, MO: Elsevier.
Introduce yourself; maintain eye contact; ask for name of woman’s health care provider, inquire if the provider has been notified that the woman was coming to the facility or birth center; ask about presenting complaints/concerns.
Establish baseline obstetric, medical, and surgical information.
Inquire and validate patient information with the prenatal care record, if available. Complete brief review of past medical, surgical, and obstetric history. Obtain a history of the current pregnancy: Gravidity? Parity? Expected date of delivery or confinement? Complications? Fetal growth? Antepartal testing results?
Inquire about obstetric course and validate uterine contraction data with palpation: When did contractions begin? Frequency? Intensity? Duration? Bloody show? Have the membranes ruptured? Time of rupture? Color? Consistency? Amount of fluid? Odor?
Assess patient’s pain tolerance? Does she have a birth plan? Has she participated in Lamaze classes?
Last meal/drink? What type of food/drink?
Medications—nonprescription/prescription/illicit/herbal preparations or supplements?
Support system?
Obtain baseline maternal and fetal vital signs.
Temperature—elevation more than 100.0° F (37.8° C) suggests a possible infection or dehydration.
Pulse—elevated over the resting rate during contractions; may be elevated between contractions due to medications, bleeding, or drug use; goal: 60 to 100 bpm.
Respirations—increases as labor progresses; goal: 12 to 24 breaths/minute.
Blood pressure (BP).
A slight elevation over baseline may be attributed to anxiety.
BP more than 140 diastolic or 90 systolic (mm Hg) may be suggestive of hypertensive disorder of pregnancy and requires further evaluation and notification to primary care provider. A BP of more than 160/110 needs immediate attention and notification of the primary health care provider due to potential for stroke or seizure. Goal: Systolic more than 90 and less than 140 mm Hg; diastolic more than 60 and less than 90 mm Hg; mean arterial pressure (MAP) less than 100.
Complete fetal heart rate assessment; if a fetal monitor is to be used, run a 20- to 30-minute strip for baseline data and assessment of fetal well-being.
Physical assessment—complete review of systems on admission to include heart and lung sounds, as well as peripheral deep tendon reflexes.
Obtain a urine specimen—test urine at bedside or send to lab for interpretation; assess results for dehydration, infection, blood, protein, or glucose.
 Evidence Base
American College of Obstetricians and Gynecologists. (2002/Reaffirmed 2010). Diagnosis and management of preeclampsia and eclampsia (Practice Bulletin #33). Washington, DC: Author.
Methods for Determining Fetal Presentation
 Evidence Base
Curran, C., & Torgersen, K. (2012). abcdEFM TEXTBook: Electronic fetal monitoring (2nd ed.). Virginia Beach, VA: Clinical Specialists Consulting.
Leopold’s Maneuvers
This involves manual manipulation of the maternal abdomen to determine fetal placement in relation to maternal structures (see Figure 37-7).
First maneuver (fundal contents) (see Figure 37-7A)— determines fetal parts (fetal head or breech) located in the uterine fundus. While facing the woman, place both hands on each side of the fundus and palpate; note the size, shape, and consistency. A head feels smooth, hard/firm, and round, mobile, and ballotable. Breech position feels irregular, rounded, soft, and not independently mobile.
Second maneuver (fetal lie) (see Figure 37-7B)—identifies the relationship of the fetal back and the small parts to the front, back, or sides of the maternal abdomen. In the same position, lower hands bilaterally along the lateral borders of the maternal abdomen. Select one hand to stabilize one side of the uterus while the opposite hand palpates downward over the opposite side. Repeat on the opposing side. Determine fetal anatomy by palpated contents: firm, smooth, and
a hard continuous structure = fetal back; if small, knobby, irregular, protruding, and moving = fetal extremities.
Third maneuver (fetal presentation) (see Figure 37-7C)— determines the portion of the fetus that is presenting into the pelvic inlet. Grasp the part of the fetal presenting part situated in the lower uterine segment between the thumb and middle finger of one hand. Assess contents as described in the first maneuver; findings should be opposite of information found in the fundus. This maneuver is also known as Pallach’s maneuver or grip.
Fourth maneuver (fetal attitude and engagement) (see Figure 37-7D)—determines flexion or attitude of the fetal vertex or the greatest prominence of the fetal head over the pelvic brim. In this maneuver, the examiner faces the woman’s feet. The examiner places their hands on each side of the uterus, below the umbilicus and pointing toward the symphysis pubis. The examiner presses deeply with the fingertips, toward the symphysis pubis, locating the cephalic prominence. If the cephalic prominence is felt on the same side as the small parts: sinciput (fetus’ forehead), fetus vertex is flexed. If the cephalic prominence is felt on the same side as the back: occiput (or crown), fetal vertex slightly extended. If the cephalic prominence is felt equally on both sides: military position (common in posterior position), or nonflexed. As hands move toward the pelvic brim, assess for the following: if the hands converge (come together) around the presenting part, it is floating; if the hands diverge (move apart), the presenting part is either dipping or engaged in the pelvis.
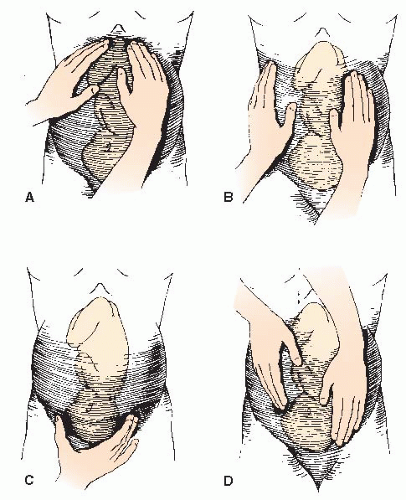 Figure 37-7. Leopold’s maneuvers. |
Vaginal Examination
See Figure 37-8.
Explain the procedure to the woman and assist her to a lithotomy position.
Conduct examination gently, under sterile conditions.
Perineum—visually assess perineum for lesions, ulcerations, bruising, discharge, odor, rupture of membranes, or bleeding. If contagious condition is suspected (ie, syphilis or genital herpes) or active bleeding exists, stop the examination and notify the primary care provider.
Perform manual examination with dominant hand (may use nondominant hand over fundus to stabilize fetal presenting part against the cervix):
Cervical assessment.
Location? Posterior, mid, or anterior (facing the introitus and aligned parallel to the vagina).
Hard or soft? Cervix softens during latent phase of labor.
Long or short? As effacement occurs, the cervix shortens and thins. Measured in percentages from 0% to 100%.
Open or closed? Measure degree of dilation in centimeters from 1 to 10 cm (complete).
Presentation.
Breech, cephalic/vertex (head), face, shoulder, transverse, or compound.
Caput succedaneum (edema occurring in and under fetal scalp) present (mild, moderate, severe) or absent.
Station identified: signifies descent in relation to maternal pelvis (-5 to +5).
Position.
Cephalic presentation (in relation to maternal pelvis anterior, posterior, transverse).
Location of fontanelles.
Membranes—intact or ruptured.
Amount, color, and any odor of fluid.
Passage of meconium and consistency.
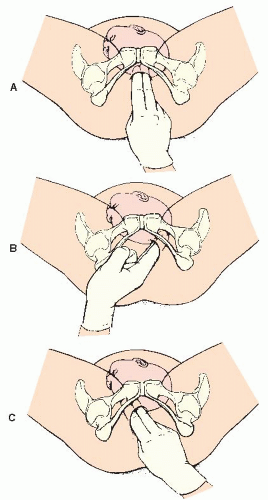 Figure 37-8. Vaginal examination. (A) Determining the station and palpating the sagittal suture. (B) Identifying the posterior fontanelle. (C) Identifying the anterior fontanelle. |
Sterile Speculum Examination
In some situations (eg, premature rupture of membranes), a vaginal examination is deferred and a sterile speculum examination is completed.
Explain the procedure to the woman, ask her to empty her bladder and remove all clothing from the waist down, and give her a sheet to cover herself.
Assist the patient into a lithotomy position (place hip roll under one hip to displace the uterus).
Drape her legs and abdomen and adjust lighting at the perineum.
After selecting a sterile speculum, utilizing sterile technique, open the package.
Put on sterile gloves using proper technique.
Ask the woman to relax her legs for proper visualization.
Explain each step of the procedure to decrease anticipatory anxiety of the patient.
With the nondominant hand separate the labia, place two fingers just inside the introitus, and gently press down on the base of the vagina. Next, insert the closed speculum past the fingers at a 45-degree downward angle such that the handle is perpendicular to the introitus.
Once the speculum enters the vagina, remove your fingers and turn the blades of the speculum into a horizontal position with the handle now parallel to the introitus; maintain a moderate and constant downward pressure (alleviates pain to the urethra).
As the speculum enters the posterior fornix, gently open the blades to visualize the cervix. If you still cannot visualize, close the blades, withdraw the speculum slightly, and move the blades toward the back of the vagina and try again. Once the cervix is in view, tighten the thumbscrew to maintain the blades in an open position. Complete a visual cervical assessment and obtain any samples necessary.
When the examination is complete, release the thumbscrew and withdraw in reverse order of placement.
Wipe any moisture or discharge from the perineal area and tell the patient the procedure is over; offer her assistance to a comfortable position.
Fetal Heart Assessment
 Evidence Base
Macones, G. A., Hankins, G. D., Spong, C. Y., et al. (2008). The 2008 National Institute of Child Health and Human Development workshop report on electronic fetal monitoring: Update on definitions, interpretation, and research guidelines. Obstetrics and Gynecology, 112, 661-666.
Curran, C., & Torgersen, K. (2012). abcdEFM TEXTbook: Electronic fetal monitoring (2nd ed.). Virginia Beach, VA: Clinical Specialists Consulting.
Fetal heart rate (FHR) assessment was established in Europe during the 17th century and fostered in the United States by Dr. Edward Hon. As FHR analysis evolved, so too has its purpose.
Providers caring for patients during labor and delivery must be skilled in utilizing correct instrumentation for the current clinical scenario, interpreting FHR characteristics and patterns, applying appropriate interventions, and communicating both routine and critical data to the perinatal team as the patient’s (mother, fetus, or both) condition warrants.
Maternal Risk Factors, Fetal/Neonatal Risks, and Fetal Heart Rate Implications
One cannot sufficiently interpret FHR variances without considering the impact of maternal physiology and pathophysiology during gestation. Maternal conditions that may negatively impact oxygenation and perfusion of the mother may lead to oxygen deprivation and hypoxemia in the fetus. The large majority of maternal and fetal couplets tolerate physiologic challenges of pregnancy, labor, and birth without consequence. Under extreme conditions (ie, asthma attack, seizure, hemorrhage), the maternal patient diverts blood and oxygen away from the nonvital uterus to vital organs at the expense of the fetus. Several maternal conditions outlined below explain risk factors to the fetus and subsequent FHR changes possibly witnessed during the intrapartum period.
Cardiac—acquired or congenital cardiac disease, anemia, or hypertensive disorders.
Fetal/neonatal secondary risks: small for gestational age (SGA), intrauterine growth restriction (IUGR), hydrops fetalis, hypoxemia, decreased amniotic fluid volume (AFV), preterm labor (PTL)/birth, placental abruption.
Potential FHR alterations: tachycardia, bradycardia, minimal or absent variability, absent accelerations, late decelerations, variable decelerations, prolonged decelerations, or sinusoidal patterns.
Respiratory—chronic disease: asthma, sickle cell, smoking; acute disease: status asthmaticus, acute respiratory distress syndrome, pulmonary embolus, amniotic fluid embolus, or infections.
Fetal/neonatal secondary risks: SGA, IUGR, hypoxemia, PTL/birth, presence of meconium.
Potential FHR alterations: tachycardia, bradycardia, minimal or absent variability, absent accelerations, late decelerations or prolonged decelerations.
Neurologic—chronic disease: epilepsy, underlying; acute disease: stroke, eclampsia.
Fetal/neonatal secondary risks: hypoxemia, PTL/birth.
Potential FHR alterations: bradycardia, minimal or absent variability, absent accelerations, late decelerations, or prolonged decelerations.
Renal—chronic disease: dialysis, transplant; acute disease: acute tubular necrosis, acute renal failure, development of calculi, fluid/electrolyte imbalance, infection.
Fetal/neonatal secondary risks: SGA, IUGR, hypoxemia, decreased AFV, decreased/reversed umbilical blood flow, PTL/birth. (Note: Altered electrolytes may adversely affect fetus if prolonged.)
Potential FHR alterations: tachycardia, bradycardia, minimal or absent variability, absent accelerations, variable decelerations, late decelerations, or prolonged decelerations.
Psychosocial and other risk factors—lack of prenatal care, medications, malnutrition/inadequate weight gain, excessive stress, domestic violence, substance abuse (eg, alcohol, illicit drug use).
Fetal/neonatal secondary risks: SGA, IUGR, congenital anomalies, placental anomalies, hypoxemia, decreased AFV, or PTL/birth.
Potential FHR alterations: tachycardia, bradycardia, minimal or absent or marked variability, absent accelerations, variable decelerations, late decelerations, or prolonged decelerations.
Fetal Heart Monitoring Instrumentation: External Options
Uterine Contraction Assessment by Palpation
Uterine palpation is performed periodically throughout labor to validate labor adequacy and progression; if applicable, palpation is also utilized to validate information received from internal equipment (ie, intrauterine pressure catheter).
Intensity may be described as follows (this may be taught to patient and labor coach):
Uterus easily indented: feels like the tip of the nose (mild intensity).
Able to slightly indent uterus: feels like the chin (moderate intensity).
Unable to indent uterus: feels like the forehead (strong intensity).
Uterine contraction data include:
Frequency: beginning of one contraction to the beginning of the next.
Duration: beginning of one contraction to the end of the same contraction.
Intensity: peak pressure of a contraction.
Resting tone: pressure of uterus at rest or between contractions.
Benefits:
Noninvasive; increases provider-patient interaction; direct assessment; easy to use/teach.
Provides information regarding relative frequency, duration, strength, and resting tone.
Allows freedom of movement and ambulation for woman.
Limitations:
Subjective information that leads to potential practitioner variance.
No permanent record for visual comparison analysis or collaboration.
Clinical conditions that may limit or alter data collection: overextended uterus (ie, multiple gestation, polyhydramnios, macrosomia) or maternal obesity.
Procedure:
Position patient in semi-Fowler’s or lateral position; place hip roll on one side to displace the uterus; explain the procedure to the patient.
Place the pads of your fingers on the patient’s abdomen in the area of the fundus and at the point of maximum intensity (this is not always midline).
Assess uterine contraction frequency, duration, intensity, and resting tone.
Normal findings/intrapartum active phase: frequency: less than or equal to five contractions in 10 minutes, averaged over a 30-minute period; duration: <90 to 120 seconds; intensity: <80 mm Hg; resting tone: <20 to 25 mm Hg.
Abnormal findings—tachysystole: more than five contractions in 10 minutes; hypertonus: intensity > 80 mm Hg, resting tone > 20 to 25 mm Hg or Montevideo units (MVUs) > 400.
Uterine Contraction Assessment by Tocodynamometer (Tocotransducer)
A tocodynamometer detects changes in tension or muscular tone over the fundus on the outside layer of the maternal abdomen. The electronic data are then converted into a number and printed on the lower half of the electronic fetal monitor (EFM) paper. However, proper placement is key for accuracy:
If patient is at term—place over the point of maximum intensity in the fundal region of the maternal abdomen.
If patient is preterm—place over the lower uterine segment below the umbilicus, typically beside the ultrasound device if the fetus is vertex.
Benefits:
Noninvasive, easy to use.
Detects relative uterine resting tone, frequency, intensity, and duration of uterine contraction.
Does not require ruptured amniotic membranes.
Generates a tracing for future assessment and permanent record keeping.
Limitations:
Nonspecific data gathered, particularly intensity and resting tone.
Difficult to obtain data in patients with the following conditions: obesity, polyhydramnios, macrosomia, PTL,
maternal vomiting, maternal bearing-down efforts/pushing during second stage or during procedures.
Location sensitive; placement may result in false or inadequate information.
Sensitive to maternal and fetal movement—may be superimposed on contraction waveform.
Limits maternal movement and ambulation during labor.
Procedure:
Position patient in a semi-Fowler’s or lateral position; place hip roll on one side to displace the uterus; explain the procedure to the patient and support persons.
Palpate the point of maximum intensity over the fundus and secure belt.
Press the uterine activity (UA) reference button on the EFM between contractions to set the resting tone between 5 and 15 mm Hg.
Palpate the fundus and compare printed data.
Reposition the device periodically, as needed, for patient comfort and during labor as the fetus descends.
Interpret data and document and communicate findings.
Fetal Heart Rate Assessment by Auscultation
Auscultation is a FHR counting technique accompanied by a listening device (ie, fetoscope or Doppler). The examiner counts the FHR over a specified time frame (see Table 37-2).
Interpretation of data includes: FHR baseline rate, rhythm, and general increases and decreases.
Devices for interpretation may include: fetoscope, Leffscope or Pinard stethoscope (rarely used today), and Doptone/Doppler.
Capabilities of a fetoscope—detects:
Differentiation of fetal and maternal heart rates—eliminates error due to fetal demise and EFM with nonelectrical device (ie, fetoscope).
Verification of FHR dysrhythmias visualized on EFM tracing.
Clarification of halving or doubling (may occur due to dysrhythmia) on the EFM tracing.
Benefits:
Neonatal outcomes comparable to the use of EFM, in low-risk populations and with 1:1 nurse-patient ratios.
Noninvasive, easy to use, and most methods require no electricity.
Patient has increased freedom of movement and ambulation.
Patient can be monitored if submerged in water (eg, water/Jacuzzi births).
Limitations:
Subjective data collection; variances between practitioners may exist.
Conditions may limit the practitioner’s ability to assess the FHR (obesity, increased fetal movement or amniotic fluid).
Cannot assess FHR variability or periodic/episodic decelerations or accelerations.
Lack of continuous recording from monitor for visual comparative analysis.
Requires education, practice, skill in auditory assessment.
Requires a 1:1 nurse-patient ratio during intrapartum; therefore, may create need to increase or realign labor and delivery staff.
Procedure:
Position patient in a semi-Fowler’s or lateral position; place hip roll on one side to displace the uterus; explain the procedure to the patient and her support persons.
Palpate the maternal abdomen to locate the fetal back by using Leopold’s maneuvers (see page 1272). Figure 37-9 outlines FHR locations and corresponding fetal positions.
If using Doppler device, apply conduction gel to underside of device.
Position the bell of the fetoscope or Doppler on the area of the abdomen where maximum fetal heart sounds can be heard, usually over the back or chest of fetus. If using a fetoscope, use firm pressure. If using Doppler device, avoid friction noises caused by fingers on the abdominal surface area.
Assess and compare maternal heart rate (radial pulse) against the FHR; confirm differentiation.
Palpate uterine contractions simultaneously and compare with FHR data.
Differentiate between fetal heart rate/tone and other abdominal sounds.
FHR—a rapid crisp ticking or galloping sound.
Uterine bruit—a soft murmur, caused by the passage of blood through dilated uterine vessels; synchronous with maternal pulse.
Funic souffle (uterine souffle)—a hissing sound produced by passage of blood through the umbilical arteries; synchronous with the FHR.
Count the FHR between contractions for at least 30 to 60 seconds (60 seconds per Society of Obstetricians and Gynaecologists of Canada).
Interpret findings to include FHR baseline rate, rhythm, increases or decreases; further evaluation via EFM is indicated if:
Baseline FHR less than 110 or more than 160, irregular rhythm, abrupt or gradual decreases in FHR during, immediately after, or 30 seconds after a contraction.
Stay updated, free articles. Join our Telegram channel

Full access? Get Clinical Tree


Get Clinical Tree app for offline access
