IV Catheter Insertion and Removal
Peripheral IV catheter insertion involves selection of a venipuncture device and an insertion site, application of a tourniquet, preparation of the site, and venipuncture. Selection of a venipuncture device and site depends on the type of solution to be used; frequency and duration of infusion; patency and location of accessible veins; the patient’s age, size, and condition; and, when possible, the patient’s preference.1,2,3
If possible, choose a vein in the nondominant arm or hand. Use veins on the dorsal and ventral surfaces of the upper extremities, including the metacarpal, cephalic, basilic, and median veins. When choosing a site, avoid areas of flexion; areas where there’s pain on palpation; veins that are compromised by bruising, infiltration, phlebitis, sclerosis, or cord formation; and areas where procedures are planned. Avoid the lateral surface of the wrist for about 4″ to 5″ (10 to 12.5 cm) because of the risk for nerve damage; avoid the ventral surface of the wrist because of the associated pain on insertion and the risk for nerve damage.
Also avoid using veins of the lower extremities because of the increased risk for tissue damage, thrombophlebitis, and ulceration. In a patient who has had breast surgery with axillary node dissection, don’t use veins in the upper extremity on the affected side; also don’t choose veins on an extremity affected by radiation therapy, lymphedema, or stroke. If the patient has stage 4 or 5 chronic kidney disease, avoid using upper arm veins or forearms that could be used for dialysis access. Collaborate with the patient and his doctor to discuss the risks and benefits of using a vein in an affected extremity if no other options exist.2
A peripheral catheter allows administration of fluids, medication, blood, and blood components and maintains IV access to the patient. It’s removed upon completion of therapy, for cannula site changes, when contamination is suspected, and for suspected infection or infiltration.4,5
According to the Centers for Disease Control and Prevention, a peripheral IV catheter should be replaced no more frequently than every 72 to 96 hours to reduce the risk of infection and phlebitis in adults.1 If an IV catheter is inserted in an emergency situation, it should be removed as soon as possible, within 48 hours.1
Equipment
Chlorhexidine solution (tincture of iodine, povidone iodine, or alcohol may be used if there’s a contraindication to chlorhexidine) ▪ gloves ▪ single-use tourniquet (preferably latex-free) ▪ IV access devices with safety shields3 ▪ IV solution with attached and primed administration set ▪ IV pole ▪ transparent semipermeable dressing ▪ catheter securement device, sterile hypoallergenic tape, or sterile surgical strips ▪ Optional: arm board, roller gauze, tube gauze, warm packs, scissors, clippers, ultrasound device with sterile probe cover, sterile ultrasound gel, local anesthetic, basin of water, soap.
Commercial venipuncture kits come with or without an IV access device. (See Comparing venous access devices, page 422.) In many facilities, venipuncture equipment is kept on a tray or cart, allowing more choice of access devices and easy replacement of contaminated items.
Preparation of Equipment
Check the information on the label of the IV solution container, including the patient’s name and identification number, the type of solution, the time and date of its preparation, the preparer’s name, and the ordered infusion rate. Compare the doctor’s orders with the solution label to verify that the solution is the correct one.6
Inspect the solution for discoloration or other loss of integrity and make sure that it hasn’t expired.7 Then select the gauge of catheter that’s appropriate for the patient’s diagnosis, prescribed type and duration of therapy (therapy that’s required for less than 1 week), available access sites, and your experience with insertion. Also take into consideration complications that are associated with the particular type catheter. If blood transfusion is necessary, a 14G to 24G catheter may be used in adults.3
If you’re using a winged infusion set, connect the adapter to the administration set, and unclamp the line until fluid flows from the open end of the needle cover. Then close the clamp and place the needle on a sterile surface, such as the inside of its packaging. If you’re using a catheter device, open its package to allow easy access.
Implementation
Place the IV pole in the proper slot in the patient’s bed frame. If you’re using a portable IV pole, position it close to the patient.
Hang the IV solution with attached primed administration set on the IV pole.
Confirm the patient’s identity using at least two patient identifiers according to your facility’s policy.12
Explain the procedure to the patient to ensure his cooperation and reduce anxiety. Anxiety can cause a vasomotor response resulting in venous constriction.
Comparing Venous Access Devices
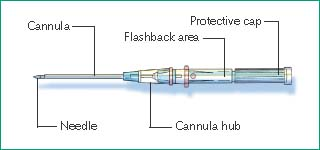
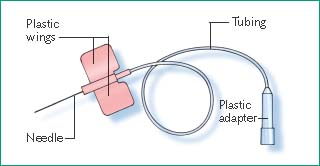
Most IV infusions are delivered through one of two basic types of venous access devices: an over-the-needle cannula or a winged infusion set. To improve IV therapy and guard against accidental needle sticks, you should use a needle-free system and shielded or retracting peripheral IV catheters. Steel-winged devices should be limited to single-dose or short-term administration.3
Over-The-Needle Cannula
 |
| Purpose | Advantages | Disadvantage |
|---|---|---|
| Long-term therapy for an active or agitated patient | More comfortable for the patient once it’s in place; contains radio-paque thread for easy location. Activity-restricting device, such as arm board, rarely required. | More difficult to insert than other devices |
Selecting the Site
Select the puncture site. If long-term therapy is anticipated, start with a vein at the most distal site so that you can move proximally as needed for subsequent IV insertion sites.2 For infusion of an irritating medication, choose a large vein distal to any nearby joint. Make sure the intended vein can accommodate the cannula.
Place the patient in a comfortable, reclining position, leaving the arm in a dependent position to increase venous fill of the lower arms and hands. If the patient’s skin is cold, cover his entire arm with warm pack for 5 to 10 minutes or submerge it in warm water.
Applying the Tourniquet
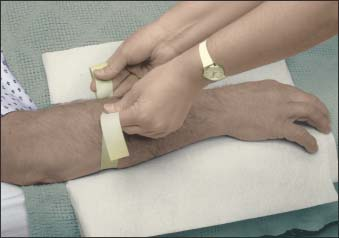
Apply a tourniquet about 4″ to 6″ (10 to 15 cm) above the intended puncture site to dilate the vein (as shown below). Check for a radial pulse. If it isn’t present, release the tourniquet and reapply it with less tension to prevent arterial occlusion.14
Lightly palpate the vein with the index and middle fingers of your nondominant hand. Stretch the skin to anchor the vein. If the vein feels hard or ropelike, select another.
If the vein is easily palpable but not sufficiently dilated, one or more of the following techniques may help raise the vein. Place the extremity in a dependent position for several seconds or lightly stroke the vessel downward. If you have selected a vein in the arm or hand, tell the patient to open and close his fist several times.15
Leave the tourniquet in place for no more than 3 minutes while you locate a suitable vein. Release the tourniquet for a few minutes.
Preparing the Site
If the intended insertion site is visibly soiled, clean it with soap and water before applying the antiseptic solution.5,15
Clip the hair around the insertion site, if needed, with a scissors or electric clippers.15
Clean the site with chlorhexidine using a back-and-forth scrubbing motion for at least 30 seconds5 to remove flora that would otherwise be introduced into the vascular system with the venipuncture. Allow the antiseptic to dry.
Reapply the tourniquet.
Use the handheld ultrasound device with a sterile probe cover to locate the vein, if necessary.
Using the thumb of your nondominant hand, stretch the skin taut below the puncture site to stabilize the vein.5
Grasp the access cannula. If you’re using a winged infusion set, hold the short edges of the wings (with the needle’s bevel facing upward) between the thumb and forefinger of your dominant hand. Then squeeze the wings together. If you’re using an over-the-needle cannula, grasp the plastic hub with your dominant hand, remove the cover, and examine the cannula tip. If the edge isn’t smooth, discard and replace the device.
Inserting the Device
Tell the patient that you are about to insert the device.
Hold the needle bevel up and enter the skin directly over the vein at a 0- to 15-degree angle.
Aggressively push the needle directly through the skin and into the vein in one motion. Check the flashback chamber behind the hub for blood return, signifying that the vein has been properly accessed. (You may not see a blood return in a small vein.)
Stay updated, free articles. Join our Telegram channel

Full access? Get Clinical Tree


Get Clinical Tree app for offline access
