Intravascular therapy
More than 80% of patients require some form of I.V. therapy. Although nurses may not be required to insert all types of I.V. lines, they’re responsible for maintaining the lines and preventing complications throughout the patient’s therapy. Nurses also assist in minor surgical procedures, such as the insertion of central venous and arterial lines.
This chapter explains the types, administration, methods, and primary indications for I.V. therapy. You’ll review how to prepare I.V. therapy: how to insert, maintain, and remove specific lines and devices, how to control infection and maintain I.V. flow rates, and how to monitor the patient’s response to therapy. After reading this chapter, you’ll also know what various organizations recommend as best practices for I.V. therapy. Some of those practices rely on basic principles of science SCIENCE or are evidence-basedEB, representing research data. Many are endorsed by professional groups, such as the Infusion Nurses SocietyINS, the Oncology Nurses SocietyONS, the American Society for Parenteral and Enteral NutritionASPEN, and the Institute of MedicineIOM. Practices relating to medication risks stem from the Institute for Safe Medication PracticesISMP and the American Association of Blood Banksaabb. Other practices derive from such organizations as the AABB, the American Heart AssociationAHA, the American Hospital Association and its Patient Care PartnershipPCP, the Joint Commission on Accreditation of Healthcare OrganizationsJCAHO, the National Institutes of HealthNIH, and the Centers for Disease Control and PreventionCDC. Still others are mandated by JCAHO, the Occupational Safety and Health AdministrationOSHA, and from specific manufacturers’MFR recommendations for the use of their products.
I.V. delivery methods
The factors involved in choosing a specific type of I.V. therapy include the therapy’s purpose and duration, the condition of the patient’s veins, and his diagnosis, age, and health history. Peripheral I.V. therapy, for example, typically involves intermittent or short-term administration of solutions given through the hands, arms, legs, or feet. In central venous (CV) therapy, a method used for patients requiring a large volume of fluid, hypertonic solution, caustic drug, or high-calorie parenteral nutrition solution, administration occurs through a central vein, such as the subclavian vein or the internal or external jugular veins. Implanted vascular access devices provide a variation on CV infusion. The infused solution enters the vein through a surgically implanted device, usually in the subcutaneous pocket. This method is used for patients requiring I.V. therapy for 6 months or longer. Midline and peripherally inserted catheters are used in home care and in health care facilities.
Uses of I.V. therapy
The most common uses for I.V. therapy are maintaining and restoring fluid and electrolyte balance, administering drugs, transfusing blood, and providing nutrition.
The I.V. route allows for rapid, effective drug administration. Commonly infused drugs include antibiotics, thrombolytics, antineoplastic drugs, cardiovascular drugs, anticonvulsants, and patient-controlled analgesics. Drugs can be given over time or can be infused rapidly (I.V. push). Blood transfusion is used to maintain adequate blood volume, increase the blood’s oxygen-carrying capacity, and maintain homeostasis. In caring for patients receiving blood transfusions, your responsibilities include administering blood and blood components and monitoring patients receiving therapy.
Parenteral nutrition is the administration of nutrients by I.V. route. Low-concentration parenteral nutrition solutions are given through a peripheral vein, while highly concentrated ones are given via a central vein. If you’re caring for a patient receiving parenteral nutrition, you’ll need to monitor his response to the therapy as well as his fluid and electrolyte balance, glucose tolerance, and acid, mineral, and vitamin levels. You’ll also need to detect and prevent complications from the therapy.
Patient teaching
Many patients are apprehensive about I.V. therapy. To reduce a patient’s anxiety, it’s important that you provide information to allay his fears and clarify misconceptions he may have about the therapy. If possible, show the patient the equipment and explain how it will be used during therapy. You can also use pamphlets and videotapes if available.
Always allow the patient to express his fears and concerns and reassure him by answering his questions fully. Also, involve his family members or caregivers to provide more reassurance to the patient.
Home I.V. therapy
Home I.V. therapy benefits the patient by making him feel more comfortable and allowing him to perform many of his normal activities. The lower cost of home I.V. therapy, in addition to benefiting the patient, helps to keep costs down for health care facilities.
Home care patients may receive fluids or such medications as antibiotics, antifungals, chemotherapeutic agents, insulin, and analgesics. In some situations, blood products may also be given at home after the initial therapy.
Candidates for home I.V. therapy should be selected carefully. These patients and families must be willing and able to administer therapy safely, learn potential complications and interventions, understand the basics of asepsis, and obtain the necessary supplies.
Teaching the patient about home I.V. therapy requires you to demonstrate the procedures and answer questions. Have the patient or family members give return demonstrations whenever possible. It’s important to include family members or caregivers during the teaching process. Teaching should begin in the health care facility and be completed before the patient is discharged.
Blood transfusion
Whole blood transfusion replenishes the volume and the oxygen-carrying capacity of the circulatory system by increasing the mass of circulating red cells. Transfusion of packed red blood cells (RBCs), from which 80% of the plasma has been removed, restores only the oxygen-carrying capacity. After plasma is removed, the resulting component has a hematocrit of 65% to 80% and a usual volume of 250 to 300 ml.
Each unit of whole blood or RBCs contains enough hemoglobin to raise the hemoglobin concentration in an average-sized adult 1 g/dl. Both types of transfusion treat decreased hemoglobin level and hematocrit. Whole blood is usually used only when decreased levels result from hemorrhage; packed RBCs are used when such depressed levels accompany normal blood volume to avoid possible fluid and circulatory overload. (See Transfusing blood and selected components, pages 110 to 112.) Whole blood and packed RBCs contain cellular debris, requiring in-line filtration during administration.
Before starting the transfusion, positive patient identification, the therapy’s appropriateness, blood compatibility, physician’s order, and signed consent form should be verified by the nurse. aabb INS In addition to confirming patient identity with the appropriate blood or blood component identification numbers, the patient’s identity must also also be verified using two patient identifiers, aside from the patient’s room number, according to your facility’s policy.JCAHO
Blood and blood components should be filtered and transfused through an appropriate blood administration set. Straight-line and Y-type blood administration sets are commonly used. Although filters come in mesh and microaggregate types, the latter type is preferred, especially when transfusing multiple units of blood. Highly effective leukocyte removal filters are available for use when transfusing blood and packed RBCs. The use of these filters can postpone sensitization to transfusion therapy. aabb INS
Transfusing blood and selected components
| Blood component | Indications | Compatibility | Nursing considerations |
|---|---|---|---|
| Whole blood | |||
| Complete (pure) blood | |||
| |||
| |||
| |||
| Packed red blood cells (RBCs) | |||
| Same RBC mass as whole blood but with 80% of the plasma removed | |||
| |||
| |||
| |||
| Leukocyte-poor RBCs | |||
| Same as packed RBCs with about 70% of the leukocytes removed | |||
| |||
| |||
| |||
| White blood cells (leukocytes) | |||
| Whole blood with all the RBCs and about 80% of the plasma removed |
|
|
|
| Platelets | |||
| Platelet sediment from RBCs or plasma platelets |
|
|
|
| Fresh frozen plasma (FFP) | |||
| Uncoagulated plasma separated from RBCs and rich in coagulation factors V, VIII, and IX |
|
|
|
| Albumin 5% (buffered saline); albumin 25% (salt-poor) | |||
| A small plasma protein prepared by fractionating pooled plasma |
|
|
|
| Factor VIII concentrate (antihemophilic factor) | |||
| Cold insoluble portion of plasma recovered from FFP |
|
|
|
| Cryoprecipitate | |||
|
|
|
Administer packed RBCs with a Y-type set. Using a straight-line set forces you to piggyback the tubing so you can stop the transfusion if necessary but still keep the vein open. Piggybacking increases the chance of harmful microorganisms entering the tubing as you’re connecting the blood line to the established line.
Single units of whole blood or blood components should be transfused within a 4-hour period. The start of the transfusion should begin within 30 minutes from the time the blood is released from the blood bank. No medications should be added to the blood other than normal saline solution. Patients should also be monitored 15 minutes after the start of therapy and at 15- to 30-minute intervals throughout the transfusion. aabb INS
Multiple-lead tubing minimizes the risk of contamination, especially when transfusing multiple units of blood (a straight-line set would require multiple piggybacking). A Y-type set gives you the option of adding normal saline solution to packed cells — decreasing their viscosity — if the patient can tolerate the added fluid volume.
transmission, reduced risk of allergic or immune reactions, universal compatibility with all blood types, efficient oxygen delivery to vital organs and tissues, and an extended shelf life of at least 1 year (compared with 42 days for donor blood). Successful transfusions have been performed in clinical trials with cardiac bypass patients. However, these products don’t provide blood cells with clotting factors or the ability to fight infection. aabb
Equipment
Blood recipient set (170- to 260-micron filter and tubing with drip chamber for blood, or combined set) ▪ I.V. pole ▪ gloves ▪ gown ▪ face shield ▪ multiple-lead tubing ▪ whole blood or packed RBCs ▪ 250 ml of normal saline solution ▪ venipuncture equipment, if necessary (should include 20G or larger catheter) ▪ optional: ice bag, warm compresses
Preparation of equipment
Avoid obtaining either whole blood or packed RBCs until you’re ready to begin the transfusion.
Prepare the equipment when you’re ready to start the infusion.
Implementation
Confirm the patient’s identity using two patient identifiers according to facility policy. JCAHO
Explain the procedure to the patient. Explain possible signs and symptoms of a transfusion reaction (chills, rash, fever, flank or back pain, dizziness, or blood in urine) and to report these possible signs and symptoms to the nurse. NIH Make sure that he has signed an informed consent form before transfusion therapy is initiated.aabb INS PCP
Record the patient’s baseline vital signs.
Obtain whole blood or packed RBCs from the blood bank within 30 minutes of the transfusion start time. Check the expiration date on the blood bag, and observe for abnormal color, RBC clumping, gas bubbles, and extraneous material. Return outdated or abnormal blood to the blood bank. aabb INS
Compare the patient’s confirmed identity with that on the blood bag label. Check the blood bag identification number, ABO blood group, and Rh compatibility. Also, compare the patient’s blood bank identification number, if present, with the number on the blood bag. Identification of blood and blood products is performed at the patient’s bedside by two licensed professionals, according to your facility’s policy.
Put on gloves, a gown, and a face shield. CDC OSHA
Using a blood administration set, close all the clamps on the set. Then insert the spike of the line you’re using for the normal saline solution into the bag of saline solution. Next, open the port on the blood bag, and insert the spike of the line you’re using to administer the blood or cellular component into the port. Hang the bag of normal saline solution and blood or cellular component on the I.V. pole, open the clamp on the line of saline solution, and squeeze the drip chamber until it’s half full. Then remove the adapter cover at the tip of the blood administration set, open the main flow clamp, and prime the tubing with saline solution. aabb CDC INS OSHA
If you’re administering packed RBCs with a blood administration set, you can add normal saline solution to the bag to dilute the cells by closing the clamp between the patient and the drip chamber and opening the clamp from the blood. Then lower the blood bag below the saline container and let 30 to 50 ml of normal saline solution flow into the packed cells. Finally, close the clamp to the blood bag, rehang the bag, rotate it gently to mix the cells and normal saline solution, and close the clamp to the saline container.
If the patient doesn’t have an I.V. line in place, perform a venipuncture, using a 20G or larger-diameter catheter. Avoid using an existing line if the needle or catheter lumen is smaller than 20G. Central venous access devices may also be used for transfusion therapy. aabb INS
If you’re administering whole blood, gently invert the bag several times to mix the cells.
Attach the prepared blood administration set to the venipuncture device, and flush it with normal saline solution. Then close the clamp to the saline solution, and open the clamp between the blood bag and the patient. Adjust the flow rate to no greater than 5 ml/ minute for the first 15 minutes of the transfusion to observe for a possible transfusion reaction. SCIENCE
Remain with the patient and watch for signs of a transfusion reaction. If such signs develop, record his vital signs and stop the transfusion. Infuse saline solution at a moderately slow infusion rate, and notify the physician at once. If no signs of a reaction appear
within 15 minutes, you’ll need to adjust the flow clamp to the ordered infusion rate. The rate of infusion should be as rapid as the patient’s circulatory system can tolerate. aabb INS
It’s undesirable for RBC preparations to remain at room temperature for more than 4 hours. If the infusion rate must be so slow that the entire unit can’t be infused within 4 hours, it may be appropriate to divide the unit and keep one portion refrigerated until it can be safely administered. aabb INS
After completing the transfusion, you’ll need to put on gloves and remove and discard the used infusion equipment. Then remember to reconnect the original I.V. fluid, if necessary, or discontinue the I.V. infusion. CDC OSHA
Return the empty blood bag to the blood bank, if facility policy dictates, and discard the tubing and filter. CDC
Record the patient’s vital signs.
Special considerations
Although some microaggregate filters can be used for up to 10 units of blood, always replace the filter and tubing if more than 1 hour elapses between transfusions. When administering multiple units of blood under pressure, use a blood warmer to avoid hypothermia. Blood components may be warmed to no more than 107.6° F (42° C).
For rapid blood replacement, you may need to use a pressure bag. Be aware that excessive pressure may develop, leading to broken blood vessels and extravasation, with hematoma and hemolysis of the infusing RBCs.
If the transfusion stops, take the following steps as needed:
Check that the I.V. container is at least 3′ (1 m) above the insertion device.
Make sure that the flow clamp is open and that the blood completely covers the filter. If it doesn’t, squeeze the drip chamber until it does.
Gently rock the bag back and forth, agitating blood cells that may have settled.
Untape the dressing over the I.V. site to check needle placement. Reposition the needle if necessary.
Flush the line with saline solution and restart the transfusion. Using a Y-type set, close the flow clamp to the patient and lower the blood bag. Next, open the saline clamp and allow some saline solution to flow into the blood bag. Rehang the blood bag, open the flow clamp to the patient, and reset the flow rate.
If a hematoma develops at the I.V. site, immediately stop the infusion. Remove the I.V. cannula. Notify the physician and expect to place ice on the site intermittently for 8 hours; then apply warm compresses. Follow your facility’s policy.
If the blood bag empties before the next one arrives, administer normal saline solution slowly. If you’re using a Y-type set, close the blood-line clamp, open the saline clamp, and let the saline run slowly until the new blood arrives. Decrease the flow rate or clamp the line before attaching the new unit of blood.
Nursing diagnoses
Impaired gas exchange
Risk for injury
Expected outcomes
The patient will:
have his hemoglobin level and hematocrit return to normal
have no signs of active bleeding
show no signs and symptoms of a transfusion reaction
identify possible complications and notify the nurse if they occur.
Complications
Despite improvements in crossmatching precautions, transfusion reactions can still occur. Unlike a transfusion reaction, an infectious disease transmitted during a transfusion may go undetected until days, weeks, or even months later, when it produces signs and symptoms. Measures to prevent disease transmission include laboratory testing of blood products and careful screening of potential donors, neither of which is guaranteed.
Hepatitis C accounts for most posttransfusion hepatitis cases. The tests that detect hepatitis B and C can produce false-negative results and may allow some hepatitis cases to go undetected.
When testing for antibodies to human immunodeficiency virus (HIV), keep in mind that antibodies don’t appear until 6 to 12 weeks after exposure. The estimated risk of acquiring HIV from blood products varies from 1 in 40,000 to 1 in 153,000.
Many blood banks screen blood for cytomegalovirus (CMV). Blood with CMV is especially dangerous for an immunosuppressed, seronegative patient. Blood banks also test blood for syphilis, but refrigerating blood virtually eliminates the risk of transfusion-related syphilis.
Circulatory overload and hemolytic, allergic, febrile, and pyogenic reactions can result from any transfusion. Coagulation disturbances, citrate intoxication, hyperkalemia, acid-base imbalance, loss of 2,3-diphosphoglycerate, ammonia intoxication, and hypothermia can result from massive transfusion.
Documentation
Record the date and time of the transfusion, the type and amount of transfusion product, the patient’s vital signs, your check of all identification data, and the patient’s response. Document any transfusion reaction and treatment. (See Documenting blood transfusions.)
Supportive references
American Association of Blood Banks. Technical Manual, 13th ed. Vengelen-Tyler, V., ed. Bethesda, Md.: AABB, 1999.
Joint Commission on Accreditation of Healthcare Organizations. Comprehensive Accreditation Manual for Home Care. Oakbrook Terrace, Ill.: JCAHO, 2005. www.jcaho.gov.
Joint Commission on Accreditation of Healthcare Organizations. Comprehensive Accreditation Manual for Hospitals. Oakbrook Terrace, Ill.: JCAHO, 2005.
“Standard 32. Filters. Infusion Nursing Standards of Practice”, Journal of Infusion Nursing 29(1S):S33-34, January-February 2006.
“Standard 34. Blood and Fluid Warmers. Infusion Nursing Standards of Practice”, Journal of Infusion Nursing 29(1S):S35, January-February 2006.
“Standard 48. Administration Set Change. Infusion Nursing Standards of Practice”, Journal of Infusion Nursing 29(1S):S48-50, January-February 2006.
“Standard 70. Transfusion Therapy. Infusion Nursing Standards of Practice”, Journal of Infusion Nursing 29(1S):S76-77, January-February 2006.
Weinstein, S.M. Plumer’s Principles and Practice of Intravenous Therapy, 7th ed. Philadelphia: Lippincott Williams & Wilkins, 2001.
Documenting blood transfusions INS aabb
Whether you administer blood or blood components, you must use proper identification and crossmatching procedures.
After matching the patient’s name, medical record number, blood group (or type) and Rh factor (the patient’s and the donor’s), the cross match data, and the blood bank identification number with the label on the blood bag, you’ll need to clearly record that you did so. The blood or blood component must be identified and documented properly by two health care professionals as well.
On the transfusion record, document:
date and time the transfusion was started and completed
name of the health care professional who verified the information
catheter type and gauge
total amount of the transfusion
patient’s vital signs before and after the transfusion
any infusion device used
flow rate and if blood warming unit was used.
If the patient receives his own blood, document in the intake and output records:
amount of autologous blood retrieved
amount of autologous blood infused
laboratory data during and after the autotransfusion
patient’s pretransfusion and posttransfusion vital signs.
Pay particular attention to:
patient’s coagulation profile
hemoglobin level, hematocrit, and arterial blood gas and calcium levels.
Central venous catheters
A central venous (CV) catheter is a sterile catheter that’s inserted through a large vein, such as the subclavian vein (or, less commonly, the internal jugular vein), and terminates in the superior vena cava. CV catheters allow long-term administration in situations requiring safe, repeated access to the venous system for administration of drugs, fluids and nutrition, and blood products. (See Central venous catheter pathways, page 116.)
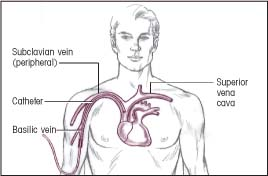
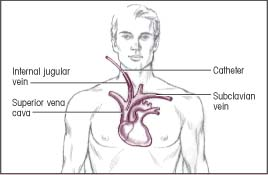
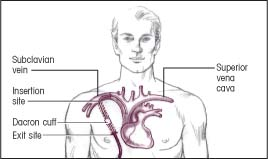
Central venous catheter pathways
The illustrations below show several common pathways for central venous (CV) catheter insertion. Typically, a CV catheter is inserted in the subclavian vein or internal jugular vein. The catheter usually terminates in the superior vena cava. The CV catheter is tunneled when long-term placement is required.
Insertion: Subclavian vein
Termination: Superior vena cava
 |
Insertion: Basilic vein (peripheral)
Termination: Superior vena cava
 |
Insertion: Internal jugular vein
Termination: Superior vena cava
 |
Insertion: Through a subcutaneous tunnel to the subclavian vein (Dacron cuff helps hold catheter in place)
Termination: Superior vena cava
 |
Other benefits of CV therapy include ease in monitoring CV pressure, drawing blood samples, administering large fluid volumes and irritating substances (such as total parenteral nutrition), and providing long-term venous access. Because multiple blood samples can be drawn through it without repeated venipuncture, the use of a CV catheter decreases the patient’s anxiety and preserves or restores peripheral veins.
CV therapy increases the risk of complications, such as pneumothorax, sepsis, thrombus formation, and vessel and adjacent organ perforation (all life-threatening conditions). Also, the CV catheter may decrease patient mobility, is difficult to insert, and costs more than a peripheral I.V. catheter.
According to the Infusion Nurses Society (INS), site selection for a CV catheter should be considered a medical act. A catheter should be chosen with the minimum number of lumens needed for patient care. EB2 There also seems to be a lower incidence of infection when the subclavian route is chosen over the internal jugular or femoral sites.EB3 The femoral vein should be used with caution, with the distal tip terminating in the inferior vena cava. Nursing assessment should include the patient’s condition, infusion history, and duration and type of therapy. INS
The type of catheter (tunneled, implanted, or percutaneously inserted) to be used is determined by the patient’s condition, length of therapy, and type of medication to be infused. INS standards also recommend that a single lumen catheter be used unless additional therapies are required. An X-ray should be taken before initiation of therapy to confirm proper catheter placement and intermittently to verify that the catheter tip is in the superior vena cava. INS
A sterile dressing, either gauze or transparent semipermeable membrane should be applied and maintained on the CV catheter. Topical antibiotic ointment or cream isn’t recommended for use on the insertion site due to the potential of promoting a fungal infection or antimicrobial resistance. CDC The edges of the gauze dressing should be covered with an occlusive material and should routinely be changed every 48 hours and immediately if the integrity of the dressing is compromised. The optimal interval for changing transparent semipermeable dressings depends on the dressing material’s age and the patient’s condition. Gauze used in conjunction with a transparent membrane should be changed every 48 hours.INS Good hand hygiene and aseptic technique during insertion and care decreases the risk of catheter-related infection.CDC
Equipment
Inserting a CV catheter
Shave preparation kit, if necessary ▪ sterile gloves and gowns ▪ blanket ▪ linen-saver pad ▪ sterile towel ▪ sterile drape ▪ masks ▪ 2% chlorhexidine swabs CDC INS ▪ normal saline solution ▪ 3-ml syringe with 25G 1″ needle ▪ 1% or 2% injectable lidocaine ▪ dextrose 5% in water (D5W) ▪ syringes for blood sample collection ▪ suture material ▪ two 14G or 16G CV catheters ▪ I.V. solution with administration set prepared for use ▪ infusion pump or controller, as needed ▪ sterile 4″ × 4″ gauze pads ▪ 1″ adhesive tape ▪ sterile scissors ▪ heparin or normal saline flushes, as needed ▪ sterile marker • sterile labels • optional: transparent semipermeable dressing
Flushing a catheter
Normal saline solution or heparin flush solution ▪ 2% chlorhexidine ASPEN CDC INS
Changing an injection cap
Alcohol pad ▪ injection cap ▪ padded clamp
Removing a CV catheter
Clean gloves and sterile gloves ▪ sterile suture removal set ▪ 2% chlorhexidine ASPEN CDC INS ▪ alcohol pads ▪ sterile 4″ × 4″ gauze pads ▪ forceps ▪ tape ▪ sterile, plastic adhesive-backed dressing or transparent semipermeable dressing ▪ agar plate or culture tube, if necessary for culture
Some facilities have prepared trays containing most of the equipment for catheter insertion. The type of catheter selected depends on the type of therapy to be used. (See Guide to central venous catheters, pages 118 to 120.)
Preparation of equipment
Before inserting a CV catheter, confirm catheter type and size with the practitioner; the most commonly used sizes are 14G and 16G.
Guide to central venous catheters
Types of central venous (CV) catheters differ in their design, composition, and indications for use. This chart outlines the advantages, disadvantages, and nursing considerations for several commonly used catheters.
| Catheter description and indications | Advantages and disadvantages | Nursing considerations |
|---|---|---|
| Short-term, single-lumen catheter | ||
Description
| Indications
| |
Advantages
Disadvantages
|
 | |
| Short-term, multilumen catheter | ||
Description
Indications
| ||
Advantages
Disadvantages
|
 | |
| Groshong catheter | ||
Description
Indications
| Advantages
Disadvantages
|
|
| Hickman catheter | ||
Description
Indications
| Advantages
Disadvantages
|
|
| Broviac catheter | ||
Description
Indications
| Advantages
Disadvantages
|
 |
| Hickman-Broviac catheter | ||
Description
Indications
| Advantages
Disadvantages
 |
|
| Long-line catheter | ||
Description
Indications
| Advantages
Disadvantages
|
 |


Set up the I.V. solution and prime the administration set using strict sterile technique.
Attach the line to the infusion pump or controller, if ordered.
Recheck all connections to make sure that they’re tight.
Label all medications, medication containers, and other solutions on and off the sterile field. JCAHO
As ordered, notify the radiology department that a chest X-ray machine will be needed.
Implementation
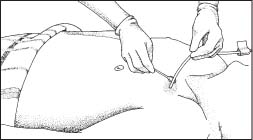
Inserting a CV catheter
Confirm the patient’s identity using two patient identifiers according to facility policy. JCAHO
Wash your hands thoroughly to prevent the spread of microorganisms. CDC
Reinforce the practitioner’s explanation of the procedure, and answer the patient’s questions. Make sure that the patient has signed a consent form, if necessary, and check his history for hypersensitivity to iodine, latex, or the local anesthetic. PCP
Place the patient in Trendelenburg’s position to dilate the veins and reduce the risk of air embolism.
For subclavian vein insertion, place a rolled blanket lengthwise between the shoulders to increase venous distention. For jugular insertion, place a rolled blanket under the opposite shoulder to extend the neck, making anatomic landmarks more visible. Place a linen-saver pad under the patient to prevent soiling the bed. INS
Turn the patient’s head away from the site to prevent possible contamination from airborne pathogens and to make the site more accessible. Place a mask on the patient if required by your facility’s policy, unless doing so increases his anxiety or is contraindicated due to his respiratory status.
Prepare the insertion site. You may need to wash the skin with soap and water first. Make sure that the skin is free from hair because hair can harbor microorganisms. Infection-control practitioners recommend clipping the hair close to the skin rather than shaving, which may cause skin irritation and create multiple small open wounds, increasing the risk of infection. (If the physician orders that the area be shaved, try shaving it the evening before catheter insertion to allow partial healing of minor skin irritations.) aabb INS
Establish a sterile field on a table, using a sterile towel or the wrapping from the instrument tray.
Put on a mask and sterile gloves and gown, and clean the area around the insertion site with a clorhexidine swab using a vigorous back-and-forth motion. If the patient is sensitive to chlorhexidine, use an alcohol applicator. CDC INS
After the physician puts on a sterile mask, a gown, and gloves and drapes the area to create a sterile field, open the packaging of the 3-ml syringe and 25G needle and hand it to him, using sterile technique. CDC
Wipe the top of the lidocaine vial with an alcohol pad and invert it. The physician will then fill the 3-ml syringe and inject the anesthetic into the site.
Open the catheter package and give the catheter to the physician, using sterile technique. The physician should inspect the catheter for leaks before inserting the catheter.
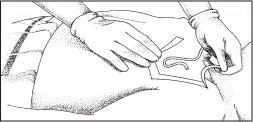
Prepare the I.V. administration set for immediate attachment to the catheter hub. Ask the patient to perform Valsalva’s maneuver while the physician attaches the I.V. line to the catheter hub. Valsalva’s maneuver increases intrathoracic pressure, reducing the possibility of an air embolus. (See Teaching Valsalva’s maneuver.) SCIENCE
After the physician attaches the I.V. line to the catheter hub, set the flow rate at a keep-vein-open rate to maintain venous access. (Alternatively, the catheter may be capped and flushed with heparin.) The physician then sutures the catheter in place.
After an X-ray confirms correct catheter placement in the midsuperior vena cava, set the flow rate as ordered.
Use normal saline solution to remove dried blood that could harbor microorganisms. Secure the catheter with adhesive tape, and apply a sterile 4″ × 4″ gauze pad. You may also use a transparent semipermeable dressing, either alone or placed over the gauze pad. Expect some serosanguineous drainage during the first 24 hours.
Place the patient in a comfortable position and reassess his status. Label the dressing with the time and date of catheter insertion and catheter length and gauge (if not imprinted on the catheter). INS
Teaching Valsalva’s maneuver
Increased intrathoracic pressure reduces the risk of air embolus during insertion and removal of a central venous catheter. A simple way to achieve this is to ask the patient to perform Valsalva’s maneuver: forced exhalation against a closed airway. Instruct the patient to take a deep breath and hold it, and then bear down for 10 seconds. Then tell the patient to exhale and breathe quietly.
Valsalva’s maneuver raises intrathoracic pressure from its normal level of 3 to 4 mm Hg to levels of 60 mm Hg or higher. It also slows the pulse rate, decreases the return of blood to the heart, and increases venous pressure.
This maneuver is contraindicated in patients with increased intracranial pressure. It shouldn’t be taught to patients who aren’t alert or cooperative.
Flushing the catheter
To maintain patency, flush the catheter routinely according to your facility’s policy. If the system is being maintained as a heparin lock and the infusions are intermittent, the flushing procedure will vary according to your facility’s policy, the medication administration schedule, and the type of catheter used.
All lumens of a multilumen catheter must be flushed regularly. Most facilities use a heparin flush solution available in premixed 10-ml multidose vials. Recommended concentrations vary from 10 to 100 units of heparin per milliliter. Use normal saline solution instead of heparin to maintain patency in two-way valved devices, such as the Groshong type, because research suggests that heparin isn’t always needed to keep the line open. INS
The recommended frequency for flushing CV catheters varies from once every 8 hours to once weekly.
The recommended amount of flushing solution also varies. Some facilities recommend using twice the volume of the cannula and the add-on devices if this volume is known. If the volume is unknown, most facilities recommend 3 to 5 ml of solution to flush the catheter, although some call for as much as 10 ml of solution. Different catheters require different amounts of solution.
To perform the flushing procedure, start by cleaning the cap with an alcohol pad. Allow the cap to dry. If using the needleless system, follow the manufacturer’s guidelines. MFR
Access the cap and aspirate until blood appears to confirm the CV catheter patency. INS
Inject the recommended type and amount of flush solution.
After flushing the catheter, maintain positive pressure by keeping your thumb on the plunger of the syringe while withdrawing the needle. This prevents blood backflow and clotting in the line. If flushing a valved catheter, close the clamp just before the last of the flush solution leaves the syringe. INS
Changing the injection cap
CV catheters used for intermittent infusions have needle-free injection caps (short luer-lock devices similar to the heparin lock adapters used for peripheral I.V. infusion therapy). These caps must be luer-lock types to prevent inadvertent disconnection and air embolism. Unlike heparin lock adapters, however, these caps contain a minimal amount of empty space, so you don’t have to preflush the cap before connecting it.
The frequency of cap changes varies according to your facility’s policy and how often the cap is used; however, if the integrity of the product is compromised, it should be changed immediately. Use strict sterile technique when changing the cap. INS
Clean the connection site with an alcohol pad or clorhexidine.
Instruct the patient to perform Valsalva’s maneuver while you quickly disconnect the old cap and connect the new cap using sterile technique. If he can’t perform this maneuver, use a padded clamp to prevent air from entering the catheter.
Removing a CV catheter
If you’re removing the CV catheter, first check the patient’s record for the most recent placement (confirmed by an X-ray) to trace the catheter’s path as it exits the body. Make sure that assistance is available if a complication, such as uncontrolled bleeding, occurs during catheter removal. (Some vessels, such as the subclavian vein, can be difficult to compress.) Confirm the patient’s identity using two patient identifiers according to facility policy. JCAHO Before you remove the catheter, explain the procedure to the patient.INS
Place the patient in a supine position to prevent emboli.
Wash your hands, and put on clean gloves and a mask. CDC
Turn off all infusions and prepare a sterile field, using a sterile drape.
Remove and discard the old dressing, and change to sterile gloves.
Clean the site with an alcohol pad or a gauze pad soaked in clorhexidine. Inspect the site for signs of drainage or inflammation.
Clip the sutures and, using forceps, remove the catheter in a slow, even motion. Have the patient perform Valsalva’s maneuver as the catheter is withdrawn to prevent an air embolism. INS SCIENCE
Apply pressure with a sterile gauze pad immediately after removing the catheter.
Apply clorhexidine to the insertion site to seal it. Cover the site with a gauze pad, and place a transparent semipermeable dressing over the gauze. Label the dressing with the date and time of the removal and your initials. The site should be assessed every 24 hours until epithetization occurs. INS
Inspect the catheter tip and measure the length of the catheter to ensure that the catheter has been completely removed. If you suspect that the catheter hasn’t been completely removed, notify the practitioner immediately and monitor the patient closely for signs of distress. If you suspect an infection, swab the catheter on a fresh agar plate, or clip the tip of the catheter, place it in a sterile container, and send it to the laboratory for culture. INS
Dispose of the I.V. tubing and equipment properly. CDC OSHA
Special considerations
While you’re awaiting chest X-ray confirmation of proper catheter placement, infuse an I.V. solution, such as D5W or normal saline solution, at a keep-vein-open rate until correct placement is assured. Or use heparin to flush the line. Infusing an isotonic solution avoids the risk of vessel wall thrombosis.
place the patient on his left side in Trendelenburg’s position and notify the physician.
After insertion, watch for signs and symptoms of pneumothorax, such as shortness of breath, uneven chest movement, tachycardia, and chest pain. Notify the physician immediately if such signs and symptoms appear.
Change the dressing every 48 hours if a gauze dressing is used or every 7 days if a transparent semipermeable dressing is used, according to your facility’s policy, or whenever it becomes moist or soiled. While the CV catheter is in place, change the tubing every 72 hours and the solution every 24 hours CDC or according to your facility’s policy. Dressing, tubing, and solution changes for a CV catheter should be performed using sterile technique. (See Changing a central venous catheter dressing.) Assess the site for signs and symptoms of infection, such as discharge, inflammation, and tenderness. INS
To prevent an air embolism, close the catheter clamp or have the patient perform Valsalva’s maneuver each time the catheter hub is open to air. (A Groshong catheter doesn’t require clamping because it has an internal valve.)
A candidate for home therapy must have a family member or friend who can safely and competently administer I.V. fluids, a backup helper, a suitable home environment, a telephone, transportation, ade-quate reading skills, and the ability to prepare, han-dle, store, and dispose of the equipment. The care pro-cedures used in the home are the same as those used in the facility, except that the home therapy patient uses clean instead of sterile technique.
The overall goal of home therapy is patient safety, so your patient teaching must begin well before discharge. After discharge, a home therapy coordinator will provide follow-up care until the patient or someone close to him can independently provide catheter care and infusion therapy. Many home therapy patients learn to care for the catheter themselves and infuse their own medications and solution.
Changing a central venous catheter dressing
Expect to change your patient’s central venous catheter dressing every 7 days. Many health care facilities specify dressing changes whenever the dressing becomes soiled, moist, or loose. The following illustrations show the key steps you’ll perform.
First, use proper hand hygiene with water and antiseptic soap or a waterless alcohol-based gel or foam. CDC Put on clean gloves, and remove the old dressing by pulling it toward the exit site of a long-term catheter or toward the insertion site of a short-term catheter. This technique helps you avoid pulling out the line. Remove and discard your gloves.
Next, put on sterile gloves, and clean the skin around the site three times, using a new alcohol pad each time. Start at the center and move outward. Allow the skin to dry and clean the site with chlorhexidine swabs using a vigorous back-and-forth motion (as shown).
 |
After the solution has dried, cover the site with a dressing, such as a gauze dressing or the transparent semipermeable dressing shown here. Topical antibiotic ointments or creams aren’t recommended for use on insertion sites because of the risk of fungal infections or antimicrobial resistance. CDC Write the time and date on the dressing.
 |
Nursing diagnoses
Risk for imbalanced fluid volume
Risk for infection
Expected outcomes
The patient will:
maintain fluid intake and output at appropriate levels
maintain urine specific gravity of 1.005 to 1.015
have mucous membranes that appear pink and moist
maintain vital signs and laboratory values within normal limits
maintain temperature within normal limits
maintain white blood cell and differential counts within normal range
have culture results that show no evidence of pathogens.
Complications
Complications can occur at any time during infusion therapy. Traumatic complications, such as pneumothorax, typically occur on catheter insertion but may not be noticed until after the procedure is completed.
Systemic complications, such as sepsis, typically occur later during infusion therapy.
Other complications include phlebitis (especially in peripheral CV therapy), thrombus formation, and air embolism.
Documentation
Record the time and date of insertion, length and location of the catheter, solution infused, practitioner’s name, and patient’s response to the procedure. Document the time of the X-ray, its results, and your notification of the physician.
Record the time and date of removal and the type of antimicrobial ointment and dressing applied. Note the condition of the catheter insertion site and collection of a culture specimen.
Supportive references
Andris, D.A., and Krzywda, E.A. “Central Venous Access: Clinical Practice Issues”, Nursing Clinics of North America 32(4):719-40, December 1997.
Centers for Disease Control and Prevention. “Guidelines for Prevention of Intravascular Catheter-Related Infections”, Morbidity and Mortality Monthly Report 51(RR-10):1-29, August 2002. EB1
Ely, E.W., et al. “Venous Air Embolism from Central Venous Catheterization: A Need for Increased Physician Awareness”, Critical Care Medicine 27(10):2113-17, October 1999.
Kim, D.K., et al. “The CVC Removal Distress Syndrome: An Unappreciated Complication of Central Venous Catheter Removal”, American Journal of Surgery 64(4):344-47, April 1998.
Merrer, J., et al. “Complications of Femoral and Subclavian Venous Catheterization in Critically Ill Patients: A Randomized Controlled Trial”, JAMA 286(6):700-707, 2001.EB3
Pearson, M.L. “Guideline for Prevention of Intravascular Device-Related Infections. Part I. Intravascular Device-Related Infections: An Overview. The Hospital Infection Control Practices Advisory Committee. American Journal of Infection Control 24(4):262-77, August 1996.
Pearson, M.L. “Guideline for Prevention of Intravascular Device-Related Infection. Part II. Recommendations for Prevention of Nosocomial Intravascular Device-Related Infections. Hospital Infection Control Practices Advisory Committee. American Journal of Infection Control 24(4):277-93, August 1996.
“Standard 29. Add-on Devices and Junction Securement. Infusion Nursing Standards of Practice”, Journal of Infusion Nursing 29(1S):S32, January-February 2006.
“Standard 37. Site Selection. Infusion Nursing Standards of Practice”, Journal of Infusion Nursing 29(1S): S37-39, January-February 2006.
“Standard 38. Catheter Selection. Infusion Nursing Standards of Practice”, Journal of Infusion Nursing 29(1S):S39-40, January-February 2006.
“Standard 39. Hair Removal. Infusion Nursing Standards of Practice”, Journal of Infusion Nursing 29(1S):S40-41, January-February 2006.
“Standard 40. Local Anesthesia. Infusion Nursing Standards of Practice”, Journal of Infusion Nursing 29(1S):S41, January-February 2006.
“Standard 41. Access Site Preparation. Infusion Nursing Standards of Practice”, Journal of Infusion Nursing S29(1S):S41-42, January-February 2006.
“Standard 42. Catheter Placement. Infusion Nursing Standards of Practice”, Journal of Infusion Nursing 29(1S):S42-44, January-February 2006.
“Standard 49. Catheter Removal. Infusion Nursing Standards of Practice”, Journal of Infusion Nursing 29(1S):S51-55, January-February 2006.
Treston-Aurand, J., et al. “Impact of Dressing Materials on Central Venous Catheter Infection Rates”, Journal of Intravenous Nursing 20(4):201-206, July-August 1997.
U.S. Department of Health and Human Services. “Public Health Service. Centers for Disease Control and Prevention. Guidelines for Prevention of Intravascular Device-Related Infections”, American Journal of Infection Control 24(4):262-77, August 1996.
Weinstein, S.M. Plumer’s Principles and Practice of Intravenous Therapy, 7th ed. Philadelphia: Lippincott Williams & Wilkins, 2001.
Wojcik, J. “Central Venous Catheters”, Advance for Nurses 7(23):25-28, October 2005. EB2
Chemotherapeutic drug administration
Administration of chemotherapeutic drugs requires specific skills in addition to those used when giving other drugs.
Only specially trained nurses and physicians should give chemotherapeutic drugs. The Infusion Nurses Society recommends that the nurse administering antineoplastic agents have knowledge of:
disease processes
drug classifications
pharmacologic indications
actions and adverse effects
adverse reactions
method of administration
rate of delivery
treatment goals
drug properties
dosage calculations related to height, weight, and body surface area. INS
Chemotherapeutic drugs may be administered through various routes. Although the I.V. route (using peripheral or central veins) is used most commonly, these drugs may also be given orally, subcutaneously, I.M., intra-arterially, into a body cavity, through a central venous (CV) catheter, through an Ommaya reservoir into the spinal canal, or through a device implanted in a vein or subcutaneously such as through a patient-controlled analgesia device. (See Understanding patient-controlled analgesia, page 126.) They may also be administered into an artery, the peritoneal cavity, or the pleural space. (See Intraperitoneal chemotherapy: An alternative approach, page 127.)
Before administering chemotherapy, laboratory data (electrolyte levels and white blood cell count) should be reviewed, the patient should be assessed for the appropriateness of the prescribed therapy, and the drug order should be validated by two clinicians with special attention to medication concentration and the infusion rate. INS
The administration route depends on the drug’s pharmacodynamics and the tumor’s characteristics. For example, if a malignant tumor is confined to one area, the drug may be administered through a localized, or regional, method. Regional administration allows delivery of a high drug dose directly to the tumor. This is particularly advantageous because many solid tumors don’t respond to drug levels that are safe for systemic administration.
If the drug to be administered is a vesicant, the nurse should remember two key factors: a lowpressure infusion device should be the instrument of choice, and a new access site should be initiated before vesicant administration. INS
Chemotherapy may be administered to a patient whose cancer is believed to have been eradicated through surgery or radiation therapy. This treatment, called adjuvant chemotherapy, helps to ensure that no undetectable metastasis exists. A patient may also receive chemotherapy, or neoadjuvant or synchronous chemotherapy, before surgery or radiation therapy. Induction chemotherapy helps improve survival rates by shrinking a tumor before surgical excision or radiation therapy.
In general, chemotherapeutic drugs prove more effective when given in higher doses, although their adverse effects commonly limit the dosage. An exception to this rule is methotrexate, which is particularly effective against rapidly growing tumors but toxic to normal tissues that grow and divide rapidly. Folinic acid halts the effects of methotrexate; therefore, it’s administered after the methotrexate has destroyed the cancer cells but before it damages vital organs. EB
Equipment
Prescribed drug ▪ aluminum foil or a brown paper bag (if the drug is photosensitive) ▪ normal saline solution ▪ syringes and needleless adapters ▪ infusion pump or controller ▪ gloves ▪ impervious containers labeled CAUTION: BIOHAZARD
Understanding patient-controlled analgesia
Stay updated, free articles. Join our Telegram channel

Full access? Get Clinical Tree


Get Clinical Tree app for offline access
