Intermittent Urinary Catheterization
Intermittent (straight) urinary catheter insertion involves inserting a temporary catheter into the bladder to drain urine. In contrast with an indwelling urinary catheter, an intermittent catheter is removed as soon as the urine is drained. It’s a preferred alternative to indwelling urinary catheter insertion for managing patients with neurogenic bladder and urinary retention because it’s associated with lower infection rates than indwelling urinary catheterization.1,2,3,4
Intermittent urinary catheterization has been used in patients with spinal cord injury, spinal tumors, diabetic neuropathy, multiple sclerosis, spina bifida, myelodysplasia, bladder outlet obstruction, and continent urinary diversion. It’s also been used to manage incontinence and postoperative urinary retention as well as to collect urine samples for culture and sensitivity.
Intermittent urinary catheterization is used long-term or short-term, depending on the patient’s condition. When used routinely, it should be performed at regular intervals throughout the day according to the patient’s fluid intake to prevent bladder overdistention.2
In a health care facility, use sterile or clean technique for insertion, depending on your facility’s policy. At home, the patient may use clean technique without increasing the risk for a urinary tract infection.4
Equipment
Sterile urethral catheter (latex or silicone #10 to #22 French) ▪ washcloth ▪ towel ▪ soap and water ▪ gloves ▪ two linen-saver pads ▪ sterile gloves ▪ sterile drape ▪ sterile fenestrated drape ▪ sterile cotton-tipped applicators (or cotton balls and plastic forceps) ▪ antiseptic cleaning agent ▪ urine drainage receptacle ▪ sterile water-soluble lubricant ▪ intake and output record
▪ Optional: urine specimen container, laboratory request form, gooseneck lamp or flashlight, pillows or rolled blankets or towels, bladder ultrasonography equipment, catheter storage container, specimen supplies.
▪ Optional: urine specimen container, laboratory request form, gooseneck lamp or flashlight, pillows or rolled blankets or towels, bladder ultrasonography equipment, catheter storage container, specimen supplies.
Prepackaged sterile disposable kits that usually contain all the necessary equipment are available.
Implementation
Gather the appropriate equipment.
Verify the doctor’s order.
Check the patient’s medical record for a history of hypersensitivity to iodine or latex.
Provide privacy and explain the procedure to the patient to allay anxiety and promote cooperation during the procedure.
Confirm the patient’s identity using at least two patient identifiers according to your facility’s policy.8
Check the patient’s intake and output record to see the time and amount of the most recent voiding and confirm the time with the patient.
Percuss and palpate the patient’s bladder to establish baseline data. Ask if the patient feels the urge to void. If possible, measure the volume of urine in the bladder using bladder ultrasonography; ultrasonography helps prevent unnecessary catheterization.2
Have a coworker hold a flashlight or place a gooseneck lamp next to the patient’s bed so that you can visualize the urinary meatus in poor lighting.
For A Female Patient
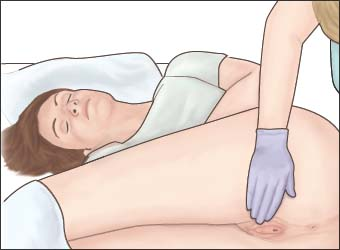
Place the patient in the supine position, with her knees flexed and separated and her feet flat on the bed, about 2″ (61 cm) apart. If she finds this position uncomfortable, have her flex one knee and keep the other leg flat on the bed. Or have the patient lie on her side with her knees drawn up to her chest during the catheterization procedure (as shown below). This position may be especially helpful for elderly or disabled patients, such as those with severe contractures.
 |
Elder Alert
An elderly patient may need pillows or rolled towels or blankets to provide support with positioning.
You may need an assistant to help the patient stay in position or to direct the light. Ask the patient to hold her position to give you a clear view of the urinary meatus and to prevent contamination of the sterile field.
Place the linen-saver pads on the bed between the patient’s legs and under her hips to prevent inadvertent soiling of the patient’s bed linens. Use warm soapy water and a washcloth to clean the patient’s genital area and perineum thoroughly. Dry the area with the towel. Then remove your gloves and perform hand hygiene.
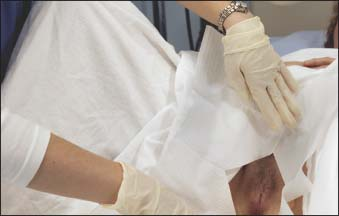
To create the sterile field, open the prepackaged kit or equipment tray and place it between the patient’s legs. If the sterile gloves are the first item on the top of the tray, put them on. Place the sterile drape under the patient’s hips. Then drape the patient’s lower abdomen with the sterile fenestrated drape so that only the genital area remains exposed (as shown below). Make sure you don’t contaminate your gloves if you have them on already.3,6,9

Open the rest of the kit or tray. Put on the sterile gloves if you haven’t already done so.
Tear open the packet of antiseptic cleaning solution, and use it to saturate the sterile cotton balls or applicators.
Open the packet of water-soluble lubricant, and apply it to the catheter tip.4
Separate the labia majora and labia minora as widely as possible with the thumb, middle, and index fingers of your nondominant hand so you have a full view of the urinary meatus. Keep the labia well separated throughout the procedure (as shown below), so they don’t obscure the urinary meatus or contaminate the area when it’s cleaned.
Stay updated, free articles. Join our Telegram channel

Full access? Get Clinical Tree


Get Clinical Tree app for offline access
