Indwelling Urinary Catheter Insertion
Also known as a Foley or retention catheter, an indwelling urinary catheter remains in the bladder to provide continuous urine drainage. A balloon inflated at the catheter’s distal end prevents it from slipping out of the bladder after insertion.
Indwelling catheters are used most commonly to relieve bladder distention caused by urine retention and to allow continuous urine drainage when the urinary meatus is swollen from childbirth, surgery, or local trauma. Other indications for an indwelling catheter include urinary tract obstruction (by a tumor or enlarged prostate), urine retention or infection from neurogenic bladder paralysis caused by spinal cord injury or disease, and any illness in which the patient’s urine output must be monitored closely. During bladder retraining for patients with neurologic disorders, such as stroke or spinal cord injury, bladder ultrasound scanning may be used to determine postvoid residual urine volume as well as the need for intermittent catheterization.
An indwelling catheter is inserted using sterile technique and only when absolutely necessary. Insertion should be performed with extreme care to prevent injury and infection. The catheter should be removed as soon as it is no longer needed to prevent catheter-associated urinary tract infections.1,2,3
Equipment
Sterile indwelling catheter (latex or silicone #10 to #22 French [average adult sizes are #16 to #18 French]) ▪ syringe filled with 5 to 8 mL of sterile water ▪ washcloth ▪ towel ▪ soap and water ▪ two linen-saver pads ▪ sterile gloves ▪ sterile drape ▪ sterile fenestrated drape ▪ sterile cotton-tipped applicators (or cotton balls and plastic forceps) ▪ antiseptic cleaning agent ▪ urine receptacle ▪ single-use packet of sterile, water-soluble lubricant ▪ sterile drainage collection bag ▪ intake and output sheet ▪ adhesive tape ▪ Optional: urine specimen container and laboratory request form, leg band with Velcro closure, gooseneck lamp or flashlight, pillows or rolled blankets or towels, ultrasound bladder scanner.
Prepackaged sterile disposable kits that usually contain all the necessary equipment are available. The syringes in these kits are prefilled with 10 mL of sterile water
Preparation of Equipment
Implementation
Confirm the patient’s identity using at least two patient identifiers according to your facility’s policy.10
Explain the procedure to the patient and provide privacy. Check the chart and ask when the patient last voided.
Percuss and palpate the bladder to establish baseline data. Ask if the patient feels the urge to void. If possible, measure the amount of urine in the bladder using ultrasonography.1
Have a coworker hold a flashlight or place a gooseneck lamp next to the patient’s bed so that you can see the urinary meatus clearly in poor lighting.
You may need the assistant to help the patient stay in position or to direct the light.
For A Female Patient
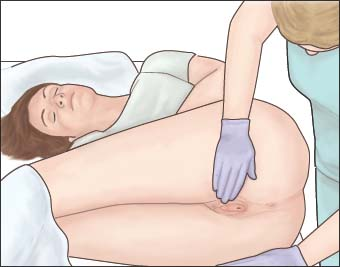
Place the patient in the supine position, with her knees flexed and separated and her feet flat on the bed, about 2′ (61 cm) apart. If she finds this position uncomfortable, have her flex one knee and keep the other leg flat on the bed. Or have the patient lie on her side with her knees drawn up to her chest during the catheterization procedure (as shown below). This position may be especially helpful for elderly or disabled patients, such as those with severe contractures.
 |
Elder Alert
The elderly patient may need pillows or rolled towels or blankets to provide support with positioning.
You may need an assistant to help the patient stay in position or to direct the light. Ask the patient to hold the position to give you a clear view of the urinary meatus and to prevent contamination of the sterile field.
Use the washcloth to clean the patient’s genital area and perineum thoroughly with soap and water. Dry the area with the towel. Then remove your gloves and perform hand hygiene again.1,4,5,6,7
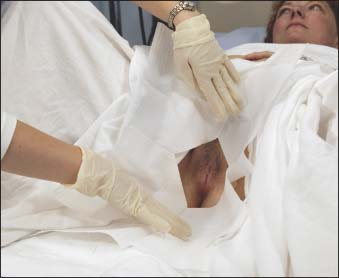
Place the linen-saver pads on the bed between the patient’s legs and under the hips. To create the sterile field, open the prepackaged kit or equipment tray and place it between the patient’s legs. If the sterile gloves are the first item on the top of the tray, put them on. Place the sterile drape under the patient’s hips. Then drape the patient’s lower abdomen with the sterile fenestrated drape so that only the genital area remains exposed (as shown in next column).7 Take care not to contaminate your gloves if you have them on already.
Open the rest of the kit or tray. Put on the sterile gloves if you haven’t already done so.
Make sure the patient isn’t allergic to iodine solution; if she is allergic, another antiseptic cleaning agent must be used.
Tear open the packet of antiseptic cleaning solution, and use it to saturate the sterile cotton balls or applicators. Be careful not to spill the solution on the equipment.
Open the packet of water-soluble lubricant, and apply it to the catheter tip; attach the drainage bag to the other end of the catheter. (If you’re using a commercial kit, the drainage bag may already be attached.) Make sure all tubing ends remain sterile, and be sure the clamp at the emptying port of the drainage bag is closed to prevent urine leakage from the bag. Some drainage systems have an air-lock chamber to prevent bacteria from traveling to the bladder from urine in the drainage bag.
Note: Some urologists and nurses use a syringe prefilled with water-soluble lubricant and instill the lubricant directly into the female urethra, instead of on the catheter tip. This method helps prevent trauma to the urethral lining as well as possible urinary tract infection. Check your facility’s policy.
Before inserting the catheter, inflate the balloon, as appropriate, with sterile water to inspect it for leaks. Be aware that some manufacturers recommend not inflating the balloon before insertion because of the risk of microtears that may cause infection. If you’re unsure whether a balloon should be pretested, check the manufacturer’s instructions included with the kit.
Nursing Alert
Don’t pretest balloons on silicone catheters. Pretesting can cause a crease at the base of the balloon that can traumatize the urethra on insertion.
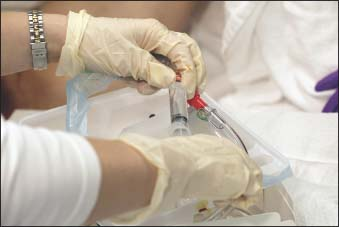
If you’re pretesting the balloon, attach the water-filled syringe to the luer-lock; then push the plunger and check for seepage as the balloon expands (as shown on next page top). Aspirate the water to deflate the balloon. Also inspect the catheter for resiliency. Rough, cracked catheters can injure the urethral mucosa during insertion, which can predispose the patient to infection.
Separate the labia majora and labia minora as widely as possible with the thumb, middle, and index fingers of your nondominant hand so you have a full view of the urinary meatus. Keep the labia well separated throughout the procedure (as shown below), so they don’t obscure the urinary meatus or contaminate the area when it’s cleaned.
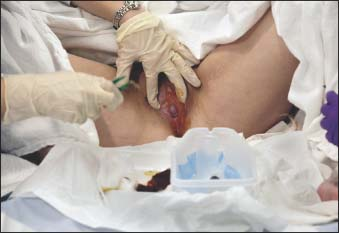
With your dominant hand, use a sterile, antiseptic-soaked, cotton-tipped applicator (or pick up a sterile cotton ball with the plastic forceps) and wipe one side of the urinary meatus with a downward motion (as shown below).7
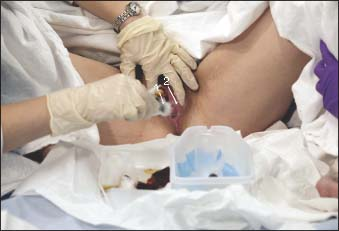
Wipe the other side with another sterile applicator or cotton ball in the same way. Then wipe directly over the meatus with still another sterile applicator or cotton ball. Take care not to contaminate your sterile glove.
Repeat the procedure, using another sterile applicator or cotton ball and taking care not to contaminate your sterile glove.
Pick up the catheter with your dominant hand, holding it 2″ to 3″ (5.1 to 7.6 cm) from the tip, and prepare to insert the lubricated tip into the urinary meatus.7 To facilitate insertion by relaxing the sphincter, ask the patient to cough as you insert the catheter. Tell her to breathe deeply and slowly to further relax the sphincter and reduce spasms.
Stay updated, free articles. Join our Telegram channel

Full access? Get Clinical Tree


Get Clinical Tree app for offline access
