Expanded Approaches to Access and Monitoring


Expanded Approaches to Access and Monitoring


Maureen T. Greene


SIGNIFICANCE OF EXPANDED ACCESS

Having alternatives to intravenous (IV) access provides patients with lifesaving options. Expanded access includes vascular infusions via the intraosseous route, unique access for hemodialysis, and medication and fluid administration via the subcutaneous route. Intraarterial access for critically ill patients provides the ability to monitor pressures and sample blood. These modalities are featured in this chapter; also included are detailed explanations of arterial and venous pressure monitoring as well as interpretation of relevant laboratory values.


One of the most common procedures carried out in acute care hospitals and a high priority for the care of a critically ill and unstable patient is establishing vascular access. The patient’s condition plays a role in the likelihood of attaining vascular access; conditions associated with difficult vascular access include obesity, sepsis, chronic illness, hypovolemia, IV drug abuse, and vasculopathy (Miles, Salcedo, & Spear, 2011; Nafiu et al., 2010).

Central venous catheterization is a common approach to cannulation in patients with difficult venous access. The central venous catheter (CVC) provides vascular access for fluid resuscitation, and additionally allows for hemodynamic monitoring, but not without risk to the patient. Common complications are pneumothorax, venous thrombosis, arterial puncture, and central line-associated bloodstream infection.

Given the time required to establish central venous access, the increased risk to the patient, and the skill required of the provider, alternatives for vascular access are desirable. Another method for monitoring a patient’s hemodynamic status includes arterial pressure monitoring through vascular access lines and the use of sophisticated monitoring equipment.


ARTERIAL BLOOD SAMPLING AND PRESSURE MONITORING

Invasive hemodynamic monitoring allows direct measurement of arterial blood pressure (BP), central venous pressure (CVP), intracardiac pressures, and pulmonary artery (PA) pressures. Hemodynamic monitoring contributes to the diagnosis of a patient’s underlying condition and can be useful in predicting prognosis. Arterial pressure monitoring via an indwelling peripheral catheter is the most common mode of invasive hemodynamic monitoring. It is used to draw blood samples, to monitor arterial BP when rapid fluctuations are anticipated, to maximize drug therapy, and when vasopressor therapy is in use. Complications of continuous arterial pressure monitoring include ecchymosis, hematoma, and soreness at the insertion site. Arterial laceration, arteriovenous (AV) fistulas, and aneurysms are rare.


Arterial Puncture Sites and One-Time Blood Sampling

The radial artery is the most common access site for placement of a peripheral arterial catheter. It has the least discomfort, allows freedom of motion, and usually does not require joint immobilization. Radial arterial lines are associated with a low risk of ischemic injury to the hand as there is usually adequate collateral circulation via the ulnar artery. Other sites for monitoring arterial pressure include the femoral, brachial, and dorsalis pedis arteries (Table 15-1).

The femoral artery, the preferred site for emergency cannulation, is easily cannulated. The femoral artery, located midway between the anterior superior spine of the ilium and the symphysis pubis (Figure 15-1), is the largest accessible artery and is easily palpated, stabilized, and entered. However, focused digital pressure is required for postpuncture pressure. If postpuncture thrombosis should occur, though this is considered low risk in the femoral artery, a limb- or life-threatening condition may result.


TABLE 15-1 SITES FOR ARTERIAL BLOOD SAMPLING OR CANNULATION


Site


Advantages


Disadvantages


Radial artery


Close to the surface


Easily palpable


Easy to check site


Pulsation is difficult to palpate on obese patients with short arms


Brachial artery


Largest artery in upper arm


Close to surface


Extension of the arm stretches the artery


Easily accessed


Easily observed after puncture


May lie deep in muscular or obese patients


Traumatic puncture may damage adjacent nerve and ligaments


Ulnar artery


Fairly close to surface and therefore accessible


Good alternative to radial artery


Palpation difficult if artery is small or deep


Difficult to stabilize


Difficulty in extending wrist if patient is uncooperative


Femoral artery


Relatively large artery


Easily palpated


Allows direct, perpendicular approach


Incidence of arterial spasm is rare


Risk of contamination at site (groin)


Possible to puncture femoral vein accidentally during procedure


Brachial artery access is the least preferred as it limits mobility of the patient and interferes with nursing care. The ulnar artery is usually much deeper and more difficult to stabilize than is the radial artery, so, although it may be larger, it is usually not the first choice as an entry site. The dorsalis pedis artery of the foot can be used for arterial monitoring but may be the least favorable site due to distal ischemic blood flow issues. This vessel is supported by collateral circulation over the arch of the foot but with comorbid conditions, such as peripheral vascular disease and vascular changes associated with diabetes, this site should be avoided.

Arterial blood is obtained for an arterial blood gas (ABG). Single stick blood sampling can be used for ABG sampling using a rigid needle sampling method. A cannulated arterial line can also be used for continuous arterial monitoring for hemodynamic pressure monitoring and frequent blood sampling using a flexible catheter.


PATIENT PREPARATION

Initially, the nurse reviews the physician/licensed independent practitioner’s (LIP) order. Unless a postexercise blood sample is ordered, the patient also should be at rest for 15 to 20 minutes before the blood sample is drawn. The most comfortable position for the patient should be used for all blood sampling procedures.

The laboratory requisition form should have all identifying patient information plus the oxygenation status of the patient, time of day (important when drawing serial samples), and, if the patient is on a ventilator, all pertinent ventilator settings (i.e., FIO2). In some institutions, the patient’s temperature and hemoglobin count are also required. In any institution, the nurse follows recommended institutional policy.


FIGURE 15-1 Location of radial, ulnar, and brachial arteries (left) and location of the femoral artery in the leg (right).


RADIAL PUNCTURE

The site is palpated for a pulse, and the condition of the skin and surrounding tissues is inspected particularly for previous arterial puncture marks. Allen test is performed to ensure the adequacy of collateral circulation (Figure 15-2). Local anesthesia prior to the arterial puncture should be considered, since it appears to prevent pain without adversely impacting the success of the procedure (Hudson, Dukes, & Reilly, 2006).

The radial artery is best palpated between the distal radius and the tendon of the flexor carpi radialis when the wrist is flexed. A rolled towel may be placed under the wrist, promoting hyperextension of the hand to stretch and stabilize the artery. Taping the forearm and the palm to the insertion field or via an armboard can help maintain the position. The planned puncture site should be sterilely draped. The skin is prepared with chlorhexidine or other agency-specific product by wiping the area in a back and forth friction motion and allowing at least a 30-second drying time at the intended puncture site. Hand hygiene is used, gloves are required, and Occupational Safety and Health Administration standards should be met.


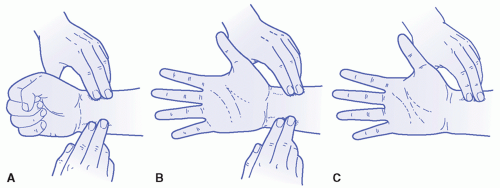
FIGURE 15-2 Performing Allen test to determine circulatory adequacy. A: The patient clenches the fist while nurse applies pressure to both the radial and ulnar artery. B: The patient opens the hand and nurse noting the pallor of the palm surface, releases the ulnar pressure releases pressure while watching to see how long it takes for the hand to color (signifying circulation and patency of vessels). C: Evaluating pulse and blood return.


To perform a radial puncture, the nurse uses one gloved hand to palpate the artery and aligns two or three fingertips along the direction the artery follows. A small needle (e.g., 22- to 25-gauge) should then be attached to the syringe. The plunger should be withdrawn 1 to 2 mL before the stick, for two reasons: if the sample is indeed arterial and not venous, the patient’s pressure causes a brisk and often pulsatile reflux of blood into the syringe (unless the patient is severely hypotensive), and it prevents complications such as arterial spasm and blood hemolysis.

Holding the syringe and the needle in a bevel up position at an angle no higher than 30 degrees directly toward the artery, the nurse enters the skin and artery smoothly in one quick motion. Arterial pressure usually causes the blood to pulsate spontaneously back into the syringe. If BP is low or the syringe not free flowing, however, the nurse may need to pull back gently on the plunger or reposition the needle to achieve intralumen artery access. The blood return stops when the blood reaches the automatic shutoff level. If the equipment does not have a shutoff feature, a volume of 1 to 2 mL blood is a sufficient quantity for the blood gas analyzer.

Immediately after quickly withdrawing the needle and blood-filled syringe, the nurse applies digital pressure to the puncture site with a 2 × 2-inch sterile sponge folded to form a pressure point. Then, taking precautions not to encircle the entire wrist, a secure dressing is firmly secured with tape. Additional postprocedure interventions are listed in Box 15-1.

If the syringe will be capped, the nurse resheaths the needle using a quick-cover cap. The nurse rolls the syringe back and forth between the hands for 5 to 10 seconds to ensure that the blood mixes with the heparin lining the syringe. The unit is then placed in an iced container and taken to the laboratory immediately for analysis. A small amount of cold water added to the ice provides for even cold distribution and facilitates placement of the sample so that all the blood in the barrel is chilled by iced water. Ice bathing ABG blood draws is not needed for transport of samples when using a fast, pneumatic tube system. Lab personnel will process all STAT lab requisitions within the guidelines established by the facility.


FEMORAL PUNCTURE

For femoral artery access, palpate the vessel below the midpoint of the inguinal ligament, when the lower extremity is extended. The needle should be inserted at a 90-degree angle just below the inguinal ligament. The femoral artery is usually easily palpated with the patient in the supine position. If the patient is obese, assistance may be needed to hold the abdomen away or the patient’s buttocks may be placed on an inverted bedpan. A pendulous abdomen may be taped up and away to provide easier access and maintain sterility. Procedures for wearing gloves and preparing the skin are the same as for a radial artery puncture.

The following two techniques may be used for a femoral arterial puncture:


  • The artery is located and kept between two fingers held in a “V” pattern, allowing pulsation to be felt on both fingers laterally but at the same time allowing enough room between them for the needle entry. The syringe and needle are held almost straight down. When the puncture is made in this manner, care must be taken not to pierce through the other wall of the artery. The acronym “NAV” (nerve, artery, vein) can assist the practitioner in focusing on the right femoral puncture location by remembering the nerve innervating the leg is to the left of the stick, the artery is central, and the vein is in the direction of the pubis symphysis.


  • Vessel entry may be performed with the same techniques used for a radial artery puncture. Two or three fingertips are placed along the direction of the femoral artery to the left over the ilium, and the syringe and needle are held at an angle no higher than 90 degrees. This method must be used for femoral artery catheter placement due to the need to manipulate more equipment; if used for a one-time needle and syringe sample, there is less chance of artery perforation using this approach.

Regardless of the method used, when pulsation is strong, it is relayed up through the needle and syringe as the needle touches and penetrates the artery. The walls of the femoral artery are usually thick and resistant to puncture, so feeling pulsations can be a good guide to needle tip placement. When the artery is entered, the blood usually pulsates back into and fills the syringe without any traction being applied on the plunger. See Box 15-1 for postprocedure interventions and nursing responsibilities.


Other Arterial Access Sites

Variations in arterial puncture for the brachial access site include palpation of the vessel medial to the biceps tendon in the antecubital fossa, when the arm is extended in the palm up fashion. The dorsalis pedis artery is best palpated lateral to the extensor hallucis longus tendon. It receives collateral flow from the lateral plantar artery through the arch similar to that of the hand. The needle should be inserted just above the elbow crease or at the level of the dorsal arch, respectively.


PERIPHERAL ARTERIAL CATHETERS AND MONITORING


Catheter Insertion and Blood Sampling

Most arterial access devices use a guidewire and hollow needle for insertion using the Seldinger technique, defined as a method of percutaneous insertion of a vascular access catheter (VAC) into a blood vessel. The vessel is accessed with a needle, and a guidewire is placed through the needle. The needle is removed, and a catheter is placed over the guidewire and advanced into the desired position. The guidewire is removed, leaving the catheter in place (Bullock-Corkhill, 2010).

To obtain a blood sample for ABG analysis from a catheter with a heparin lock device, the nurse puts on gloves and prepares three syringes. A needleless access cap should be used to access the line and prevent open system contamination:


  • A heparinized syringe


  • A plain syringe for withdrawal of dilute heparin from the injection port


  • A syringe with dilute heparin solution for flushing the catheter after drawing the blood sample

Next, the nurse cleanses the capping port of the catheter with antiseptic, securely anchors the catheter hub with the free hand to prevent excessive pressure at the insertion site, and inserts a plain syringe. Approximately 0.5 mL of blood of the heparin-capped line is withdrawn from the catheter and is discarded.

The cap is recleansed, the heparinized syringe inserted, the syringe allowed to fill with enough blood for the ABG analysis, and the syringe is removed and closed with the proper transport cap. Finally, the injection port is recleansed, and the nurse, still securely anchoring the catheter hub, inserts the syringe containing dilute heparin, flushes the catheter, and removes the syringe leaving the catheter with a heparinized cap. The blood sample is treated in the same manner as the sample obtained for a one-time analysis. Key interventions may be found in Table 15-2.


Continuous Arterial Pressure Monitoring

Arterial pressure monitoring via an indwelling peripheral catheter is the most common mode of invasive hemodynamic monitoring. Continuous arterial pressure monitoring requires inserting an indwelling arterial catheter, which permits the infusion nurse and other health care personnel to obtain continuous systolic, diastolic, and mean arterial pressure readings; to assess the cardiovascular effects of vasopressor or vasodilator drugs during the treatment
of shock; and, at the same time, to draw arterial blood for ABG measurement and other sampling.


TABLE 15-2 KEY INTERVENTIONS: POSTARTERIAL CATHETER INSERTION CARE


1.


Observe the catheter site for signs of arterial thrombosis, hematoma formation, arterial perforation, and catheter kinking or dislodgment.


2.


Check the patient’s extremity for adequate blood supply by noting color and temperature.


3.


Maintain secure, clean, and intact dressings.


4.


Avoid placing undue stress at the insertion site by using the unaffected arm for BP monitoring and venipunctures.


5.


Femoral arterial lines may hamper patient mobility and a physician/licensed independent practitioner’s order is required for out of bed activity. Patients with femoral lines can be positioned in a side-lying position, but hemodynamic measures should be taken in a neutral, re-zeroed position for best accuracy.


OBTAINING BLOOD FOR ABG ANALYSIS

When an ABG sample is needed, a sampling port using a three-way stopcock provides an easy arterial access. The nurse removes the cap when sampling and attaches an appropriate syringe. The stopcock is turned off to pressure and open to the sampling site, and the nurse gently withdraws the sample and handles it consistent with institutional policy. The port is then flushed using the transducer fast-flush valve and the stopcock turned back to its original position. Many arterial blood drawing systems are prepared with a blood-sparing in-line syringe device whereby a waste sample is drawn into the syringe and the stopcock is turned off to the waste and on to a sampling syringe. The lab sample is withdrawn, and the waste syringe volume is reintroduced to the patient by turning the stopcock open to the patient. This reduces the extrinsic blood loss associated with frequent lab tests.


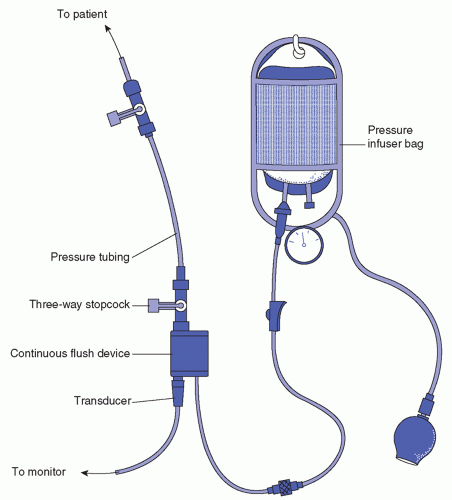
FIGURE 15-3 Cable and transducer setup.


PURPOSE AND USE OF ARTERIAL BLOOD GAS ANALYSIS

Arterial blood with all its nourishing elements supplies all body tissues; thus, arterial blood is used routinely for diagnosing abnormalities and assessing patients’ conditions. Intraarterial therapy may involve one-time or daily blood sampling to analyze the concentration of gases, such as oxygen, and other components, or it may involve inserting an indwelling catheter to obtain serial or daily samples for arterial blood gas (ABG) analysis and continuous arterial pressure monitoring.

Although venous, arterial, and capillary blood all contain comparable levels of carbon dioxide and base bicarbonate, the levels of oxygen in venous and capillary blood vary significantly from the level of oxygen in arterial blood.


Oxygen in Plasma

Oxygen moves through the circulatory system in plasma and hemoglobin; because the small amount of oxygen dissolved in plasma cannot be measured directly, its presence is expressed as the tension or partial pressure it exerts on plasma (PaO2—the letter P symbolizes the pressure value; the letter a signifies that the partial pressure of oxygen measured is that in arterial blood).


Oxygen in Hemoglobin

Oxygen level determination is the most common reason for taking blood gas readings. The major portion of blood oxygen is bound to hemoglobin and measured as a percentage of the hemoglobin saturated with oxygen (SaO2). Tissue is adequately oxygenated when the
partial pressure of oxygen in arterial blood (PaO2) is in the normal range between 80 and 100 mm Hg and when SaO2 ranges from 93% to 100% (Horne & Derrico, 1999; Tortora & Grabowski, 2003). Under normal resting conditions, blood contains 20 mL oxygen per 100 mL blood. Of that, 97% (19.4 mL) is attached to hemoglobin of the red blood cells, and 3% (0.6 mL) is dissolved in the plasma (Margereson, 2001). If the PaO2 is high, more oxygen is able to bind with hemoglobin; the converse is also true. It is important to interpret SaO2 and PaO2 values in relation to the amount of supplemented oxygen the patient is receiving. The alveolar-arterial gap is the difference between the mean alveolar PaO2 and the measured arterial PaO2. The alveolar PaO2 is always higher than the arterial PaO2. Elevations in the gap indicate a ventilation perfusion imbalance in the lungs and inadequate diffusion of oxygen to carbon dioxide at the pulmonary blood supply.

Under normal circumstances, when the PaO2 value decreases slightly, there is an incremental drop in the SaO2 value. However, when PaO2 falls below 60 mm Hg, the association is disturbed and subtle decreases in partial pressure cause significant drops in SaO2, known as hemoglobin desaturation. The oxyhemoglobin dissociation curve is illustrated in Figure 15-4.


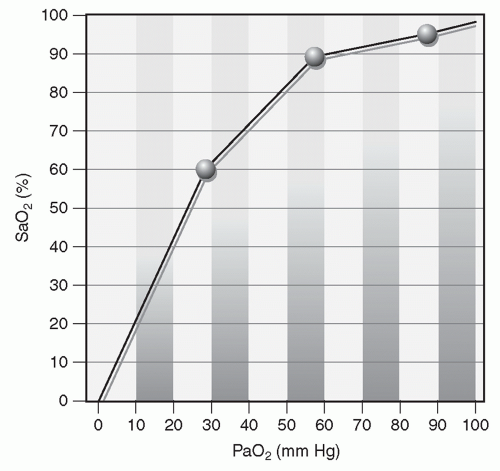
FIGURE 15-4 Oxyhemoglobin dissociation curve.

Normally, PaO2 and SaO2 values are closely related. When PaO2 decreases slightly, so does SaO2. However, when PaO2 drops below 60 mm Hg, the close association is disrupted. The disruption is represented graphically as the oxyhemoglobin dissociation curve, which illustrates the relationship between PaO2 and SaO2 values known as the 30-60-90 rule. When PaO2 measures 30 mm Hg, SaO2 is usually 60%, and when PaO2 is 60 mm Hg, SaO2 is usually 90%. (Adapted from Horne, C., & Derrico, D. (1999). Mastering ABGs: The art of arterial blood gas measurement. American Journal of Nursing, 99(8), 26-33.)


ABG Parameters and Interpretation

ABG measurements are used to detect and address respiratory imbalances. Specific uses include diagnosing and regulating oxygen therapy and evaluating all other therapy and metabolic imbalances. In particular, ABG measurements assess the effectiveness of the therapy. To interpret ABG values, the nurse must understand the physiologic, chemical, and physical processes that influence each parameter. Normal ABG values are outlined in Box 15-2.


pH

The pH value refers to the degree of acidity or alkalinity of the blood. It is not an absolute measurement but gives an approximation of hydrogen ion concentration. The pH scale is as follows (numbers are inversely related to the degree of acidity): the range compatible with life is roughly 6.8 to 7.8, and the normal range lies between 7.35 and 7.45. A pH increase represents a decrease in acidity, and a pH decrease represents an increase in acidity. A pH decrease of 0.3 shows a doubling of hydrogen concentration (e.g., blood pH of 7.10 has twice the hydrogen concentration of blood pH 7.40) (Woodrow, 2010).

The ABG analyzers measure:


  • pH


  • Respiratory function


  • Metabolic function


  • Electrolytes + metabolites

Thus, analysis by the nurse should follow a systematic sequence:


  • pH


  • Respiratory function—three core measurements (PaCO2, PaO2, and SaO2)


  • Metabolism function—two core measurements (bicarbonate, HCO3 and base excess, BE) noting whether each aspect of one to three as normal, low, or high to baseline ranges


  • Is compensation occurring (compare pH with respiratory and metabolic function)? If so, which direction is the change?


  • Note electrolytes + metabolites


HYDROGEN

Cell metabolism produces hydrogen, which combines with bicarbonate to form carbonic acid. This breaks down into water, which is excreted by the kidneys, and carbon dioxide, which is excreted by the lungs. Acid-base balance is the maintenance of hydrogen ion (H+) concentration in the blood at a level that enables normal cell function. The normal pH of the arterial blood is 7.35 to 7.45, and normal H+ concentration is 36 to 44 nmol/L (Kindlen, 2003). H+ and pH have an inverse relationship, that is, as one increases, the other decreases.

Acid-base balance is achieved through (1) cellular processing of hydrogen with no appreciable change in blood concentration by elimination of volatile acid as carbon dioxide by the lungs, (2) by excretion and reabsorption of fixed acid and bicarbonate by the kidneys, and (3) by chemical buffering. When the pH is below 7.0 or above 8.0, survival is unlikely (Woodrow, 2010). Three mechanisms help to maintain acid-base balance in the blood:

Only gold members can continue reading. Log In or Register to continue

Stay updated, free articles. Join our Telegram channel

Jun 19, 2016 | Posted by in NURSING | Comments Off on Expanded Approaches to Access and Monitoring

Full access? Get Clinical Tree

Get Clinical Tree app for offline access