Endotracheal Tube Care
The intubated patient requires meticulous care to ensure airway patency and prevent complications. Care includes repositioning the endotracheal (ET) tube daily to prevent skin and mucosal injury and repositioning the ET tube if it becomes partially dislodged or a chest X-ray shows improper placement.
After a patient has been successfully weaned from mechanical ventilation, the ET tube is usually removed. The patient should be able to ventilate adequately, with acceptable oxygenation levels, and be able to clear secretions independently. The condition that led to intubation should also be resolved.
Equipment
10-mL syringe ▪ suction equipment ▪ handheld resuscitation bag with mask ▪ gloves ▪ personal protective equipment.
For Repositioning an ET Tube
Washcloth ▪ skin preparation ▪ stethoscope ▪ adhesive or hypoallergenic tape or commercial tube holder ▪ sedative or 2% lidocaine, as needed.
For Removing an ET Tube
Equipment for reintubation ▪ supplemental oxygen delivery equipment.
Preparation of Equipment
Gather all equipment at the patient’s bedside. Set up the suction equipment. If appropriate, set up supplemental oxygen equipment. Have a handheld resuscitation bag with a mask available.
Implementation
Explain the procedure to the patient and provide privacy.
Confirm the patient’s identity using at least two patient identifiers according to your facility’s policy.4
For Repositioning an ET Tube
Obtain assistance from a respiratory therapist or another nurse to prevent accidental extubation during the procedure if the patient coughs.
Suction the patient’s trachea through the ET tube to remove any secretions, which can cause the patient to cough during the procedure. Coughing increases the risk of trauma and tube dislodgment. Then suction the patient’s pharynx to remove any secretions that may have accumulated above the tube cuff, which helps to prevent aspiration of secretions during cuff deflation.5,6
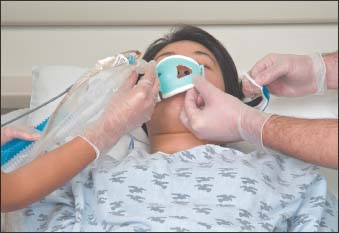
To prevent traumatic manipulation of the tube, instruct the assisting nurse to hold the tube as you carefully untape it or unfasten the commercial tube holder (as shown below). When freeing the tube, locate a landmark, such as a number on the tube, or measure the distance from the patient’s mouth to the top of the tube so that you have a reference point when moving the tube.5

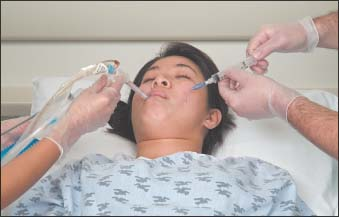
Next, deflate the cuff by attaching a 10-mL syringe to the pilot balloon port and aspirating air until you meet resistance and the pilot balloon deflates. Deflate the cuff before moving the tube (as shown below) because the cuff forms a seal within the trachea and movement of an inflated cuff can damage the tracheal wall and vocal cords.

Reposition the tube, as necessary, noting new landmarks or measuring the length. Then immediately reinflate the cuff. To do this, instruct the patient to inhale (if appropriate), and slowly inflate the cuff using a 10-mL syringe attached to the pilot balloon port. As you do this, use your stethoscope to auscultate the patient’s neck to determine the presence of an air leak. When air leakage ceases, stop cuff inflation and, while still auscultating the patient’s neck, aspirate a small amount of air until you detect a slight leak (as shown at top of next column). This maneuver creates a minimal air leak, which indicates that the cuff is inflated at the lowest pressure possible to create an adequate seal. If the patient is being mechanically ventilated, aspirate to create a minimal air leak during the inspiratory phase of respiration because the positive pressure of the ventilator during inspiration will create a larger leak around the cuff.5 Note the number of cubic centimeters of air required to achieve a minimal air leak.
Stay updated, free articles. Join our Telegram channel

Full access? Get Clinical Tree


Get Clinical Tree app for offline access
