Cardiovascular care
Cardiovascular disorders affect millions of people every year and are, collectively, the leading cause of death in the United States. Because the care of patients with cardiovascular disorders Is shared by practitioners of every type of nursing practice, cardiovascular care ranks as one of the most rapidly growing areas of nursing. Nurses face a constant challenge to keep up with new drugs and diagnostic tests as well as other innovative treatments.
The information presented in this chapter provides the latest evidence-based EB information from recent research and recommendations from various professional groups regarding care for this patient population. These groups include the American Heart Association AHA and its Advanced Cardiac Life Support ACLS guidelines, the American College of Cardiology ACC, the American Association of Critical-Care Nurses AACN, the Joint National Committee on Prevention, Detection, Evaluation, and Treatment of High Blood Pressure JNC, Emergency Nurse Association ENA, Joint Commission on Accreditation of Health Care Organizations JCAHO, and the Centers for Disease Control and Prevention CDC. Additional points are supported by the American Hospital Association’s Patient Care Partnership PCP and fundamental tenets of science SCIENCE. Other points derive from specific manufacturers’ recommendations MFR for the use of their equipment. You’ll also learn about the kinds of equipment used in cardiac care and the best practices for various settings and situations.
Patient teaching
Nurses assume much of the responsibility for preparing patients physically and psychologically for hospitalization and ongoing care. They play a pivotal role in teaching patients and their families about disease prevention and lifestyle modification, tests and procedures, drugs and other treatments, and follow-up care. Patient and family teaching not only reduces stress but also improves patient compliance with prescribed therapy.
Monitoring
Cardiac and hemodynamic monitoring are vital aspects of cardiovascular care. Cardiac monitoring commonly involves either hardwire or telemetry systems that continually record the patient’s cardiac activity. It’s also useful to assess the patient’s cardiac rhythm, gauge his response to drug therapy or diagnostic procedures, and provide opportunities for early intervention to prevent complications. Once only used in the critical care setting, cardiac monitoring is now utilized in high-risk obstetric care, general medical, pediatric, and transplantation departments.
Hemodynamic monitoring has become widely used since its inception in the 1970s. It uses invasive techniques to monitor the flow, pressure, and resistance of the cardiovascular system. Made with a pulmonary artery catheter, these measurements are used to guide therapy. Hemodynamic monitoring includes pulmonary artery pressure monitoring, right atrial pressure monitoring, pulmonary artery wedge pressure monitoring, cardiac output measurement, temporary pacing through the pulmonary artery catheter, and continuous evaluation of mixed venous oxygen saturation.
Treatment
In cardiovascular emergencies, nurses may perform or assist in lifesaving procedures, such as cardiopulmonary resuscitation, defibrillation, cardioversion, and temporary pacing. Carrying out these procedures requires in-depth knowledge of cardiovascular anatomy, physiology, and equipment as well as sound assessment and intervention techniques. Only nurses who are knowledgeable of the best practice regarding cardiovascular care can ensure the optimal outcome for their patients.
Ambulatory blood pressure monitoring
Ambulatory blood pressure monitoring (ABPM) allows measurement of blood pressure and cardiac activity over time without confining the patient to the health care facility. ABPM records the variations that occur in a patient’s blood pressure during normal activity. Such monitoring more readily allows diagnosis of sustained hypertension and response to treatment than isolated blood pressure measurements taken in the physician’s office.
The American Heart Association’s Seventh Report of the Joint National Committee suggests that ABPM values are usually lower than physician office readings. Recent studies show that patients with a 24-hour ABPM greater than 135/85 mm Hg are two times more likely to have a cardiovascular event than those with a 24-hour ABPM less than 135/85 mm Hg, regardless of the blood pressure reading in the physician’s office. AHA JNC
Equipment
Monitor (with new battery) that contains a cuff, microphone, and microprocessor that pumps the cuff and records measurements • carrying case with strap • 1″ adhesive tape • logbook or diary
Implementation
Explain to the patient that he may need to wear a blood pressure cuff for 24 hours after activation of the monitor and tell him not to remove the cuff unless told to do so.
Explain to the patient that he will have a carrying case with a strap to carry the 2-lb (0.9 kg) monitor.
Tell the patient that he’ll need to maintain an activity log during the 24-hour monitoring period. He should record the time, activities he performs, and any symptoms (such as headache, dizziness, light-headedness, palpitations, or chest pain) that occur.
Explain to the patient the importance of maintaining his usual routine, including working, eating, sleeping, using the bathroom, and taking his medication.
Suggest to the patient that he wear a watch to make keeping the log easier.
Tell the patient that he’ll need a follow-up appointment to review results 48 to 72 hours after removal of the monitor.
Show the patient how to position the microphone over the brachial artery on the inner aspect of the nondominant arm, just above the elbow. Secure the microphone with tape. Then choose an appropriate-size blood pressure cuff.SCIENCE
Explain that you will calibrate the monitor while the patient sits and then stands by measuring simultaneous blood pressure readings, using the ABPM unit and a mercury sphygmomanometer attached to the monitor with a T-tube device.ONS
Show the patient how to use the tape to secure the microphone on the brachial area of his arm in case the microphone becomes loose.
Tell the patient to keep the cuff arm still and free from extraneous noise when he feels the cuff inflating and deflating to ensure that measurements are accurate.
Tell the patient to avoid activities — such as mowing the lawn, golfing, running, and playing tennis — that call for isometric use of the upper extremities to help avoid erroneous blood pressure measurements during such activities.
Special considerations
If the patient’s skin is extremely oily, scaly, or diaphoretic, wash the electrode site with soap and water, then rub with a dry 4″ × 4″ gauze pad before applying the electrode.
If the patient can’t return to the office immediately after the monitoring period, show him how to remove the equipment and store the monitor, blood pressure cuff, and log.
If the patient is wearing a patient-activated electrocardiogram, tell him that he can wear the monitor for up to 7 days. Tell him how to initiate the recording manually when symptoms occur.
Nursing diagnoses
Health-seeking behaviors (blood pressure monitoring)
Expected outcomes
The patient will:
demonstrate how to use ABPM
state an understanding of the reason for monitoring
state his blood pressure range
express an interest in learning new behaviors to help reduce blood pressure.
Documentation
Document the indications for monitoring, noting the date and time the monitor was applied. Record the patient’s medication regimen and blood pressure before monitoring. Be sure to include the patient’s event log in the documentation. Document postprocedure results and actions taken.
Supportive references
American College of Physicians-American Society of Internal Medicine — Medical Specialty Society. “Diagnosing Syncope”, June 1997.
Heaven, D.J., and Sutton, R. “Syncope”, Critical Care Medicine 28(10 Suppl):N116-20, October 2000.
Institute for Clinical Systems Improvement. “Hypertension Diagnosis and Treatment”, November 2000. www.icsi.org/guide/HTN.pdf.
O’Brien, E., et al. “Use and Interpretation of Ambulatory Blood Pressure Monitoring: Recommendations of the British Hypertension Society”, British Medical Journal 320(7242):1128-34, April 2000.
“Seventh Report of the Joint National Committee on Prevention, Detection, Evaluation, and Treatment of High Blood Pressure”, Hypertension 42:1206-52, 2003.
Yarows, S.A., et al. “Home Blood Pressure Monitoring”, Archives of Internal Medicine 160(9):1251-57, May 2000.
Zimetbaum, P.J., and Josephson, M.E. “The Evolving Role of Ambulatory Arrhythmia Monitoring in General Clinical Practice”, Annals of Internal Medicine 130(10):848-56, May 1999.
Zimetbaum, P.J., et al. “Diagnostic Yield and Optimal Duration of Continuous-Loop Event Monitoring for the Diagnosis of Palpitations: A Cost-Effective Analysis”, Annals of Internal Medicine 128(11):890-95, June 1998.
Arterial pressure monitoring
Direct arterial pressure monitoring permits continuous measurement of systolic, diastolic, and mean pressures and allows arterial blood sampling. Because direct measurement reflects systemic vascular resistance in addition to blood flow, it’s generally more accurate than indirect methods (such as palpation and auscultation of Korotkoff sounds or audible pulse), which are based on blood flow alone.
Direct monitoring is recommended when highly accurate or frequent blood pressure measurements are required; for example, in patients with low cardiac output and high systemic vascular resistance. It also should be used for patients who are receiving titrated doses of vasoactive drugs or need frequent blood sampling.
Indirect monitoring, which carries few associated risks, is commonly performed by applying pressure to an artery (such as by inflating a blood pressure cuff around the arm) to decrease blood flow. As pressure is released, flow resumes and can be palpated or auscultated. Korotkoff sounds presumably result from a combination of blood flow and arterial wall vibrations; with reduced flow, these vibrations may be less pronounced.
Equipment
Catheter insertion
Gloves • sterile gown • mask • protective eyewear • sterile gloves • 16G to 20G catheter (type and length depend on the insertion site, the patient’s height and Special considerations
weight, and other anticipated uses of the line) • preassembled preparation kit (if available) • sterile drapes • sheet protector • prepared pressure transducer system • ordered local anesthetic • sutures • syringe and needle (21G to 25G, 1″) • I.V. pole • tubing and medication labels • site care kit (containing sterile dressing and hypoallergenic tape) • arm board and soft wrist restraint (for a femoral site, an ankle restraint) • optional: shaving kit (for femoral artery insertion)
weight, and other anticipated uses of the line) • preassembled preparation kit (if available) • sterile drapes • sheet protector • prepared pressure transducer system • ordered local anesthetic • sutures • syringe and needle (21G to 25G, 1″) • I.V. pole • tubing and medication labels • site care kit (containing sterile dressing and hypoallergenic tape) • arm board and soft wrist restraint (for a femoral site, an ankle restraint) • optional: shaving kit (for femoral artery insertion)
Blood sample collection
If an open system is in place: gloves • gown • mask • protective eyewear • sterile 4″ × 4″ gauze pads • sheet protector • 500-ml I.V. bag • 5- to 10-ml syringe for discard sample • syringes of appropriate size and number for ordered laboratory tests • laboratory request forms and labels • needleless device (depending on your facility’s policy) • Vacutainers; if a closed system is in place: gloves • gown • mask • protective eyewear • syringes of appropriate size and number for ordered laboratory tests • laboratory request forms and labels • alcohol pads • blood transfer unit • Vacutainers
Arterial line tubing changes
Gloves • gown • mask • protective eyewear • sheet protector • preassembled arterial pressure tubing with a flush device and disposable pressure transducer • sterile gloves • 500-ml bag of I.V. flush solution (such as dextrose 5% in water or normal saline solution) • 500 or 1,000 units of heparin • syringe and needle (21G to 25G, 1″) • medication label • pressure bag • site care kit • tubing labels
Arterial catheter removal
Gloves • mask • gown • protective eyewear • two sterile 4″ × 4″ gauze pads • sheet protector • sterile suture removal set • dressing • hypoallergenic tape
Femoral line removal
Additional sterile 4″ × 4″ gauze pads • small sandbag (which you may wrap in a towel or place in a pillowcase) • adhesive bandage
Catheter-tip culture
Sterile scissors • sterile container
Preparation of equipment
Before setting up and priming the monitoring system, wash your hands thoroughly. CDC
Maintain asepsis by wearing personal protective equipment (PPE) throughout preparation. CDC
Label all medications, medication containers, and other solutions on and off the sterile field. JCAHO
When you’ve completed the equipment preparation, set the alarms on the bedside monitor according to your facility’s policy.
Implementation
Confirm the patient’s identity using two patient identifiers according to facility policy JCAHO
Explain the procedure, including the purpose of arterial pressure monitoring and the anticipated duration of catheter placement, to the patient and his family. Make sure that the patient signs a consent form. If he can’t sign, ask a responsible family member to give written consent. PCP
Check the patient’s history for an allergy or a hypersensitivity to iodine, heparin, latex, or the ordered local anesthetic.
Maintain asepsis by wearing PPE throughout all procedures described here. CDC
Position the patient for easy access to the catheter insertion site. Place a sheet protector under the site.
If the catheter will be inserted into the radial artery, perform Allen’s test to assess collateral circulation in the hand. (See “Arterial puncture”, page 22.) SCIENCE
Inserting an arterial catheter
Using a preassembled preparation kit, the physician prepares and anesthetizes the insertion site. He covers the surrounding area with sterile drapes. The catheter is then inserted into the artery and attached to the fluid-filled pressure tubing.
While the physician holds the catheter in place, activate the fast-flush release to flush blood from the catheter. After each fast-flush operation, observe the drip chamber to verify that the continuous flush rate is as desired. A waveform should appear on the bedside monitor.
The physician may suture the catheter in place, or you may secure it with hypoallergenic tape. Cover the insertion site with a dressing, as specified by your facility’s policy.
Immobilize the insertion site. With a radial or brachial site, use an arm board and soft wrist restraint (if the patient’s condition so requires). With a femoral site, assess the need for an ankle restraint; maintain the patient on bed rest, with the head of the
bed raised no more than 30 degrees, to prevent the catheter from kinking. Level the zeroing stopcock of the transducer with the phlebostatic axis, and then zero the system to atmospheric pressure.EB
Activate monitor alarms, as appropriate.
Obtaining a blood sample from an open system
Assemble the equipment, taking care not to contaminate the dead-end cap, stopcock, and syringes. Deactivate or temporarily silence the monitor alarms, if this is permitted by your facility’s policy.
Locate the stopcock nearest the patient. Open a sterile 4″ × 4″ gauze pad. Remove the dead-end cap from the stopcock and place it on the gauze pad.
Insert the syringe for the discard sample into the stopcock. (This sample is discarded because it’s diluted with flush solution.) Follow your facility’s policy on how much discard blood to collect. Usually, you’ll withdraw 5 to 10 ml through a 5- or 10-ml syringe.
Turn the stopcock off to the flush solution. Slowly retract the syringe to withdraw the discard sample. If you feel resistance, reposition the affected extremity and check the insertion site for obvious problems such as catheter kinking. After correcting the problem, resume blood withdrawal. Then turn the stopcock halfway back to the open position to close the system in all directions.SCIENCE
Remove the discard syringe and dispose of the blood in the syringe, observing universal precautions. (See “Standard precautions”, page 105.)CDC
Place the syringe for the laboratory sample in the stopcock, turn the stopcock off to the flush solution, and slowly withdraw the required amount of blood. For each additional sample required, repeat this procedure. If the physician has ordered coagulation tests, obtain blood for this sample from the final syringe to prevent dilution from the flush device.
After you’ve obtained blood for the final sample, turn the stopcock off to the syringe and remove the syringe. Activate the fast-flush release to clear the tubing. Then turn off the stopcock to the patient, and repeat the fast flush to clear the stopcock port.
Turn the stopcock off to the stopcock port, and replace the dead-end cap. Reactivate the monitor alarms. Attach the needleless device to the filled syringes, and transfer the blood samples to the appropriate Vacutainers, labeling them according to your facility’s policy. Send all samples to the laboratory with appropriate documentation.
Check the monitor for return of the arterial waveform and pressure reading. (See Understanding the arterial waveform, page 198.)
Obtaining a blood sample from a closed system
Confirm the patient’s identity using two patient identifiers according to facility policy. JCAHO
Assemble the equipment, maintaining aseptic technique. Locate the closed-system reservoir and blood sampling site. Deactivate or temporarily silence monitor alarms, if this is permitted by your facility’s policy.
Clean the sampling site with an alcohol pad.
Holding the reservoir upright, grasp the flexures and slowly fill the reservoir with blood over 3 to 5 seconds. (This blood serves as discard blood.) If you feel resistance, reposition the affected extremity, and check the catheter site for obvious problems such as kinking. Then resume blood withdrawal.
Turn the one-way valve off to the reservoir by turning the handle perpendicular to the tubing. Using a syringe with an attached cannula, insert the cannula into the sampling site. (Make sure that the plunger is depressed to the bottom of the syringe barrel.) Slowly fill the syringe. Then grasp the cannula near the sampling site, and remove the syringe and cannula as one unit. Repeat the procedure, as needed, to fill the required number of syringes. If the physician has ordered coagulation tests, obtain blood for those tests from the final syringe to prevent dilution from the flush solution.
After filling the syringes, turn the one-way valve to its original position, parallel to the tubing. Now smoothly and evenly push down on the plunger until the flexures lock in place in the fully closed position and all fluid has been reinfused. The fluid should be reinfused over a 3- to 5-second period. Then activate the fast-flush release to clear blood from the tubing and reservoir.
Clean the sampling site with an alcohol pad. Reactivate the monitor alarms. Using the blood transfer unit, transfer blood samples to the appropriate Vacutainers, labeling them according to your facility’s policy. Send all samples to the laboratory with appropriate documentation.
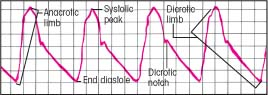
Understanding the arterial waveform
Normal arterial blood pressure produces a characteristic waveform, representing ventricular systole and diastole. The waveform has five distinct components: the anacrotic limb, systolic peak, dicrotic limb, dicrotic notch, and end diastole.
The anacrotic limb marks the waveform’s initial upstroke, which results as blood is rapidly ejected from the ventricle through the open aortic valve into the aorta. The rapid ejection causes a sharp rise in arterial pressure, which appears as the waveform’s highest point. This is called the systolic peak.
As blood continues into the peripheral vessels, arterial pressure falls, and the waveform begins a downward trend. This part is called the dicrotic limb. Arterial pressure usually will continue to fall until pressure in the ventricle is less than pressure in the aortic root. When this occurs, the aortic valve closes. This event appears as a small notch (the dicrotic notch) on the waveform’s downside.
When the aortic valve closes, diastole begins, progressing until the aortic root pressure gradually descends to its lowest point. On the waveform, this is known as end diastole.
Changing arterial line tubing
Confirm the patient’s identity using two patient identifiers according to facility policy. JCAHO
Wash your hands and follow standard precautions. CDC (See “Standard precautions”, 105.) Assemble the new pressure monitoring system.
Consult your facility’s policy and procedure manual to determine how much tubing length to change.
Inflate the pressure bag to 300 mm Hg, check it for air leaks, and then release the pressure.
Prepare the I.V. flush solution and prime the pressure tubing and transducer system. At this time, add medication and tubing labels. Apply 300 mm Hg of pressure to the system. Then hang the I.V. bag on a pole. EB
Place the sheet protector under the affected extremity. Remove the dressing from the catheter insertion site, taking care not to dislodge the catheter or cause vessel trauma. Deactivate or temporarily silence the monitor alarms, if this is permitted by your facility’s policy.
Turn off the flow clamp of the tubing segment to be changed. Disconnect the tubing from the catheter hub, taking care not to dislodge the catheter. Immediately insert new tubing into the catheter hub. Secure the tubing, and then activate the fast-flush release to clear it.
Reactivate the monitor alarms. Apply an appropriate dressing.
Level the zeroing stopcock of the transducer with the phlebostatic axis, and zero the system to atmospheric pressure. EB
Removing an arterial line
Consult your facility’s policy to determine whether you’re permitted to perform this procedure.
Confirm the patient’s identity using two patient identifiers according to facility policy. JCAHO
Explain the procedure to the patient. PCP
Assemble all equipment. Wash your hands. Observe standard precautions, including wearing PPE, for this procedure. CDC
Record the patient’s systolic, diastolic, and mean blood pressures. If a manual, indirect blood pressure hasn’t been assessed recently, obtain one now to establish a new baseline. AACN
Turn off the monitor alarms, and then turn off the flow clamp to the flush solution.
Carefully remove the dressing over the insertion site. Remove any sutures, using the suture removal kit, and then carefully check to ensure that all sutures have been removed.
Withdraw the catheter using a gentle, steady motion. Keep the catheter parallel to the artery during withdrawal to reduce the risk of traumatic injury.
Allow a small amount of blood out following the catheter removal and before applying pressure to the site. This will ensure that any clot adhered to the catheter is removed with the catheter.
Apply pressure to the site with a sterile 4″ × 4″ gauze pad. Maintain pressure for at least 10 minutes (longer if bleeding or oozing persists). Apply additional pressure to a femoral site, or if the patient has coagulopathy or is receiving anticoagulants. SCIENCE
Cover the site with an appropriate dressing and secure the dressing with tape. If stipulated by facility policy, make a pressure dressing for a femoral site by folding in half four sterile 4″ × 4″ gauze pads, and apply the dressing. Cover the dressing with a tight adhesive bandage, and then cover the bandage with a sandbag, if ordered. Maintain the patient on bed rest for 4 to 6 hours or as ordered.
If the physician has ordered a culture of the catheter tip (to diagnose a suspected infection), gently place the catheter tip on a 4″ × 4″ sterile gauze pad. When the bleeding is under control, hold the catheter over the sterile container. Using sterile scissors, cut the tip so it falls into the sterile container. Label the specimen and send it to the laboratory.
Observe the site for bleeding. Assess circulation in the extremity distal to the site by evaluating color, pulses, and sensation. Repeat this assessment every 15 minutes for the first hour, every 30 minutes for the next hour, and then hourly for the next 2 hours, or as ordered.AACN
Special considerations
Observing the pressure waveform on the monitor can enhance arterial pressure assessment. An abnormal waveform may reflect an arrhythmia (such as atrial fibrillation) or other cardiovascular problems, such as aortic stenosis, aortic insufficiency, pulsus alternans, or pulsus paradoxus. (See Recognizing abnormal waveforms, page 200.)
Change the pressure tubing every 2 to 3 days, according to your facility’s policy. Change the dressing at the catheter site at intervals specified by facility policy. Regularly assess the site for signs of infection, such as redness and swelling. Notify the physician immediately if you note any such signs.
Be aware that erroneous pressure readings may result from a clotted or positional catheter, loose connections, extra stopcocks or extension tubing, inadvertent entry of air into the system, or improper calibration, leveling, or zeroing of the monitoring system. If the catheter lumen clots, the flush system may be improperly pressurized. Regularly assess the amount of flush solution in the I.V. bag, and maintain 300 mm Hg of pressure in the pressure bag.
Nursing diagnoses
Decreased cardiac output
Expected outcomes
The patient will:
maintain an adequate cardiac output
exhibit no arrhythmias
maintain a blood pressure and pulse rate within normal limits.
Complications
Direct arterial pressure monitoring can cause such complications as arterial bleeding, infection, air embolism, arterial spasm, or thrombosis.
Documentation
Document the date of system setup so that all caregivers will know when to change the components. Document the dynamic response or square wave test every 8 to 12 hours to verify the accuracy of the waveform and readings. (See Square wave test, page 201.) Document systolic, diastolic, and mean pressure readings as well. Record circulation in the extremity distal to the site by assessing color, pulses, and sensation. Carefully document the amount of flush solution infused to avoid hypervolemia and volume overload and to ensure accurate assessment of the patient’s fluid status.
Make sure that the patient’s position is documented when each blood pressure reading is obtained. This is important for determining trends.
Supportive references
Imperial-Perez, F., and McRae, M. “Protocols for Practice: Applying Research at the Bedside. Arterial Pressure Monitoring”, Critical Care Nurse 19(2):105-107, April 1999.
Recognizing abnormal waveforms
Understanding a normal arterial waveform is relatively straightforward, but an abnormal waveform is more difficult to decipher. Abnormal patterns and markings, however, may provide important diagnostic clues to the patient’s cardiovascular status, or they may simply signal trouble in the monitor. Use this chart to help you recognize and resolve waveform abnormalities.
| Abnormality | Possible causes | Nursing interventions |
|---|---|---|
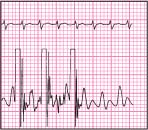
Alternating high and low waves in a regular pattern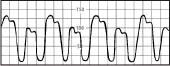 | Ventricular bigeminy Cardiac tamponade |
|
Fla tened waveform | Overdamped waveform Hypotensive patient |
|
Slightly rounded waveform with consistent variations in systolic height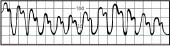 | Patient on ventilator with positive end-expiratory pressure |
|
Slow upstroke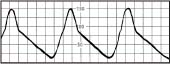 | Aortic stenosis |
|
Diminished amplitude on inspiration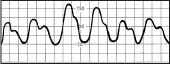 | Pulsus paradoxus, possibly from cardiac tamponade, constrictive pericarditis, or lung disease |
|
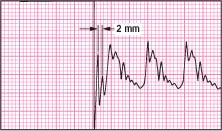
Square wave test
When using a pressure monitoring system, you must ensure and document the system’s accuracy. Along with leveling and zeroing the system to atmospheric pressure at the phlebostatic axis and interpreting waveforms, you can ensure accuracy by performing the square wave test (or dynamic response test). To perform the test:
Activate the fast-flush device for 1 second, and then release. Obtain a graphic printout.
Observe for the desired response: the pressure wave rises rapidly, squares off, and is followed by a series of oscillations. (See illustration below.)
Know that these oscillations should have an initial downstroke, which extends below the baseline and just 1 to 2 oscillations after the initial downstroke. Usually, but not always, the first upstroke is about one-third the height of the initial downstroke.
Be aware that the intervals between oscillations should be no more than 0.04 to 0.08 second (1 to 2 small boxes).
 |
Underdamped square wave
If you observe extra oscillations after the initial downstroke or more than 0.08 second between oscillations, the waveform is underdamped. (See illustration at top of next column.) This can cause falsely high pressure readings and artifact in the waveforms. It can be corrected by:
removing excess tubing or extra stopcocks from the system
inserting a damping device (available from pressure tubing companies)
dampening the wave by inserting a small air bubble at the transducer stopcock.
Repeat the square wave test, read the pressure waveform, and then remove the small air bubble.
 |
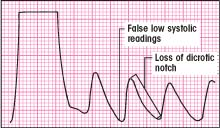
Overdamped square wave
If you observe a slurred upstroke at the beginning of the square wave and a loss of oscillations after the initial downstroke, the waveform is overdamped. (See illustration below.) This can cause falsely low pressure readings, and you can lose the sharpness of waveform peaks and the dicrotic notch. It can be corrected by:
clearing the line of any blood or air
checking to make sure there are no kinks or obstructions in the line
ensuring that you’re using short, low-compliance tubing.
 |
Stay updated, free articles. Join our Telegram channel

Full access? Get Clinical Tree


Get Clinical Tree app for offline access
