Basic care
According to the American Hospital Association, approximately 37 million people are hospitalized each year. For most people, hospitalization is one of the most difficult times in their life — illness, disrupted routine, loss of privacy, and loss of control over life events. In addition to being the direct caregiver, the nurse may need to provide for the patient and his family, offering teaching, counseling, coordination of services, development of community support systems, and assistance in coping with health-related lifestyle changes. In many facilities, staff nurses, primary nurses, clinical nurse specialists, and advanced practitioners provide some or all of these vital services.
In this chapter, you’ll find recommendations of best practice techniques, innovative practices, and controversial issues that can challenge traditional nursing practices. Many are evidence-based EB, representing research data, based on fundamental principles of science SCIENCE, or recommended by product manufacturersMFR. Others are endorsed by professional groups, such as the American Nurses’ AssociationANA or the Infusion Nurses SocietyINS. Still others are endorsed by organizations, such as the American Heart AssociationAHA, the American Association for Respiratory CareAARC, the American Diabetes Association ADiabA, the Wound Ostomy and Continence Nurses SocietyWOCN, the National Pressure Ulcer Advisory PanelNPUAP, the American Cancer SocietyACS, the Joint Commission on Accreditation of Healthcare OrganizationsJCAHO, the Agency for Healthcare Research and QualityAHRQ, the Centers for Medicare & Medicaid ServicesCMS (formerly the Health Care Financing Administration), the Joint National Committee on Prevention, Detection, Evaluation, and Treatment of High Blood PressureJNC, and the Centers for Disease Control and PreventionCDC. And some are mandated by the American Hospital Association’s Patient Care PartnershipPCP, the Occupational Safety and Health AdministrationOSHA, the Hospice Patients AllianceHPA, or the Health Insurance Portability & Accountability ActHIPAA.
Understanding basic care
First, it’s important to review the broader aims of nursing care, such as helping the patient cope with restricted mobility, making his environment comfortable, promoting safety, preventing complications, and helping him return to a normal life.
Dealing with impaired mobility. Whenever a patient’s condition restricts or prevents mobility, your nursing goal is to promote independence. You can motivate him by setting goals together to help prevent injury and complications associated with immobility. If the patient faces long-term immobility, it’s important for you to help him achieve and maintain a positive self-image.
Providing a comfortable environment. With ongoing assessment of a patient’s needs, you can affect a patient’s comfort, condition, response to treatment, and overall outcome. You can provide a comfortable environment simply by manipulating physical factors, such as temperature, humidity, and lighting. However, keep in mind that illness is a stressor that may intensify a patient’s response.
Promoting safety. Be alert to hazards in the patient’s environment, and teach him and his family to recognize them. When caring for a patient with restricted mobility, you must assist him if he’s moved, lifted, or transported. By using proper body mechanics, you can prevent injury to the patient and yourself. To help reduce patient and nurse injury, the Occupational Safety and Health Administration has developed guidelines to help prevent musculoskeletal injuries that also include keeping the patient safe at the same time. JCAHO OSHA
Preventing complications. Immobility poses special hazards for the patient who’s confined to bed, such as increased pressure on bony prominences; venous, pulmonary, or urinary stasis; and disuse of muscles and joints. These can lead to such complications as pressure ulcers, thrombi, phlebitis, pneumonia, urinary calculi, or contractures. To prevent complications, be sure to use correct positioning, assistive devices, frequent positioning, and range-of-motion exercises and to provide meticulous skin care.
Promoting rehabilitation. In most cases, the first step toward rehabilitation is walking. Depending on the patient’s condition, this may occur gradually. If necessary, use assistive devices, such as canes, crutches, or walkers. Effective rehabilitation may also require you to teach positioning, transfer, and mobilization techniques to the patient and his family. Demonstrating a technique, such as transfer from a bed to a wheelchair during hospitalization, helps the patient and his family to understand it. Practicing it under your supervision gives them the confidence to perform it at home. Encourage the family to provide positive reinforcement to motivate the patient to work toward his goals.
In addition to these nursing care goals, this chapter also covers the basic fundamentals of nursing: admission, transfer, and discharge procedures; patient safety and mobility; and patient transfer techniques and proper body mechanics. In addition to providing a comprehensive review of nursing fundamentals, the chapter also covers procedures, such as arterial puncture, blood pressure and pulse assessment, fecal occult blood testing, venipuncture, urine collection, use of restraints, postoperative and preoperative care, respiratory assessment, care of the dying patient, spiritual care, and postmortem care.
Admission
Admission to the nursing unit prepares the patient for his stay in the health care facility. Every facility follows a different set of policies and procedures for admitting a patient, and a patient’s condition determines the extent of the admitting procedure. For instance, a patient who’s admitted through the emergency department (ED) may not go through the same interview process as a patient scheduled for admission.
Whether the admission is scheduled or follows emergency treatment, effective admission procedures should accomplish these goals:
verify the patient’s identity using two patient identifiers according to facility policy JCAHO and assess his clinical status
make him as comfortable as possible
introduce him to roommates and staff members
orient him to the environment and routine
provide supplies and special equipment needed for daily care.
Florence Nightingale defined nursing as “the act of utilizing the environment of the patient to assist him in his recovery.” Because admission procedures can color the patient’s perception of the environment, they have a significant impact on responses to treatment. Nurses should be directly involved in the admission process — assigning a patient to a room, making sure that the necessary diagnostic tests are completed, and providing for continuity of care when the patient is admitted. Admitting personnel (a clerk or secretary) should confer with the nursing staff to make sure that the patient’s room assignment is based on the patient’s condition, health care needs, and personal preferences. Consideration of these factors during the admission process reduces the patient’s anxiety and promotes cooperation, contributing to the patient’s recovery.
The initial contact with the patient sets the foundation for your relationship. Be prepared to give the patient and his family, if present, your undivided attention during the admission process. Taking the time to listen to and assess your patient fulfills his physiologic and safety needs and establishes a therapeutic relationship. When orienting the patient and his family to the facility’s routine, remember to mention that two or more nurses may care for the patient (depending on shift requirements) during his hospitalization.
The Joint Commission on Accreditation of Healthcare Organizations requires that each patient have an admission assessment performed by a registered nurse. JCAHO During this assessment, the nurse must prioritize the patient’s needs, and she should always be conscious of the patient’s levels of fatigue and comfort. The admission process can be exhausting, especially when the patient is delayed in the admitting office for a room assignment. When the patient is experiencing physical or psychological problems,
the nurse should decide whether any portion of the admission assessment can be postponed.
the nurse should decide whether any portion of the admission assessment can be postponed.
Multidisciplinary assessment tool
Health care workers at Baton Rouge General Medical Center in Louisiana have developed an innovative multidisciplinary admission assessment tool. The multidisciplinary team includes health care workers from social services, respiratory therapy, diabetes management, pastoral care, dietary, enterostomal therapy, clinical case management, and physical, speech, and occupational therapy.
During the admission history, the patient is asked a series of questions that “trigger” other health care disciplines to assess the patient. A person from the appropriate department then visits and assesses the patient and provides recommendations for care. The health care team believes that patients benefit from this multidisciplinary approach by receiving necessary assessments earlier in the hospital stay.
It’s also important to maintain the patient’s privacy while obtaining his health history. According to the Patient’s Bill of Rights, now referred to as the Patient Care Partnership, the patient has the right to expect this. Examination, consultation, and treatment should be conducted in a way that protects the patient’s privacy. PCP
Admission routines that are efficient and show appropriate concern for the patient can ease his anxiety and promote cooperation and receptivity to treatment. Conversely, routines that the patient perceives as careless or excessively impersonal can heighten anxiety, reduce cooperation, impair the response to treatment, and perhaps aggravate symptoms.
Equipment
Gown • personal property form • admission form • nursing assessment form • thermometer • emesis basin • bedpan or urinal • bath basin • water pitcher, cup, and tray • urine specimen container, if needed
An admission pack usually contains soap, a comb, a toothbrush, toothpaste, mouthwash, a water pitcher, a cup, a tray, lotion, and facial tissues. The pack helps prevent cross-contamination and increases nursing efficiency. Because the patient’s pack is included in his bill, he can take it home with him.
Preparation of equipment
Obtain a gown and an admission pack.
Position the bed as the patient’s condition requires. If the patient is ambulatory, place the bed in the low position; if he’s arriving on a stretcher, place the bed in the high position. Fold down the top linens.
Prepare emergency or special equipment, such as oxygen or suction, as needed.
Implementation
Adjust the lights, temperature, and ventilation in the patient’s room.
Admitting the adult patient
Greet the patient by name and introduce yourself and other staff present.
Confirm the patient’s identity using two patient identifiers according to facility policy. JCAHO Verify the name and its spelling with the patient. Notify the admission office of any corrections.
Quickly review the admission form and the practitioner’s orders. Note the reason for admission, restrictions on activity or diet, and orders for diagnostic tests requiring specimen collection.
Escort the patient to his room and, if he isn’t in great distress, introduce him to his roommate, if he has one. Then wash your hands and help the patient change into a gown or pajamas; if he’s sharing a room, provide privacy. Itemize all valuables, clothing, and prostheses on the personal property form or, if your facility doesn’t use such a form, in your notes. Encourage the patient to store valuables or money in the safe or, preferably, to send them home along with medications he may have brought. Show the ambulatory patient the bathroom and closets.
Obtain a complete list of the patient’s current medications and dosages and document this information in the patient’s medical record.JCAHO
Take and record the patient’s vital signs, and collect ordered specimens. Measure his height and weight if possible. If he can’t stand, use a chair or bed scale and ask him his height. Knowing the patient’s height and weight is important for planning
treatment and diet and for calculating medication and anesthetic dosages.JCAHO
Show the patient how to use the equipment in the room. Be sure to include the call system, bed controls, television controls, telephone, and lights.
Explain the routine at your health care facility. Mention when to expect meals, vital signs checks, and medications. Review visiting hours and restrictions.
Take a complete patient history. Include all previous hospitalizations, illnesses, and surgeries; current drug therapy; and food or drug allergies. Ask the patient to tell you why he came to the facility. Record the answers (in the patient’s own words) as the chief complaint. Follow up with a physical assessment, emphasizing complaints. On the nursing assessment form, record any marks, bruises, or discoloration. (See Multidisciplinary assessment tool.) JCAHO
After assessing the patient, inform him of tests that have been ordered and when they’re scheduled. Describe what he should expect.
Before leaving the patient’s room, make sure that he’s comfortable and safe. Return the bed to the low position, and adjust the pillows and linens. Place the call button and other equipment (such as water pitcher, cup, emesis basin, and facial tissues) within easy reach.
Post patient care reminders (concerning such topics as allergies or special needs) at the head of the patient’s bed to notify coworkers. (See Using patient care reminders.)
Admitting the pediatric patient
Your initial goal is to establish a friendly, trusting relationship with the child and his parents to help relieve fears and anxiety, which can hinder treatment. Remember that a child younger than age 3 may fear separation from his parents; an older child may worry about what will happen to him.
Speak directly to the child, and allow him to answer questions before obtaining more information from his parents. PCP
While orienting the parents and child to the unit, describe the layout of the room and bathroom, and tell them the location of the playroom, television room, and snack room, if available.
Teach the child how to call the nurse. Stress that someone will always be available to take care of his needs such as helping him to the bathroom.
Explain the facility’s rooming-in and visiting policies so the parents can take every opportunity to be with their child.
Inquire about the child’s usual routine so that favorite foods, bedtime rituals, toileting, and adequate rest can be incorporated into the routine.
Encourage the parents to bring some of their child’s favorite toys, blankets, or other items to make the child feel more at home in unfamiliar surroundings.
Using patient care reminders
When placed at the head of the patient’s bed, care reminders call attention to the patient’s special needs and help ensure consistent care by communicating these needs to the facility staff, the patient’s family, and other visitors.
You can use a specially designed card or a plain piece of paper to post important information about the patient, such as:
allergies
dietary restrictions
fluid restrictions
specimen collection
deafness or impaired hearing (specify which ear)
foreign-language speaker.
You can also use care reminders to post special instructions, such as:
complete bed rest
no blood pressure on right arm
turn every hour
nothing by mouth
infection control or isolation procedures.
Never violate the patient’s privacy by posting his diagnosis, details about surgery, or other confidential information he might find revealing or intrusive.
Special considerations
If the patient doesn’t speak English and isn’t accompanied by a bilingual family member, contact the appropriate resource (usually the social services department) to secure an interpreter.
Keep in mind that the patient admitted to the ED may require special procedures.
If the patient brings medication from home, take an inventory and record this information on the nursing
assessment form.JCAHO Instruct the patient not to take any medication unless authorized by the practitioner. Send authorized medication to the pharmacy for identification and relabeling. Send other medication home with a responsible family member or store it in the designated area outside the patient’s room until he’s discharged. Use of unauthorized medication may interfere with treatment or cause an overdose.
Find out the patient’s normal routine, and ask him if he would like adjustments to the facility regimen; for instance, he may prefer to shower at night instead of in the morning. By accommodating the patient with such adjustments whenever possible, you can ease his anxiety and help him feel more in control of his potentially threatening situation.
Documentation
After leaving the patient’s room, complete the nursing assessment form or your notes, as required. The completed form should include the patient’s vital signs, height, weight, allergies, and drug and health history; a list of his belongings and those sent home with family members; the results of your physical assessment; and a record of specimens collected for laboratory tests. Also document any patient teaching you performed.
Supportive references
Bickley, L. Bates’ Guide to Physical Examination and Health History Taking, 8th ed. Philadelphia: Lippincott Williams & Wilkins, 2003.
Joint Commission on Accreditation of Healthcare Organizations. “Standards: Frequently Asked Questions: Hospital,” 2005. www.jcaho.org/accredited+organizations/standard/faq/hos.html.
Kozier, B., et al. Fundamentals of Nursing, 7th ed. Upper Saddle River, N.J.: Prentice Hall Health, 2003.
Perry, A., and Potter, P. Clinical Nursing Skills and Techniques, 6th ed. St. Louis: Mosby–Year Book, Inc., 2005.
Alignment and pressure-reducing devices
Proper body alignment means that the joints, tendons, ligaments, and muscles are in line with the pull of gravity. When the body is aligned — whether the patient is sitting, standing, or lying down — these structures carry no excessive strain. Body balance is achieved when a wide base of support exists, the center of gravity falls within the base of support, and a vertical line can be drawn from the center of gravity through the base of support.
The human body is meant to be mobile, as evidenced by the harmful effects of immobility. The most obvious signs of prolonged immobility commonly occur in the muscles and skin. Common problems resulting from prolonged immobility include:
disuse osteoporosis — the bones demineralize and become spongy in the absence of weight-bearing exercise and may fracture easily
disuse atrophy — the muscles decrease in size, losing most of their strength and normal function
contracture — permanent shortening of the muscle that limits joint mobility; muscle fibers can’t shorten and lengthen
reduced skin turgor — skin atrophy and a shift in body fluids between the compartments of the dermis decrease the skin’s elasticity
skin breakdown — immobility impedes circulation and decreases the supply of nutrients to specific areas.
Positioning to maintain proper body alignment is vital in the prevention of complications, such as joint contractures and deformities. Devices, such as pillows and foam, can reduce pressure on bony prominences by preventing contact between prone areas and support surfaces. AHRQ Incorrect positioning or infrequent repositioning of the patient with circulatory problems may result in pressure ulcers, which can develop within 24 hours and require months to heal and thousands of dollars to correct. Frequent repositioning may prevent contractures as well as pressure ulcers. The goal is to maintain the body posture as near as normal to an upright position. The spine should be straight, the head neutral, and all extremities in functional positions.
For patients confined to a bed, special support surfaces and positioning devices can be used to maintain correct body positioning and prevent complications of prolonged bed rest. Specialty beds provide pressure relief, eliminate shearing and friction, and reduce moisture; for example, a kinetic (RotoRest) bed provides continuous passive range of motion (ROM) or oscillation to counteract the patient’s immobility. Special support surfaces can include gel or air overlays.
Be sure to follow the manufacturer’s instructions before using these products. MFR
Be sure to follow the manufacturer’s instructions before using these products. MFR
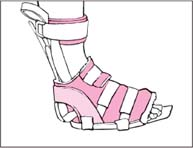
Positioning devices should be used to maintain the functional position of the wrists, hands, fingers, ankles, and other extremities. The major joints should be placed in extension to prevent hip and knee contractures. Devices include cradle boots to protect the heels and help prevent skin breakdown and footdrop; external hip rotation and abduction pillows to help prevent internal hip rotation after femoral fracture, hip fracture, or surgery; trochanter rolls to help prevent external hip rotation; and hand rolls to help prevent hand contractures. SCIENCE
Cradle boots, made of sponge rubber with heel cutouts, cushion the ankle and foot without completely enclosing it. Other commercial boots are available, but not all help to prevent external hip rotation. Footboards with antirotation blocks help prevent footdrop and external hip rotation but don’t prevent heel pressure. High-topped sneakers may be used to help prevent footdrop, but they don’t prevent external hip rotation or heel pressure.
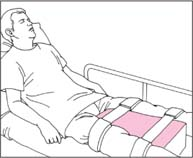
The abduction pillow is a wedge-shaped piece of sponge rubber with lateral indentations for the patient’s thighs and straps that wrap around the thighs to maintain correct positioning. Although a properly shaped bed pillow may temporarily substitute for the commercial abduction pillow, it’s difficult to apply and doesn’t maintain the correct lateral alignment.
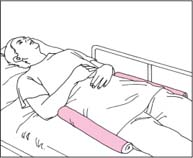
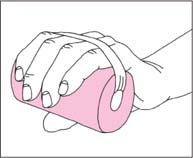
The commercial trochanter roll is made of sponge rubber, but one can also be improvised from a rolled blanket or towel. The hand roll, available in hard and soft materials, is held in place by fixed or adjustable straps. It can be improvised from a rolled washcloth secured with roller gauze and adhesive tape.
The primary nursing goal in immobility is to neutralize detrimental effects on the patient and maintain normal function. (See Preventing pressure ulcers, page 20.)
Equipment
Cradle boots or substitute ▪ abduction pillow ▪ trochanter rolls ▪ hand rolls (see Common preventive devices, page 21)
Preparation of equipment
If you’re using a device that’s available in different sizes, select the appropriate size for the patient.
Always refer to the manufacturer’s application guidelines before applying the device. MFR
Implementation
Confirm the patient’s identity using two patient identifiers according to facility policy. JCAHO
Explain the purpose and steps of the procedure to the patient and his family.
Applying cradle boots
Open the slit on the superior surface of the boot. Then place the patient’s heel in the circular cutout area. If the patient is positioned laterally, you may apply the boot only to the bottom foot and support the flexed top foot with a pillow.
If appropriate, apply the second boot to the other foot.
Position the patient’s legs properly to prevent strain on hip ligaments and pressure on bony prominences.
Applying an abduction pillow
Place the pillow between the supine patient’s legs. Slide it toward the groin so that it touches the legs all along its length.
Place both upper legs in the pillow’s lateral indentations, and secure the straps to prevent the pillow from slipping.
Applying trochanter rolls
Position one roll along the outside of the thigh, from the iliac crest to midthigh and another roll along the other thigh. Make sure that neither roll extends as far as the knee to avoid peroneal nerve compression and palsy, which can lead to footdrop.
If you’ve fashioned trochanter rolls from a towel, leave several inches unrolled and tuck this under the patient’s thigh to hold the device in place and maintain the patient’s position.
Applying hand rolls
Place one roll in the patient’s hand to maintain the neutral position. Secure the strap, if present, or apply roller gauze and secure with nonallergenic or adhesive tape.
Place another roll in the other hand if needed.
Preventing pressure ulcers EB
Pressure ulcers have tremendous emotional, physical, and financial consequences to patients and the heath care system. Research shows that complying with the 1992 pressure ulcer prevention guidelines from the Agency for Healthcare Research and Quality reduces the incidence of pressure ulcers. However, a study by the University of Washington, Department of Plastic Surgery, Department of Epidemology, and the Department of Pediatrics found that despite these guidelines for pressure ulcer prevention, the incidence of pressure ulcers among hospitalized patients hasn’t declined.
The authors of the study gathered census data from the National Center for Health Statistics for a period of 14 years from 1987 to 2000. They looked at patients admitted with a primary diagnosis of pressure ulcers as well as those patients admitted for another diagnosis but who developed pressure ulcers while hospitalized. Although no evidence indicated that following the guidelines for pressure ulcer prevention decreased the number of pressure ulcers that developed in hospitalized patients, the study did reveal that pressure ulcers are now being reported in a more thorough manner.
Special considerations
Remember that the use of assistive devices doesn’t replace the need for frequent patient positioning, ROM exercises, and skin care.
Nursing diagnoses
Impaired physical mobility
Impaired skin integrity
Expected outcomes
The patient will:
maintain functional mobility
exhibit no signs of skin breakdown
communicate understanding of skin protection measures
remain free from complications.
Complications
Contractures and pressure ulcers may occur with the use of a hand roll and possibly with other assistive devices. To avoid these problems, remove a soft hand roll every 4 hours (every 2 hours if the patient has hand spasticity); remove a hard hand roll every 2 hours.
All skin surfaces should be assessed every 2 to 4 hours in the nonambulatory patient to assess for potential skin breakdown. JCAHO Also, provide vigilance in assessing the nutritional needs of the immobilized patient.
Documentation
Record the use of these devices in the patient’s chart and the nursing care plan, include the reason for the device, and indicate assessment for complications. Document any patient teaching performed and the patient’s understanding. Reevaluate your patient care goals as needed.
Supportive references
Baranoski, S., and Ayello, E. Wound Care Essentials Practice and Principles. Philadelphia: Lippincott Williams & Wilkins, 2004.
Groeneveld, A., et al. “The Prevalence of Pressure Ulcers in a Tertiary Care Pediatric and Adult Hospital,” Journal of Wound, Ostomy & Continence Nursing 31(3):108-20, May-June 2004.
Jones, J. “Evaluation of Pressure Ulcer Prevention Devices: A Critical Review of the Literature,” Journal of Wound Care 14(9):422-25, October 2005.
National Pressure Ulcer Advisory Panel: www.npuap.org/.
Price, M., et al. “Development of a Risk Assessment Tool for Intraoperative Pressure Ulcers,” Journal of Wound, Ostomy & Continence Nursing 32(1):19-30, January-February 2005.
Scott, J.R., and Gibran, N.S., et al. “Incidence and Characteristics of Hospitalized Patients with Pressure Ulcers: State of Washington, 1987 to 2000,” Plastic and Reconstructive Surgery 117(2):630-34, February 2006.EB
Thompson, P., et al. “Skin Care Protocols for Pressure Ulcers and Incontinence in Long-Term Care: A Quasi-Experimental Study,” Advances in Skin and Wound Care 18(8):422-29, October 2005.
Common preventive devices
Equipment is available to reduce pressure or help maintain positioning, depending on the patient’s needs.
Arterial puncture for blood gas analysis
Arterial blood gas (ABG) analysis helps assess oxygenation and ventilation and provides vital information to manage a patient’s metabolic and respiratory disturbances. ABG analysis evaluates ventilation by measuring blood pH and the partial pressures of arterial oxygen (PaO2) and partial pressure of arterial carbon dioxide (PaCO2). Blood pH measurement reveals the blood’s acid-base balance, the PaO2 indicates the amount of oxygen that the lungs deliver to the blood, and the PaCO2 indicates the lungs’ capacity to eliminate carbon dioxide. ABG samples also can be analyzed for oxygen content and saturation and for bicarbonate values. Any change in cardiopulmonary status results in changes in ABG values, which reflect changes in the pulmonary and renal systems as they attempt to compensate for imbalances in the body.
Typically, ABG analysis is ordered for patients who have chronic obstructive pulmonary disease, pulmonary edema, acute respiratory distress syndrome, myocardial infarction, or pneumonia. It’s also performed during episodes of shock and after coronary artery bypass surgery, resuscitation from cardiac arrest, changes in respiratory therapy or status, and prolonged anesthesia.
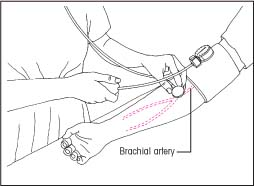
A specially trained nurse can draw most ABG samples. When selecting a site for sampling arterial blood, the nurse should keep three key factors in mind. First, superficial arteries are easier to palpate, stabilize, and puncture and puncture of arteries that are surrounded by insensitive body tissues, such as muscle, tendon, and fat, is less painful for the patient. Second, potential complications include vascular spasm, clotting of the vessel, or bleeding that results in a hematoma and vascular compression. Third, if a complication does occur, the artery should have good collateral blood flow. The radial artery best meets these criteria; the brachial artery is usually the best second choice.
Allen’s test is a simple clinical maneuver to assess collateral blood flow in the radial artery before an attempt is made to puncture the artery. A positive result indicates that ulnar collateral flow is present, allowing a degree of safety in using the radial artery. (See Performing Allen’s test.)
If the radial artery is inaccessible or Allen’s test is negative, then the brachial artery can be used. However, the brachial artery is one of the most difficult arteries to palpate and stabilize, carries a higher risk of venous puncture because of its location, and can be very painful if the brachial nerve is punctured.
Only nurses who have had additional specialized training should use the femoral artery. This artery is best used in an emergency, such as cardiac arrest or hypovolemic shock, when pulses are difficult to palpate.
Equipment
10-ml glass syringe or plastic luer-lock syringe specially made for drawing blood for ABG analysis ▪ 1-ml ampule of aqueous heparin (1:1,000) ▪ 20G 1 1/4″ needle ▪ 22G 1″ needle ▪ gloves ▪ alcohol pad ▪ two 2″ × 2″ gauze pads ▪ rubber cap for syringe hub or rubber stopper for needle ▪ ice-filled plastic bag ▪ label ▪ laboratory request form ▪ adhesive bandage ▪ optional: 1% lidocaine solution
Many health care facilities use a commercial ABG kit that contains all the equipment listed above except the adhesive bandage and ice. If your facility doesn’t use such a kit, obtain a sterile syringe specially made for drawing ABG samples, and use a clean emesis basin filled with ice instead of the plastic bag to transport the sample to the laboratory.
Preparation of equipment
Prepare the collection equipment before entering the patient’s room.
Wash your hands thoroughly, then open the ABG kit and remove the sample label and the plastic bag.
Record on the label the patient’s name and room number, date and collection time, and the practitioner’s name. Fill the plastic bag with ice and set it aside.
If the syringe isn’t heparinized, you’ll have to do so. Attach the 20G needle to the syringe, and then open the ampule of heparin. Draw all the heparin into the syringe to prevent the sample from clotting. Hold the syringe upright, and pull the plunger back slowly to about the 7-ml mark. Rotate the barrel while pulling the plunger back to allow the heparin to
coat the inside surface of the syringe. Then slowly force the heparin toward the hub of the syringe, and expel all but about 0.1 ml of heparin.
To heparinize the needle, first replace the 20G needle with the 22G needle. Then hold the syringe upright, tilt it slightly, and eject the remaining heparin. Excess heparin in the syringe alters blood pH and PaO2 values.
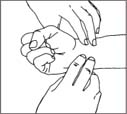
Performing Allen’s test EB
Rest the patient’s arm on the mattress or bedside stand, and support his wrist with a rolled towel. Tell him to clench his fist. Using your index and middle fingers, press on the radial and ulnar arteries. Hold this position for a few seconds.
 |
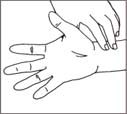
Without removing your fingers from the patient’s arteries, ask him to unclench his fist and hold his hand in a relaxed position. The palm will be blanched because pressure from your fingers has impaired normal blood flow.
 |
Release pressure on the patient’s ulnar artery. If the hand becomes flushed, which indicates blood filling the vessels, you can safely proceed with the radial artery puncture. If the hand doesn’t flush, perform Allen’s test on the other arm.
 |
Implementation
Confirm the patient’s identity using two patient identifiers according to facility policy. JCAHO
Tell the patient that you need to collect an arterial blood sample, and explain the procedure to help ease anxiety and promote cooperation. Tell him that the needle insertion will cause some discomfort but that he must remain still during the procedure. PCP
Wash your hands and put on gloves. CDC
Place a rolled towel under the patient’s wrist for support. Locate the artery and palpate it for a strong pulse.
Clean the puncture site with an alcohol pad, starting in the center of the site and spiraling outward in a circular motion with friction for 30 seconds or until the final pad comes away clean. Allow the skin to dry.
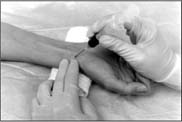
Palpate the artery with the index and middle fingers of one hand while holding the syringe over the puncture site with the other hand. The puncture site should be between your index and middle fingers as they palpate the pulse.
Puncture the skin and the arterial wall in one motion, following the path of the artery. When puncturing the radial artery, hold the needle bevel up at a 30- to 45-degree angle. When puncturing the brachial artery, hold the needle at a 60-degree angle. (See Arterial puncture technique, page 24.)
Watch for blood backflow in the syringe. Don’t pull back on the plunger because arterial blood should enter the syringe automatically. Fill the syringe to the 5-ml mark.
After collecting the sample, press a gauze pad firmly over the puncture site until the bleeding stops — at least 5 minutes. If the patient is receiving anticoagulant therapy or has a blood dyscrasia, apply pressure for 10 to 15 minutes; if necessary, ask a coworker to hold the gauze pad in place while you prepare the sample for transport to the laboratory. Don’t ask the patient to hold the pad. If he fails to apply sufficient
pressure, a large, painful hematoma may form, hindering future arterial punctures at that site.
Check the syringe for air bubbles. If any appear, remove them by holding the syringe upright and slowly ejecting some of the blood onto a 2″ × 2″ gauze pad.
Insert the needle into a rubber stopper, or remove the needle and place a rubber cap directly on the needle hub. This prevents the sample from leaking and keeps air out of the syringe.
Put the labeled sample in the ice-filled plastic bag or emesis basin. Attach a properly completed laboratory request form, and send the sample to the laboratory immediately.
When bleeding stops, apply a small adhesive bandage to the site.
Monitor the patient’s vital signs, and observe for signs of circulatory impairment, such as swelling, discoloration, pain, numbness, or tingling in the arm or leg. Watch for bleeding at the puncture site.
Special considerations
If the patient is receiving oxygen, make sure that his therapy has been underway for at least 15 minutes before collecting an arterial blood sample.
Unless ordered, don’t turn off existing oxygen therapy before collecting arterial blood samples. Be sure to indicate on the laboratory request slip the amount and type of oxygen therapy the patient is receiving.
If the patient isn’t receiving oxygen, indicate that he’s breathing room air. If the patient has received a nebulizer treatment, wait about 20 minutes before collecting the sample.
If necessary, anesthetize the puncture site with 1% lidocaine solution or normal saline with 0.9% benzyl alcohol. Consider such use of lidocaine carefully because it delays the procedure, the patient may be allergic to the drug, or the resulting vasoconstriction may prevent successful puncture.
When filling out a laboratory request form for ABG analysis, be sure to include the following information to help the laboratory staff calibrate the equipment and evaluate results correctly: the patient’s current temperature, most recent hemoglobin level, current respiratory rate and, if the patient is on a ventilator, fraction of inspired oxygen and tidal volume. JCAHO
Nursing diagnoses
Deficient knowledge (procedure)
Risk for infection
Risk for injury
Expected outcomes
The patient will:
demonstrate an understanding of the procedure and reason for the test
remain free from infection
not develop complications related to the procedure.
Complications
If you use too much force when attempting to puncture the artery, the needle may touch the periosteum of the bone, causing the patient considerable pain, or you may advance the needle through the opposite wall of the artery. If this happens, slowly pull the needle back a short distance and check to see if you obtain a blood return. If blood still doesn’t enter the syringe, withdraw the needle completely and start with a fresh heparinized needle. Don’t make more than two attempts to withdraw blood from the same site. Probing the artery may injure it and the radial nerve. Also, hemolysis will alter test results.
Documentation
Record the results of Allen’s test, the time the sample was drawn, the patient’s temperature, site of the arterial puncture, how long pressure was applied to the site to control bleeding, and the type and amount of oxygen therapy the patient was receiving.
Supportive references
Aaron, S.D., et al. “Topical Tetracaine Prior to Arterial Puncture: A Randomized, Placebo-Controlled Clinical Trial,” Respiratory Medicine 97(11):1195-99, November 2003.
American Association for Respiratory Care. “AARC Clinical Guideline: Blood Gas Analysis and Hemoximetry. 2001 Revision and Update,” Respiratory Care 46(5):498-505, May 2001.
Patterson, P., et al. “Comparison of 4 Analgesic Agents for Venipuncture,” AANA Journal 68(1):43-51, February 2000.
Perry, A.G., and Potter, P.A. Clinical Nursing Skills and Techniques, 6th ed. St. Louis: Mosby–Year Book, Inc., 2005. EB
Blood pressure assessment
Arterial blood pressure is a measure of the pressure exerted by the blood as it flows through the arteries. Blood moves in waves as the heart contracts and relaxes. Systolic pressure occurs during left ventricular contraction at the height of the wave and reflects the integrity of the heart, arteries, and arterioles. Diastolic pressure occurs during left ventricular relaxation and directly indicates blood vessel resistance. The difference between systolic and diastolic pressures is called pulse pressure. Blood pressure is measured in millimeters of mercury (mm Hg).
Arterial blood pressure may be measured directly (invasively) or indirectly (noninvasively). The direct method requires electronic monitoring equipment and the insertion of a catheter into an artery. The patient must be in an intensive care unit or setting. Noninvasive measurement requires a blood pressure cuff, a sphygmomanometer, and a stethoscope. The brachial artery is commonly used; however, the radial artery or popliteal artery may also be used.
Cloth or disposable vinyl compression cuffs come in many different sizes. According to the American Heart Association, cuff size should be proportional to the circumference of the patient’s limb. (See Acceptable bladder dimensions for arms of different sizes, page 26.) Ideally, the width of the cuff should be 40% of the circumference or 20% wider than the diameter of the midpoint of the limb. AHA JNC The bladder should encircle at least 80% of the adult upper arm and the entire arm of a child. For an adult, the average bladder is 4 3/4″ to 5 1/4″ (12 to 13 cm) wide and 8 5/8″ to 9 1/8″ (22 to 23 cm) long. If the bladder is too narrow, the blood pressure reading will be falsely high; if it’s too wide, the reading will be falsely low.
Frequent blood pressure measurement is critical after serious injury, surgery, or anesthesia and during an illness or a condition that threatens cardiovascular stability. (Frequent measurement may be done with an automated vital signs monitor.) Regular measurement is indicated for patients with a history of hypertension or hypotension, and yearly screening is recommended for all adults.
Because pressure differences of more than 10 mm Hg exist between the arms of 6% of hypertensive patients, blood pressure should be measured in both arms at the initial assessment and in the arm with the higher pressure for future blood pressure measurements. EBI
Blood pressure should be measured using the recommendations set by the Seventh Report of the Joint National Committee on Prevention, Detection, Evaluation, and Treatment of High Blood Pressure (JNC VII). Until recently, patients with hypertension were stratified based on blood pressure readings alone. The JNC VII, however, also considers the patient’s individual risk factors so that those with more risk factors are treated more aggressively. (See Classification of blood pressure, page 26.) The JNC VII has developed an innovative flowchart to guide the treatment of patients with hypertension. (See Algorithm for treatment of hypertension, page 27.)
Equipment
Mercury or aneroid sphygmomanometer ▪ stethoscope ▪ automated vital signs monitor (if available)
Acceptable bladder dimensions for arms of different sizes*
Using an improper cuff size can greatly reduce the accuracy of a blood pressure reading. Use the chart below to help you to select the proper cuff size based on the patient’s arm circumference.
| Cuff | Bladder width (cm) | Bladder length (cm) | Arm circumference range at midpoint (cm) |
|---|---|---|---|
| Neonate | 3 | 6 | < 6 |
| Infant | 5 | 15 | 6 to 15† |
| Child | 8 | 21 | 16 to 21† |
| Small adult | 10 | 24 | 22 to 26 |
| Adult | 13 | 30 | 27 to 34 |
| Large adult | 16 | 38 | 35 to 44 |
| Adult thigh | 20 | 42 | 45 to 52 |
* There’s some overlapping of the recommended range for arm circumferences to limit the number of cuffs; it’s recommended that the larger cuff be used when available.
† To approximate the bladder width:arm circumference ratio of 0.4 more closely in infants and children, additional cuffs are available.
Adapted from Perloff, D., et al. “Human Blood Pressure Determination by Sphygmomanometry,” Circulation 88(2)2460-467, November 1993, with permission of the publisher.
Classification of blood pressure JNC EB3
The Seventh Report of the Joint National Committee on Prevention, Detection, Evaluation, and Treatment of High Blood Pressure recommends that a person’s risk factors be considered in the treatment of hypertension. The patient with more risk factors should be treated more aggressively.
| Category | SBP mm Hg | DBP mm Hg | |
|---|---|---|---|
| Normal | ≤ 120 | and | ≤ 80 |
| Prehypertension | 120 to 139 | or | 80 to 89 |
| Hypertension, stage 1 | 140 to 159 | or | 90 to 99 |
| Hypertension, stage 2 | ≥ 160 | or | ≥ 100 |
Key: SBP = systolic blood pressure; DBP = diastolic blood pressure
Adapted from the Seventh Report of the Joint National Committee on Prevention, Detection, Evaluation, and Treatment of High Blood Pressure. NIH Publication No. 03-5231. Bethesda, Md.: National Institutes of Health; National Heart, Lung, and Blood Institute; National High Blood Pressure Education Program, May 2003.
Algorithm for treatment of hypertension JNCEB3
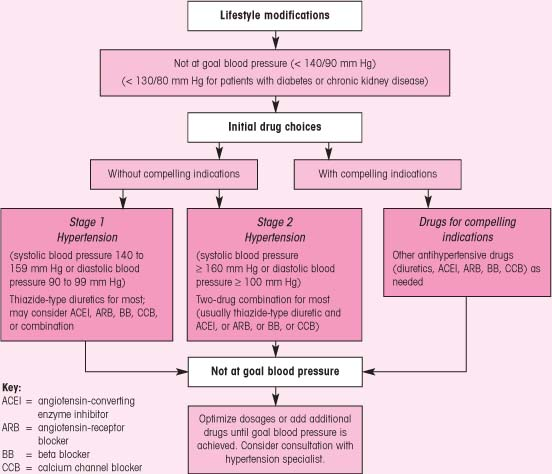 |
Adapted from the Seventh Report of the Joint National Committee on Prevention, Detection, Evaluation, and Treatment of High Blood Pressure. NIH Publication No. 03-5231. Bethesda, Md.: National Institutes of Health; National Heart, Lung, and Blood Institute; National High Blood Pressure Education Program, May 2003.
The sphygmomanometer consists of an inflatable compression cuff linked to a manual air pump and a mercury manometer or an aneroid gauge. The JNC VII recommends using a mercury sphygmomanometer because it’s more accurate and requires calibration less frequently than the aneroid model.JNC However, a recently calibrated aneroid manometer may be used. To obtain an accurate reading from a mercury sphygmomanometer, you must rest its gauge on a level surface and view the meniscus at eye level; you can rest an aneroid gauge in any position, but you must view it directly from the front.
Positioning the blood pressure cuff
To properly position a blood pressure cuff, wrap the cuff snugly around the upper arm above the antecubital area (the inner aspect of the elbow). When measuring an adult’s blood pressure, place the lower border of the cuff about 1″ (2.5 cm) above the antecubital fossa. The center of the bladder should rest directly over the medial aspect of the arm; most cuffs have an arrow to be positioned over the brachial artery. Next, place the bell of the stethoscope on the brachial artery at the point where you hear the strongest beats.
 |
Cuffs come in sizes ranging from neonate to extra-large adult. Disposable cuffs and thigh cuffs are available. (See Positioning the blood pressure cuff.)
The automated vital signs monitor is a noninvasive device that measures the pulse rate, systolic and diastolic pressures, and mean arterial pressure at preset intervals. (See Using an electronic vital signs monitor.)
Preparation of equipment
Carefully choose an appropriate-sized cuff for the patient; the bladder should encircle at least 80% at the upper arm. JNC An excessively narrow cuff may cause a falsely high pressure reading; an excessively wide one, a falsely low reading. EB4
If you’re using an automated vital signs monitor, collect the monitor, dual air hose, and pressure cuff. Then make sure that the monitor unit is firmly positioned near the patient’s bed.
Implementation
Confirm the patient’s identity using two patient identifiers according to facility policy. JCAHO
Tell the patient that you’re going to take his blood pressure.
Have the patient rest for at least 5 minutes before measuring his blood pressure. Make sure that he hasn’t had caffeine or smoked for at least 30 minutes. JNC
The patient may lie supine or sit erect during blood pressure measurement. If the patient is sitting erect, make sure that he has both feet flat on the floor because crossing the legs may elevate blood pressure. EB5 His arm should be extended at heart level and be well supported. If the artery is below heart level, you may get a false-high reading. Make sure that the patient is relaxed and comfortable when you take his blood pressure so it stays at its normal level.EB4
To ensure proper cuff placement on the patient’s arm, first palpate the brachial artery. Position the cuff 1″ (2.5 cm) above the site of pulsation, center the bladder above the artery with the cuff fully deflated, and wrap the cuff evenly and snugly around the upper arm. If the arm is very large or misshapen and the conventional cuff won’t fit properly, take leg or forearm measurements.
To obtain a thigh blood pressure, apply the appropriate-sized cuff to the thigh, and auscultate the pulsations over the popliteal artery. To obtain a forearm blood pressure, apply the appropriate-sized cuff to the forearm 5″ (13 cm) below the elbow. Blood pressure sounds can be heard from the popliteal artery.
If necessary, connect the appropriate tube to the rubber bulb of the air pump and the other tube to the manometer. Then insert the stethoscope earpieces into your ears.
To determine how high to pump the blood pressure cuff, first estimate the systolic blood pressure by palpation. As you feel the radial artery with the fingers of one hand, inflate the cuff with your other hand until the radial pulse disappears. Read this pressure on the manometer and add 30 mm Hg to it. Use this sum as the target inflation to prevent discomfort from overinflation. Deflate the cuff and wait at least 2 minutes. EB4
Using an electronic vital signs monitor
An electronic vital signs monitor allows you to track a patient’s vital signs continually, without having to reapply a blood pressure cuff each time. What’s more, the patient won’t need an invasive arterial line to gather similar data. These steps can be followed with most other monitors.
Some automated vital signs monitors are lightweight and battery operated and can be attached to an I.V. pole for continual monitoring, even during patient transfers. Make sure that you know the capacity of the monitor’s battery, and plug the machine in whenever possible to keep it charged. Regularly calibrate the monitor to ensure accurate readings.
Before using a monitor, check its accuracy. Determine the patient’s pulse rate and blood pressure manually, using the same arm you’ll use for the monitor cuff. Compare your results when you get initial readings from the monitor. If the results differ, call your supply department or the manufacturer’s representative.
Check the manufacturer’s guidelines because most automated monitoring devices are intended for serial monitoring only and may be inaccurate for a one-time measurement. MFR
Preparing the device
Explain the procedure to the patient. Describe the alarm system so he won’t be frightened if it’s triggered.
Make sure that the power switch is off. Then plug the monitor into a properly grounded wall outlet. Secure the dual air hose to the front of the monitor.
Connect the pressure cuff’s tubing to the other ends of the dual air hose, and tighten connections to prevent air leaks. Keep the air hose away from the patient to avoid accidental dislodgment.
Squeeze all air from the cuff, and wrap it loosely around the patient’s arm about 1″ (2.5 cm) above the antecubital fossa. If possible, avoid applying the cuff to a limb that has an I.V. line in place. Position the cuff’s “artery” arrow over the palpated brachial artery. Then secure the cuff for a snug fit.
Selecting the parameters
When you turn on the monitor, it will default to a manual mode. (In this mode, you can obtain vital signs yourself before switching to the automatic mode.) Press the AUTO/MANUAL button to select the automatic mode. The monitor will give you baseline data for the pulse rate, systolic and diastolic pressures, and mean arterial pressure.
Compare your previous manual results with these baseline data. If they match, you’re ready to set the alarm parameters. Press the SELECT button to blank out all displays except systolic pressure.
Use the HIGH and LOW limit buttons to set the specific parameters for systolic pressure. (These limits range from a high of 240 mm Hg to a low of 0 mm Hg.) Repeat this step three times for mean arterial pressure, pulse rate, and diastolic pressure. After setting the parameters for diastolic pressure, press the SELECT button again to display current data. Even if you forget to do this last step, the monitor will automatically display current data 10 seconds after you set the last parameters.
Collecting the data
Program the monitor according to the desired frequency of assessments. Press the SET button until you reach the desired time interval in minutes. If you have chosen the automatic mode, the monitor will display a default cycle time of 3 minutes. You can override the default cycle time to set the interval you prefer.
You can obtain a set of vital signs at any time by pressing the START button. Also, pressing the CANCEL button will stop the interval and deflate the cuff. You can retrieve stored data by pressing the PRIOR DATA button. The monitor will display the last data obtained along with the time elapsed since then. Scrolling backward, you can retrieve data from the previous 99 minutes. Make sure that the patient’s vital signs are documented frequently on a vital signs assessment sheet.
The diastolic dilemma AHA
The decision of whether to use the fourth or fifth Korotkoff sound as the diastolic blood pressure has long been the subject of controversy. Although the difference in the fourth and fifth sounds is usually less than 5 mm Hg, the sounds may be the same, the fourth sound may 10 mm Hg higher, or sounds may be heard all the way down to zero. The American Heart Association accepts the point at which all sound disappears, the fifth Korotkoff sound, as the diastolic blood pressure. The fifth sound is believed to more closely match the diastolic pressure obtained by direct intra-arterial monitoring and is more easily recognized by health care professionals. The fourth Korotkoff sound is considered the diastolic pressure in infants and children.EB5
When you resume, locate the brachial artery by palpation. Center the bell of the stethoscope over the area of the artery where you detect the strongest beats, and hold it in place with one hand. The bell of the stethoscope transmits low-pitched arterial blood sounds more effectively than the diaphragm.
Using the thumb and index finger of your other hand, turn the thumbscrew on the rubber bulb of the air pump clockwise to close the valve.
Pump the cuff up to the predetermined level.
Carefully open the valve of the air pump, and then slowly deflate the cuff — no faster than 2 to 3 mm Hg/second. While releasing air, watch the mercury column or aneroid gauge and auscultate for the sound over the artery. EB4
When you hear the first beat or clear tapping sound, note the pressure on the column or gauge. This is the systolic pressure. (The beat or tapping sound is the first of five Korotkoff sounds. The second sound resembles a murmur or swish; the third sound, crisp tapping; the fourth sound, a soft, muffled tone; and the fifth, the last sound heard.) EB4
Continue to release air gradually while auscultating for the sound over the artery.
Note the pressure where sound disappears. This is the diastolic pressure — the fifth Korotkoff sound. (See The diastolic dilemma.) EB4
After you hear the last Korotkoff sound, deflate the cuff slowly for at least another 10 mm Hg to ensure that no further sounds are audible.
Rapidly deflate the cuff. Record the pressure, wait 2 minutes, and then repeat the procedure. If the average of the readings is greater than 5 mm Hg, take the average of two more readings. After doing so, remove and fold the cuff, and return it to storage. JNC
Document the blood pressure results.
Explain the importance of follow-up visits based on JNC VII recommendations to your patient. (See Hypertension: Recommendations for follow-up.)
Special considerations
If you can’t auscultate blood pressure, you may estimate systolic pressure. To do this, first palpate the brachial or radial pulse. Then inflate the cuff until you no longer detect the pulse. Slowly deflate the cuff and, when you detect the pulse again, record the pressure as the palpated systolic pressure.
Palpation of systolic blood pressure also may be important to avoid underestimating blood pressure in patients with an auscultatory gap. This gap is a loss of sound between the first and second Korotkoff sounds; it may be as great as 40 mm Hg. You may find this in patients with venous congestion or hypotension.
When measuring blood pressure in the popliteal artery, position the patient on his abdomen, wrap a cuff around the middle of the thigh, and proceed with blood pressure measurement.
If the patient is anxious or crying, delay blood pressure measurement, if possible, until he becomes calm to avoid falsely elevated readings. EB4
Occasionally, blood pressure must be measured in both arms or with the patient in two different positions (such as lying and standing or sitting and standing). In such cases, observe and record significant differences between the two readings, and record the blood pressure and the extremity and position used.
Measure the blood pressure of patients taking antihypertensive medications while they’re in a sitting position to ensure accurate measurements.
Remember that malfunction in an aneroid sphygmomanometer can be identified only by checking it against a mercury manometer of known accuracy. Be
sure to check your aneroid manometer this way periodically. Malfunction in a mercury manometer is evident in abnormal behavior of the mercury column. Don’t attempt to repair either type yourself; instead, send it to the appropriate service department.
Nursing diagnoses
Deficient knowledge (disease)
Health-seeking behaviors (monitoring blood pressure)
Expected outcomes
The patient will:
state an understanding of the need to monitor his blood pressure
state an understanding of lifestyle modifications
express an interest in learning new behaviors to lower his blood pressure
state his blood pressure range
maintain blood pressure within the desired limits.
Complications
Impaired circulation can affect blood pressure and cause an inaccurate reading. Therefore, don’t measure blood pressure on a patient’s affected arm if the:
– shoulder, arm, or hand is injured or diseased.
– arm has a cast or bulky bandage.
– patient has had a mastectomy or removal of lymph nodes on that side.
– patient has an arteriovenous fistula in that limb.
Don’t take blood pressure in the arm on the affected side of a mastectomy because it may decrease already compromised lymphatic circulation, worsen edema, and damage the arm.
Likewise, don’t take blood pressure on the same arm of an arteriovenous fistula or hemodialysis shunt because blood flow through the vascular device may be compromised. EB4
Documentation
In the patient’s chart, record blood pressure as systolic over diastolic such as 120/78 mm Hg. Chart an auscultatory gap if present. If required by your facility, chart blood pressures on a graph, using dots or checkmarks. Also, document the limb used and the patient’s position. Include patient teaching about lifestyle modifications, drug therapy, and follow-up care. Record the name of any practitioner notified of blood pressure results and any orders given.
Hypertension: Recommendations for follow-up JNC
The Seventh Report of the Joint National Committee on Prevention, Detection, Evaluation, and Treatment of High Blood Pressure recommends the following guidelines.
After antihypertensive drug therapy is initiated, most patients should return for follow-up and adjustment of medications at approximately monthly intervals until the blood pressure goal is reached. More frequent visits will be necessary for patients with stage 2 hypertension or with complicating comorbid conditions. Serum potassium and creatinine levels should be monitored at least one to two times per year. After blood pressure is at goal and stable, follow-up visits can usually occur at 3- to 6-month intervals. Comorbidities, such as heart failure; associated diseases, such as diabetes; and the need for laboratory tests infuence the frequency of visits. Other cardiovascular risk factors should be treated to their respective goals, and tobacco avoidance should be promoted vigorously. Low-dose aspirin therapy should be considered only when blood pressure is controlled because the risk of hemorrhagic stroke is increased in patients with uncontrolled hypertension.
Supportive references
Beevers, G., et al. “ABC of Hypertension. Blood Pressure Measurement. Conventional Sphygmomanometry: Technique of Auscultatory Blood Pressure Measurement,” British Medical Journal 322(7293):1043-47, April 2001.
Craven, R.F., and Hirnle, C.J. Fundamentals of Nursing Human Health and Function, 5th ed. Philadelphia: Lippincott Williams & Wilkins, 2006. EB4
Joanna Briggs Institute for Evidence Based Nursing and Midwifery. “Best Practice: Vital Signs,” 3(3), 1999. www.joannabriggs.edu.au/bpmenu.html.
Keele-Smith, R., and Price-Daniel, C. “Effects of Crossing Legs on Blood Pressure Measurement,” Clinical Nursing Research 10(2):202-13, May 2001. EB4
McAlister, F., and Straus, S. “Evidence-Based Treatment of Hypertension. Measurement of Blood Pressure: An Evidence-Based Review,” British Medical Journal 322(7291):908-11, April 2001.EB1
Perloff, D., et al. “Human Blood Pressure Determination by Sphygmomanometry: Part 1,” Circulation 88(5): 2460-470, November 1993. EB2
Perry, A., and Potter, P.A. Clinical Nursing Skills and Techniques, 6th ed. St. Louis: Mosby–Year Book, Inc., 2005.
The Seventh Report of the Joint National Committee on Prevention, Detection, and Treatment of High Blood Pressure. NIH Publication No. 03-5233. Bethesda, Md.: National Institutes of Health; National Heart, Lung, and Blood Institute; National High Blood Pressure Education Program. December 2003. www.nhlbi.nih. gov/guidelines/hypertension/jcintro.html. EB3
Woods, A. “Improving the Odds Against Hypertension,” Nursing2001 31(8):36-42, August 2001.
Body mechanics SCIENCE
Body mechanics is the term used to describe the efficient, coordinated, and safe use of muscle groups to maintain balance, reduce fatigue, reduce energy requirements, and decrease the risk of injury while moving objects and carrying out activities of daily living. It involves the concepts of center of gravity, line of gravity, and base of support in relation to body alignment and balance.
The center of gravity is a point in the center of the body at navel level that’s the pivot point for forward, back, and lateral balance. The line of gravity is located midline and forms a vertical line from the middle of the forehead to the midpoint between the feet, which form the base of support. When a person moves, the center of gravity moves continuously in the same direction as the body. Balance depends on the interrelationship of the center of gravity, line of gravity, and base of support. During movement, the closer the line of gravity is to the center of the base of support, the more stable the balance. The closer the line of gravity is to the edge of the base of support, the more precarious the balance. If the line of gravity falls outside the base of support, balance is lost.
The broader the base of support and the lower the center of gravity, the greater the stability and balance. Body balance, therefore, can be greatly enhanced by widening the base of support and lowering the center of gravity, bringing it closer to the base of support.
The best practice for body mechanics can be summed up in three principles. First, keep a low center of gravity by flexing the hips and knees instead of bending at the waist. This position distributes weight evenly between the upper and lower body, helps maintain balance, and decreases the load on the back muscles by transferring the weight to the stronger leg muscles. Second, create a wide base of support by spreading the feet apart. This tactic provides lateral stability and lowers the body’s center of gravity. Finally, maintain proper body alignment — spine straight, head in neutral position, and all extremities in functional position — and keep the center of gravity directly over the base of support by moving the feet rather than twisting and bending at the waist.
Many patient care activities require the nurse to push, pull, lift, and carry. Application of proper body mechanics enables her to use the appropriate muscle groups when performing nursing care and can prevent musculoskeletal injury and fatigue and reduce the risk of injuring patients.
Implementation
Follow the directions below to push, pull, stoop, lift, and carry correctly.
Pushing and pulling
Stand close to the object and place one foot slightly ahead of the other, as in a walking position. Tighten the leg muscles and set the pelvis by simultaneously contracting the abdominal and gluteal muscles.
To push, place your hands on the object and flex your elbows. Lean into the object by shifting weight from the back leg to the front leg, and apply smooth, continuous pressure using leg muscles.
To pull, grasp the object and flex your elbows. Lean away from the object by shifting weight from the front leg to the back leg. Pull smoothly, avoiding sudden, jerky movements.
After you’ve started to move the object, keep it in motion; stopping and starting uses more energy.
Stooping
Stand with your feet 10″ to 12″ (25.5 to 30.5 cm) apart and one foot slightly ahead of the other to widen the base of support.
Lower yourself by flexing your knees, and place more weight on the front foot than on the back foot. Keep the upper body straight by not bending at the waist.
To stand up again, straighten the knees and keep the back straight.
Lifting and carrying
Assume the stooping position directly in front of the object to minimize back flexion and avoid spinal rotation when lifting.
Grasp the object, and tighten your abdominal muscles.
Stand up by straightening the knees, using the leg and hip muscles. Always keep your back straight to maintain a fixed center of gravity.
Carry the object close to your body at waist height — near your center of gravity — to avoid straining the back muscles.
Special considerations
Wear shoes with low heels, flexible nonslip soles, and closed backs to promote correct body alignment, facilitate proper body mechanics, and prevent accidents.
When possible, pull rather than push an object because the elbow flexors are stronger than the extensors. Pulling an object allows the use of hip and leg muscles and avoids the use of lower back muscles.
When doing heavy lifting or moving, remember to use assistive or mechanical devices, if available, or obtain assistance from coworkers. Know your limitations and use sound judgment.
Mechanical and other assistive devices have been shown to significantly decrease incidences of low back injury in nursing personnel. EB1 EB2 EB3
Supportive references
Collins, J., and Owen, B. “NIOSH Research Initiatives to Prevent Back Injuries to Nursing Assistants, Aides and Orderlies in Nursing Homes,” American Journal of Industrial Medicine 29(4):421-24, April 1996.EB1
Lee, Y., and Chiou, W. “Ergonomic Analysis of Working Posture in Nursing Personnel: Example of Modified Ovako Working Analysis System Application,” Research in Nursing and Health 18(1):67-75, February 1995.EB2
Owen, B. “Preventing Injuries Using an Ergonomic Approach,” AORN Journal 72(6):1031-36, December 2000.EB2
Owen, B., et al. “What Are We Teaching About Lifting and Transferring Patients?” Research in Nursing and Health 22(1):3-13, February 1999.
Owen, B., and Fragala, G. “Reducing Perceived Physical Stress While Transferring Residents: An Ergonomic Approach,” AAOHN Journal 47(7):316-23, July 1999.
Care of the dying patient
Dying is a profound process affecting everyone involved: the dying person, significant others, friends, and caregivers. Beliefs and past experiences will affect how each person deals with the process of dying and death. To be effective in caring for the dying patient, a nurse needs to be knowledgeable about the dying process and comfortable in addressing death.
As a patient approaches death, he needs intensive physical support, and he and his family require emotional comfort. There are two phases, which occur before the actual time of death: the pre-active phase of dying and the active phase of dying. The pre-active phase may last approximately 2 weeks, while the active phase of dying usually lasts 3 days. Signs and symptoms of the pre-active phase are increased lethargy, withdrawal from social activities, decreased appetite, changes in respiration (periods of apnea) whether awake or asleep, edema in the extremities or the whole body, and an inability to recover from infections or heal from wounds. During this phase, the patient also may report seeing people or loved ones who have already died, and commonly the patient will state that he’s dying. HPA
Signs and symptoms of impending death (the active phase of dying) include reduced respiratory rate and depth, decreased or absent blood pressure, weak or erratic pulse rate, lowered skin temperature, decreased level of consciousness (LOC), diminished sensorium and neuromuscular control, diaphoresis, pallor, cyanosis, and mottling. Emotional support for the dying patient and his family typically means simple reassurance and the nurse’s physical presence to help ease fear and loneliness. More intense emotional support is important at much earlier stages, especially for the patient with a long-term progressive illness, who can work through the stages of dying. (See Five stages of dying, page 34.) HPA
Patients sometimes request withdrawal of treatment of a chronic illness that causes or prolongs suffering. Health care providers should respect a patient’s wishes regarding extraordinary means of life support. The Patient Self-Determination Act of 1991 requires health care agencies serving Medicaid and Medicare patients to provide them with information regarding the various advance directive options, legal documents allowing a patient to decide what medical treatments he’ll receive if he becomes unable to make decisions.
Five stages of dying EB1
Elisabeth Kübler-Ross, author of On Death and Dying, explained that the dying patient progresses through five psychological stages in preparation for death. Further research has shown that not all patients experience these emotional states in the same order or in the same way. However, knowing about the five stages allows you to more accurately assess the emotional needs of the dying patient.
Denial
The patient refuses to accept the diagnosis. He may experience physical symptoms similar to a stress reaction — shock, fainting, pallor, sweating, tachycardia, nausea, or GI disorders. During this stage, be honest with the patient but not blunt or callous. Maintain communication with him, so he can discuss his feelings when he accepts the reality of death. Don’t force the patient to confront this reality.
Anger
When a patient stops denying his impending death, he may show deep resentment toward those who will live on after he dies — you, the facility staff, and his own family. Although you may instinctively draw back from the patient or even resent this behavior, it may help if you understand it as a normal reaction to the loss of control in his life rather than a personal attack. Maintaining a calm manner will help defuse the anger and allow you to help him find different ways to express it.
Bargaining
Although the patient acknowledges his impending death, he attempts to bargain for more time with God or fate for more time. He’ll probably strike this bargain secretly. If he does confide in you, don’t urge him to keep his promises.
Depression
In the depression stage, the patient may first experience regrets about his past and then grieve about his current condition. He may withdraw from his friends, family, physician, and you. He may suffer from anorexia, increased fatigue, or self-neglect. You may find him sitting alone, crying. Accept the patient’s sorrow, and if he talks to you, listen. Provide comfort by touch, as appropriate. Resist the temptation to make optimistic remarks or cheerful small talk.
Acceptance
In acceptance, the last stage, the patient accepts the inevitability and imminence of his death — without emotion. The patient may simply desire the quiet company of a family member or friend. If, for some reason, a family member or friend can’t be present, stay with the patient to satisfy his final need. Remember, however, that many patients die before reaching this stage.
The patient may have signed a living will. This document, legally binding in most states, declares the patient’s desire for a death unimpeded by the artificial support of such equipment as defibrillators, respirators, life-sustaining drugs, or auxiliary hearts. Nurses should know if a living will is legal in their state and their facility’s policy regarding a signed living will. If the patient has signed such a document, the nurse must respect his wishes and communicate the physician’s “no code” order to all staff members. (See Evidence-based protocol: Advance directives.)
An open discussion among the patient, the patient’s family, and the health care provider will contribute to rational understanding of the situation so that the patient can make the best decision. Such discussion should distinguish between the desire to avoid suffering and the feeling and fear many patients have of being a burden.
Evidence-based protocol: Advance directives EB2
Here’s an example of an advance directive protocol.
Assessment criteria
Determine the patient’s age.
Identify the patient’s primary language and any communication barriers.
Assess the patient’s cognitive level and ability to make decisions regarding treatment.
Find out if the patient already has an advance directive.
If yes, make a copy and place in the patient’s chart.
If no, provide patient education about advance directives and then ask the patient if he wishes to complete one. If the patient decides he would like to complete an advance directive, refer him to the appropriate resources. If not, document the results of the advance directive assessment in the health care record.
Description of the practice
If a living will has been signed or a health care proxy has been designated, do the following:
Make sure that the documents can be easily found and accessed in the patient’s chart.
Communicate the document’s existence to the practitioner.
Determine if the designated health care proxy has a copy of the document.
Review and clarify the document with the practitioner, patient, or proxy so that everyone is clear about the patient’s wishes.
If the patient hasn’t signed a living will or if a durable Power of Attorney hasn’t been executed, do the following:
Provide the patient (and, if appropriate, his family or significant others) with information about advance directives (brochures, videos, or other materials).
Ask the patient if he would like to involve family members in discussions about advance directives; be sure to be sensitive to how the patient’s beliefs and values may affect the discussion regarding advance directives.
Be sensitive to the patient’s and his family’s fears about death in discussions about advance directives.
Respect the patient’s right not to complete advance directives.
Reassure the patient that by signing an advance directive doesn’t mean he’ll receive substandard care.
Know the facility’s policy about resolving conflict between the patient and his family and health care providers regarding the patient’s treatment.
Help a patient execute an advance directive, and make suggestions as to whom to give advance directives and where to keep them.
Make copies of the signed advance directive and place one in the patient’s chart and communicate to the staff the patient’s wishes.
Adapted from Weiler, K., and Garand, L. “Advance Directives.” In Titler, M., series ed. Series on Evidence-Based Practice for Older Adults. Iowa City: The University of Iowa College of Nursing Gerontological Nursing Interventions Research Center, Research Dissemination Core, 2001. www.nursing.uiowa.edu/gnirc, with permission of the publisher.
Equipment
Clean bed linens ▪ clean gowns ▪ gloves ▪ water-filled basin ▪ soap ▪ washcloth ▪ towels ▪ lotion ▪ linen-saver pads ▪ petroleum jelly ▪ suction equipment, as necessary ▪ optional: indwelling urinary catheter
Implementation
Assemble equipment at the patient’s bedside, as needed.
Meeting physical needs
Take the patient’s vital signs often, and observe for pallor, diaphoresis, and decreased LOC.
Reposition the patient in bed at least every 2 hours because sensation, reflexes, and mobility diminish first in the legs and gradually in the arms. Make sure the bed sheets cover him loosely to reduce discomfort caused by pressure on arms and legs. EB3
When the patient’s vision and hearing start to fail, turn his head toward the light and speak to him from near the head of the bed. Because hearing may be acute despite loss of consciousness, avoid whispering
or speaking inappropriately about the patient in his presence. EB3
Change the bed linens and the patient’s gown as needed. Provide skin care during gown changes, and adjust the room temperature for patient comfort, as necessary.
Observe for incontinence or anuria, the result of diminished neuromuscular control or decreased renal function. If necessary, obtain an order to catheterize the patient, or place linen-saver pads beneath the patient’s buttocks. Put on gloves and provide perineal care with soap, a washcloth, and towels to prevent irritation.
Suction the patient’s mouth and upper airway to remove secretions. Elevate the head of the bed to decrease respiratory resistance. As the patient’s condition deteriorates, he may breathe mostly through his mouth.
Offer fluids frequently, and lubricate the patient’s lips and mouth with petroleum jelly to counteract dryness.
If the comatose patient’s eyes are open, provide appropriate eye care to prevent corneal ulceration.
Provide mouth care for the comatose patient.
Provide ordered pain medication as needed. Keep in mind that, as circulation diminishes, medications given I.M. will be poorly absorbed. Medications should be given I.V., if possible, for optimum results. EB4
Meeting emotional needs
Fully explain all care and treatments to the patient even if he’s unconscious because he may still be able to hear. Answer questions as candidly as possible, without sounding callous. EB3
Allow the patient and his family to express their feelings, which may range from anger to loneliness. Take time to talk with the patient. Sit near the head of the bed, and avoid looking rushed or unconcerned.
Notify family members, if they’re absent, when the patient wishes to see them. Let the patient and his family discuss death at their own pace.
Offer to contact a member of the clergy or social services department, if appropriate.
If a living will and advance directives have been completed, make sure that the documents can be easily located. Notify all relevant care providers of their existence and review them to be sure you understand the patient’s wishes. EB2
If no living will has been executed, provide the patient and significant others with information regarding end-of-life issues. Remember to be sensitive, yet straightforward, taking into account cultural, ethnic, and religious issues for the patient and his family. Respect the patient’s or his family’s right not to complete advance directives if they choose, and inform them that you won’t abandon them or provide substandard care because of their choice. EB3
Special considerations
If the patient has signed a living will, the physician will write a “no code” order on his progress notes and order sheets. Know your state’s policy regarding living wills. If living wills are legal, transfer the “no code” order to the patient’s chart or Kardex and, at the end of your shift, inform the incoming staff of this order.
If family members remain with the patient, show them the location of bathrooms, lounges, and cafeterias. Explain the patient’s needs, treatments, and care plan to them. If appropriate, offer to teach them specific skills so they can take part in nursing care. Emphasize that their efforts are important and effective. As the patient’s death approaches, give them emotional support.
At an appropriate time, ask the patient’s family if they have considered organ and tissue donation. Check the patient’s records to determine whether he completed an organ donor card. (See Understanding organ and tissue donation.)
Nursing diagnoses
Death anxiety
Expected outcomes
The patient will:
identify the need to be with others and the need to be alone
use available support services as needed
express feelings of peacefulness and comfort.
Documentation
Record changes in the patient’s vital signs, intake and output, and LOC. Note the times of cardiac arrest and the end of respiration, and notify the practitioner when these occur.
Supportive references
Harvey, J. “Debunking Myths about Post-Mortem Care,” Nursing2001 31(7):44-45, July 2001. EB3
Jenkins, C., and Bruera, E. “Assessment and Management of Medically Ill Patients Who Refuse Life-Prolonging Treatment: Two Case Reports and Proposed Guidelines,” Journal of Palliative Care 14(1):18-24, Spring 1998. EB4
Kübler-Ross, E. Questions and Answers on Death and Dying. New York: Simon & Schuster, 1997. EB1
Quill, T., and Byock, I. “Responding to Intractable Terminal Suffering: The Role of Terminal Sedation and Voluntary Refusal of Food and Fluids,” Annals of Internal Medicine 132(5):408-14, March 2000. Published erratum, Annals of Internal Medicine 132(12):1011, June 2000.
University of Iowa Gerontological Nursing Interventions Research Center, 2001. www.nursing.uiowa.edu/gnirc/. EB2
Discharge
Successful discharge planning is a centralized, coordinated, multidisciplinary process that makes sure that a patient has a plan for continuing care after leaving the health care facility. Sometimes referred to as continuity of care, discharge planning seeks to provide services that will enable the patient to become as independent as possible by developing a care plan for ongoing maintenance and improvement of health. (See Reducing readmissions, page 38.)
The American Nurses Association describes discharge planning as “the part of the continuity of care process which is designed to prepare the client for the next phase of care and to assist in making any necessary arrangements for that phase of care, whether it be self-care, care by family members, or care by an organized health care provider.” ANA
The Joint Commission on Accreditation of Healthcare Organizations standards state that discharge planning should be initiated early in the treatment process based on the requirements of the care plan or other written guidelines. Ideally, the admitting nurse who first meets the patient starts the assessment and identifies needs. Staff nurses, social workers, therapists, utilization review, physicians, and others then add to the care plan. The health care facility is responsible for keeping the patient and his family informed of the care process, especially when the facility anticipates some level of care continuing after discharge, while also ensuring compliance with all regulators regarding the patient’s confidentiality. HIPAA JCAHO This discussion should begin as early as possible and should continue throughout the care process, anticipating and including the time of discharge. Criteria for discharge or terminating treatment are stipulated and may vary with the patient’s age, disability, and treatment objectives. Criteria may also vary according to treatment settings, as set forth in the organization’s policies and procedures. The standards also state that the information given to the patient and his family at the time of discharge includes:
conditions that may result in the transfer to another facility or level of care
alternatives to transfer
clinical basis for discharge
anticipated need for continued care after discharge. JCAHO
Reducing readmissions EB1
With shorter hospital stays, patients with chronic illness may be discharged before their exacerbation is resolved. Elderly patients, in particular, are prone to readmissions and poor outcomes after early discharge. Researchers at the University of Pennsylvania in Philadelphia found that a special discharge program and home care plan reduced health care costs and readmissions in vulnerable hospitalized elderly patients.
Advanced practice nurses (APNs) with master’s degrees and experience in gerontology visited patients and caregivers for discharge planning within 48 hours of patient admission and at least every 48 hours throughout the hospital stay. After discharge, APNs visited patients and caregivers within 48 hours and again 7 to 10 days after discharge. They made additional home visits based on patient needs, were available by telephone 7 days a week, and called patients and caregivers each week.
Care provided by the APNs centered on medications, management of symptoms, nutrition, activity, rest, follow-up care, and psychosocial concerns. APNs monitored the patient’s progress and collaborated with the practitioner and other multidisciplinary team members.
At 24 weeks after discharge from the hospital, patients who received comprehensive discharge care by an APN were less likely to be readmitted to the hospital and were hospitalized for fewer days than elderly patients receiving standard discharge planning and intervention.
Reimbursement pressures have resulted in shorter hospital stays for patients. The Omnibus Reconciliation Act of 1986 mandated that all hospitals participating in Medicare have a discharge-planning program. Because of changes with the health care financing system, mainly the prospective payment system (PPS), decreased hospital stays has been the primary goal of many administrators, boards, and medical staff.
When a patient receives Medicare or other insurance payment for hospitalization, the PPS has a set price for each type of discharge diagnosis. Medicare uses diagnosis-related groups (DRGs) to categorize patients into over 400 diagnostic categories, such as fractured hip, heart failure, or urinary tract infection. If the hospitalization costs are less than the prenegotiated rate, the hospital keeps the difference, making a profit. However, if patient care costs more, the hospital loses money on the case because it isn’t allowed to bill the patient for charges not covered by DRGs.
Although discharge from the health care facility is considered routine, effective discharge requires careful planning and ongoing assessment of the patient’s needs during his hospitalization to ensure the best outcome.
Equipment
Wheelchair, unless the patient leaves by ambulance ▪ patient’s chart ▪ patient instruction sheet ▪ discharge summary sheet ▪ prescriptions ▪ plastic bag or patient’s suitcase for personal belongings
Implementation
Confirm the patient’s identity using two patient identifiers according to facility policy. JCAHO
Inform the patient and his family of the time and date of discharge as soon as it’s known. If the patient can’t arrange transportation, notify the social services department. (Always confirm arranged transportation on the day of discharge.) PCP
Make a referral to the discharge planning department, if appropriate, in your facility.
Obtain a written discharge order from the practitioner. If the patient discharges himself against medical advice, obtain the appropriate form. (See Dealing with a discharge against medical advice.)
If the patient requires home medical care, confirm arrangements with the appropriate facility department or community agency.
On the day of discharge, review the patient’s discharge care plan, initiated on admission and modified during his hospitalization, with the patient and his family. List prescribed drugs on the patient instruction sheet along with the dosage, prescribed time schedule, and adverse reactions he should report to the practitioner. Make sure that the drug schedule is consistent with the patient’s lifestyle to prevent improper
administration and to promote patient compliance
Stay updated, free articles. Join our Telegram channel

Full access? Get Clinical Tree


Get Clinical Tree app for offline access
